
Windows 11 brought great new features. However, although Microsoft has made it easier to upgrade to the new operating system, it is essential to do some checks to make sure the clean install goes well.
In this guide, let’s take a look at 9 things you need to do before you upgrade to Windows 11. The goal is to make sure your PC meets Microsoft’s requirements and that you have a full backup in in case everything goes wrong
1. Guaranteed compatibility
Start by checking if your PC can run Windows 11 properly. Microsoft’s new operating system has the following minimum system requirements:
| CPU | 1Ghz or higher on a System on a Chip or compatible 64-bit processor |
| GPU | DirectX 12 compatible with WDDM 2.0 . driver |
| RAM | 4GB or more |
| Memory | 64GB or more |
| Firmware | UEFI, Capable of Secure Boot |
| TPM | Version 1.2 or 2.0 |
| Screen | HD display (720p) larger than 9″, 8 bits per color channel |
| Internet | Stable connection for Windows 11 Home edition |
You can check your system specs from Settings > System > About. However, you should use Microsoft’s new PC Health Check application to see if your PC is compatible. Once installed, click the button Check Now in blue and this will give you a full report:
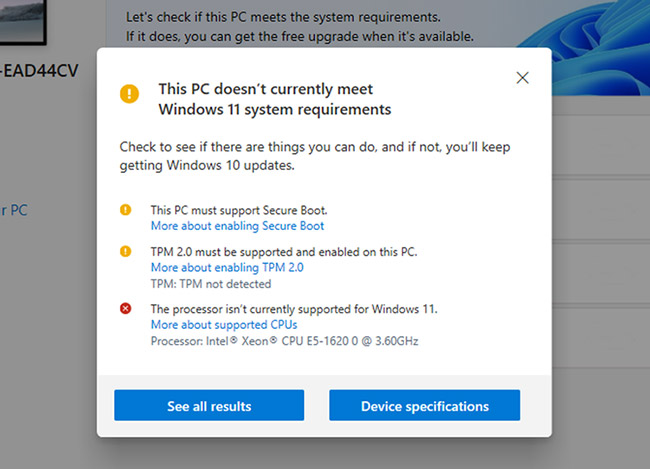
The application will notify that you should not upgrade if TPM 2.0 and UEFI Secure Boot are disabled. So let’s see how you can enable these elements.
2. Enable Trusted Platform Module (TPM)
Trusted Platform Module or TPM is a chip installed on the motherboard to store sensitive security data. To enable the Trusted Platform Module, refer to the article: How to enable TPM 2.0 to fix the “This PC Can’t Run Windows 11” error for more details.
3. Enable Secure Boot
Similar to TPM, Secure Boot is also a security feature. It ensures that the system only boots a trusted operating system. To enable Secure Boot, do the following:
B1: Reboot the system via Settings > Update & Security > Recovery > Advanced Startup.
B2: Go Troubleshoot > Advanced Options > UEFI Firmware Settings > Restart > Boot.
B3: Change status Secure Boot Fort Enabled.
However, your system may not be able to boot after enabling this security feature if you are using a computer with BIOS. To prevent this from happening, convert MBR to GPT and switch BIOS to UEFI.
4. Data backup
The first versions of new software like Windows 11 often have a lot of bugs. These put you at risk of disrupting your workflow and even losing all your data. The best precaution is to back up your data.
You can use quick backup options in the cloud or an external hard drive (SSD or HDD). Remember, backups are essential even if you are installing Windows 11 as a secondary system.
5. Memory Optimization
Another important thing is to make space for the new Windows. Microsoft requires 64GB or more of free space on your system for the new operating system. You can try one of the following to free up space on your drive.
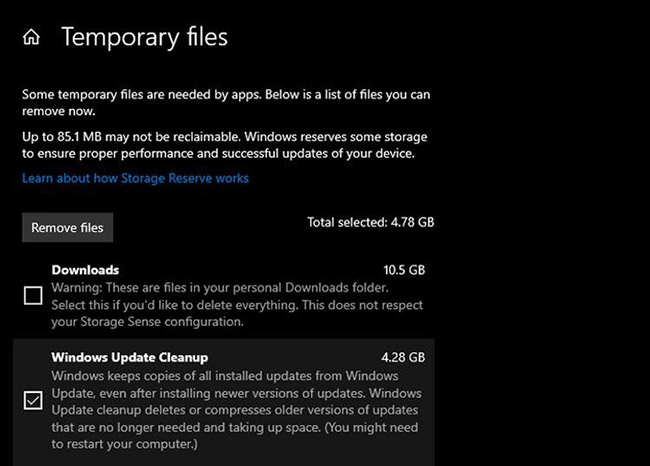
Using Disk Cleanup
Disk Cleanup is a built-in, quick fix solution for cluttered drives. You can use the maintenance utility to delete temporary and unnecessary files on the primary partition that will host the new operating system.
While Disk Cleanup will do most of the work, you can also use a combination of other Windows junk removal methods.
Using external storage
By far the best way to free up space is to move large unnecessary or rarely used files to an external hard drive, such as photo albums or software setups.
6. Remember Microsoft account
Windows 11 update requires you to sign in to your Microsoft account. If you’ve synced your data with the account (for example, Skype and Email accounts), make sure you remember the credentials for the account.
You may lose access to multiple accounts if they are all synced to the main Microsoft account. Recording your login details – or resetting if necessary – will help you keep your contacts and calendar intact, allowing for uninterrupted workflow.
7. Ensure a stable Internet connection
A major reason why many Windows 11 operating system updates fail is because of an unstable Internet connection. Windows 11 is a software update from Microsoft servers. For this reason, you must remain connected to the web throughout the installation.
The use of unstable mobile data hotspots, public WiFi and/or private connections may cause errors. Avoid accessing hotspots and public connections, and make sure your WLAN is at least stable enough to support a half-to-an-hour Windows 11 installation.
8. Make sure the power supply is not interrupted
If you’re using a laptop, make sure it’s plugged in to prevent the battery from running out. Likewise, if you’re updating on a PC, make sure the power isn’t interrupted. An accidental power failure can cause data loss and reset the installation progress.
9. Some other safety measures
The article specifically recommends making sure the workflow is smooth and backing up the system before updating, in case things don’t go smoothly.
Check out the app
A smart move is to confirm that all your professional tools and applications are also available on Windows 11. It is possible that some specific applications that you use regularly are not available for the new operating system yet. by Microsoft.
Create a recovery drive
Creating a system restore point on an external drive means creating a copy of Windows as it is. If something doesn’t work well after an update, a recovery drive will help you restore the system to a point in time before the update.
Source link: 9 things to do before updating to Windows 11
– https://techtipsnreview.com/


