Information about Uniswap V3
Today, Uniswap V3 officially Mainnet, with many new updates such as:
- Centralized liquidity.
- Update to add more fee frameworks for Liquidity Provider.
- New Oracle update.
This is considered a complete upgrade compared to the previous Uniswap V2 update. You can read more Uniswap V2 Operation Model to better understand how Uniswap is working and the improvements in this Uniswap v3.
This article will guide you on how to use the main features of Uniswap V3. Consists of:
- Swap Tutorial in Uniswap v3.
- Instructions to transfer liquidity from Uniswap V2 to V3.
- Instructions for providing liquidity on Uniswap v3.
Let’s start!
Instructions for trading on Uniswap v3
Uniswap does not update its own website for Uniswap V3.
Step 1: To transact on Uniswap V3, you go to Uniswap’s official website as usual: https://app.uniswap.org/
Step 2: Select connect wallet.

In this step, you can choose Wallet Connect, and connect to Techtipsnreview Wallet to experience Techtipsnreview’s non-custodial wallet product.
Read more: Instructions to connect Techtipsnreview Wallet with Uniswap

Step 3: Select desired token and swap. What’s special is Uniswap There exist 2 versions of Uniswap V2 and Uniswap V3 in parallel. When you trade any 1 pair, Uniswap will choose for you a better price in 2 versions.
Please note, the default transaction version you use is Uniswap V3.
Eg,
When I trade ETH/DAI pair. Because the Uniswap V3 version gives a better ratio, you use this new version by default.

However, if I try to trade another less popular pair, like ETH/BNT, the screen will show “Get a better price on V2“.
That means, V2 version offers better rate. Maybe it’s because the liquidity on Uniswap V2 hasn’t been completely transferred yet.
And to transact on Uniswap V2, you just need to click on the button “Get a better price on V2” and trade as usual.

If you want to switch back to Uniswap V3, you continue to click on it, and return to the new version.

Instructions for transferring liquidity from Uniswap V2 to V3
Brothers follow these steps:
Step 1: On the main screen of Uniswap, you select the item Pool choose More Choose Migrate.

Step 2: If you provide liquidity, the screen will show your LP tokens as follows. You continue to choose “Manage“Continue the liquidity transfer process.

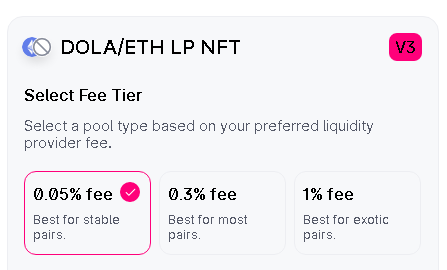
Step 3: In this step, you will set 2 indicators that you want when providing liquidity in Uniswap V3, including: Charges and Price range.
Charges: Uniswap V3 for you to choose 1 of 3 fees. The project has also clearly noted which cost should be selected accordingly.
- 0.05% fee: Fees are usually applied to pairs that require stability such as USDC/DAI, wBTC/sBTC, etc. Low fees will make the prices in these pools less volatile.
- 0.3% fee: Fees are applied in most regular Pools.
- 1% fee: Fees are applied to rare token pairs, with little supply in the market.
Price range: Centralized liquidity is a breakthrough feature of Uniswap V3, you can provide in any amount, thereby optimizing capital.
For example, my LP token DOLA / ETH pair, with the ratio ETH = 3723 DOLA.
Since DOLA is a stablecoin, I will focus liquidity in a range near that price, and I have chosen to offer a range from 3600 DOLA / ETH to 3800 DOLA / 1 ETH. If the ETH price rises or falls outside of that range, I will not be entitled to the fee.
You can also choose the +0.1%, -0.1% buttons to adjust the price accordingly.

Step 4: Approval and Transfer of Liquidity.
After completing the above 3 steps and checking carefully, you select Allow and Migrate, and accept in the non-custodial wallet.

So you have completed the liquidity transfer from Uniswap V2 to Uniswap V3.
Instructions for providing liquidity on Uniswap v3
To provide liquidity in Uniswap V3, follow these steps.
Step 1: At the main screen of Uniswap, you choose Pool choose New Position.

Step 2: Here, you will fill in 4 information to provide liquidity. Consists of:
- Choose a token that provides liquidity.
- Select Fees.
- Select the Range that will provide liquidity.
- Choose the amount that will provide liquidity.
(2.1) Choose a token that provides liquidity. You choose 2 tokens you want to provide liquidity

(2.2) Select Fees. There will also be 3 fees for you to choose from: 0.05%, 0.3%, 1%.

(2.3) Select the price range you want to provide liquidity. You choose the price range where the price will move mostly around that area.
For example in this case, when the ETH price is at 3500 DAI, you can choose to provide liquidity at the price of 1 ETH equal to 3000 DAI – 4000 DAI.

(2.4) Select the amount you want to provide liquidity.

Step 3: After completing the above 4 information, you just need to choose Approve + Add liquidity and confirm in your Non-custodial wallet.

So you have completed providing liquidity on Uniswap V3.
Epilogue
Uniswap V3, an update that brings major changes in the entire DeFi ecosystem.
At first, you may be a bit surprised, especially those involved in providing liquidity. But in the long run, when you get used to it, you will find this update really interesting and beneficial for you.
Above are detailed instructions for using Uniswap V3, if you still have questions when using Uniswap V3, do not hesitate to comment your opinions in the comment section below so that I can answer and supplement.
Wish you successful trading and providing liquidity on Uniswap V3.
Source: Detailed Uniswap V3 User Manual (2022)
– TechtipsnReview