Note: Please read the article carefully before proceeding! If you encounter any errors during use, such as error in download link, slow blog loading, or unable to access a certain page on the blog … please notify me. via Contact page. Thanks!
Before buying a computer, new or used, the first thing you need to do is test the computer, see information about computer configuration Is that the same as the information they announced or not. The more careful you are, the more likely you will be to buy a good computer.
In this article, techtipsnreview will introduce to you a small software that supports extremely accurate computer configuration testing that is CPU-Z.
With software CPU-Z, You can see very detailed information about CPU, Chipset, Mainboard and RAM ...on the computer you are using.
The software will display full information about the manufacturer, chipset series, socket, speed parameters, bus, cache, how many cores … And see if your machine is able to overclock or not .. and very many more features.
Read more:
I. How to use CPU-Z to view the computer configuration
If not you can go to the home page of CPU-Z to download. You can download the Setup to install or use the Portable (.Zip) version without installation, which is very convenient to carry in USB.
Main interface of CPU-Z: very user-friendly and easy to understand.
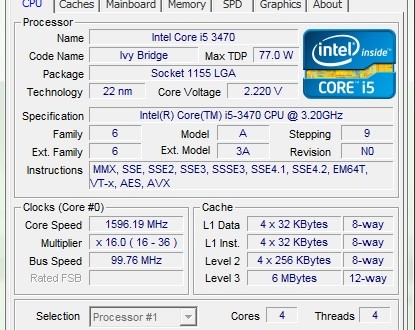
#first. View information about the processor (CPU)
+ Name: Name of processor – (Intel Core i5 3470)
+ Code name: The name of the CPU architecture also known as the generation of the CPU – (Ivy Bridge)
+ Packpage: CPU socket (socket types like 478, 775, 1155 … this parameter is very important when you want to upgrade your CPU. You cannot bring 1 socket 775 CPU chip to another socket (1155, 478 …) and opposite.
+ Core Speed: The clock speed of the CPU chip, also known as the speed of the CPU.
+ Technology: Transistor technology, for example, my example is 22 nm, ie Transistor, each Transistor in your CHIP has a size of 22 nm. You note that the smaller the size of the Transistor, the cooler your CPU runs> is very good for the computer.
+ Core Voltage: That is the voltage for the core of CHIP, the current chips usually adjust the clock speed and voltage consumption to save power.
+ Specification: The full name of the CPU you are using.
+ Stepping: This part is quite important, it tells us what chips are being released to the market.
My example here is 9, the higher the Stepping is, the better and has been fixed with bugs from previous versions. It is similar to patches of other software or Windows.
+ Revision: Is version information, similar to Stepping.
+ Instructions: These are the instructions for the chip to process.
+ Core Speed: CPU clock, which fluctuates frequently to save power.
+ Bus Speed: In CPU Z you can see Bus speed was BLCK (Base Clock)
+ Level 2: Buffer memory parameter, the higher this parameter is, the less CPU will suffer from data congestion when processing.
Here my machine is Core i5 chip so the CPU with Level 3 memory is usually only Level 2 … The bigger the level, the higher the capacity, the faster your CPU will run.
+ Cores and Threads: Number of CPU cores and threads. This number is usually an even number and is often referred to as: 2-core CPU, 4-core CPU, 6-core CPU …
#2. Caches
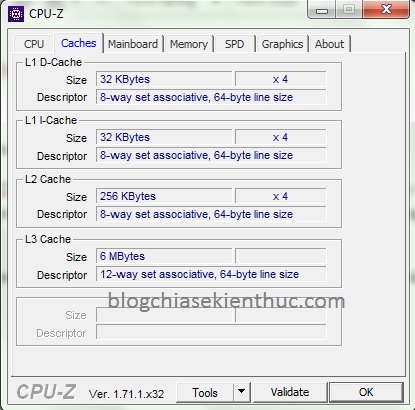
Displays detailed information about caches, in this part nothing is important so you skip to the 3rd tab.
# 3. View information about computer motherboard
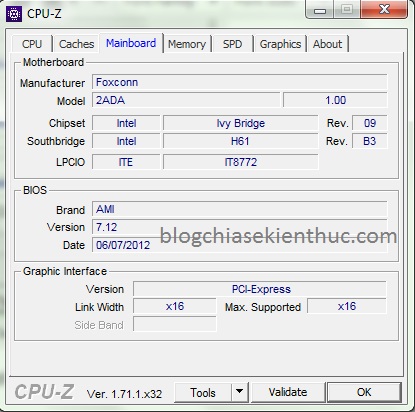
+ Manufacturer: The name of the manufacturer of the motherboard (For example, there are manufacturers such as: Gigabyte, Asus, Foxconn …)
+ Model: is the model of the motherboard. This information is very important during driver search, without having to open the case cover for live view. Next cell 1.0 is the version information, the higher the better.
+ Chipset: Information about main chipset – ex: 945, 965, G31, G41, H61 …
+ BIOS: Displays BIOS manufacturer, manufacturer date and Version information.
+ Graphic Interface: (Graphics Communication) Information about the graphics card slot on the motherboard, the most popular today only 2 standards are AGP and PCI-Express x16.
+ Link Width: Is the width of the bandwidth.
# 4. Check RAM, information about RAM (Memory)
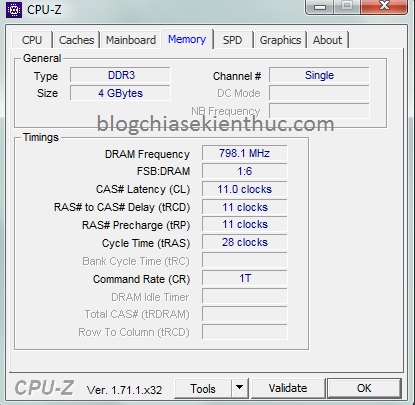
+ Type: Displays the type of RAM (RAM life) being used on the machine (There are RAM types such as DDR, DDR2, DDR3 …)
+ Size: Is the total amount of RAM in use on your device.
+ Channel: If the display is Single, you are mounting 1 RAM stick or the main does not support dual channel running mode, if Dual is currently RAM running in dual channel mode (faster speed) this also means you are mount 2 or more RAM sticks.
+ DRAM Frequency: Is the real speed of RAM, mine is DDRAM (double data rate) => Bus of RAM = DRAM Frequency x 2. This parameter will help us calculate how much RAM Bus is.
+ FSB: DRAM : FSB: DRAM = Base Clock Cpu (blck): Real Bus Ram
FSB = Bus speed x 4
core clock = base clock X Multiplier (Multiplier on the CPU tab)
For older chips with FSB, Bus speed = BLCK = FSB / 4.
For later chips, the chip uses socket 1366, 1156, the default BLCK is 1333 MHz, 1155 onwards, BLCK is 100 MHz.
# 5. SPD: Check how many Ram slots there are
In this section, you will see how many RAM slots and ram is plugged in your computer. And displays detailed information about RAM.
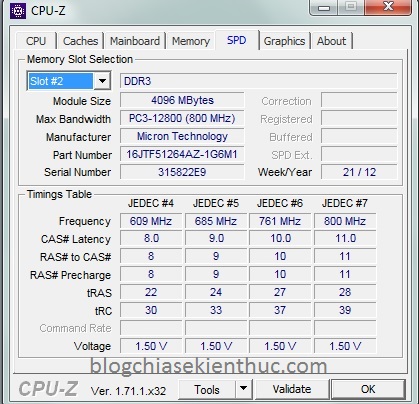
So on my computer, the ram is plugged into slot 2 (Slot # 2).
+ Slot #: Pressing the drop-down arrow will display the number of RAM slots. Usually the computer will have 2 or 4 Ram slots.
DDR3: That means checking Ram, there are types like DDR2, DDR33333 ..
+ Module Size: The amount of RAM in the slot being viewed. The unit is MB (1GB = 1024MB). Like my machine here is using 4GB ram.
+ Max Bandwidth: (Maximum bandwidth speed) This is actually the specification of the RAM bus. You just need to multiply the clock speed in the parentheses by 2, which will output the current RAM bus. Example: 800Mhz x 2 = 1600 >> RAM bus is 1600. Find out more:
* In Single Channel mode: Only 1 BANK will be accessed at the same time and the Data Bus Width will be 64 bits. So => BandWidth = Bus Speed * Bus Width / 8 = Bus Speed * 64/8 = Bus Speed * 8 (The reason for dividing by 8 is because Bus width is calculated in Bit units and BandWidth is calculated in units of MB / s , 1Byte = 8 bits). For example: With a DDR2 800 MHZ bar, BandWidth = 800 * 64/8 = 6400MB / s so they still have the symbol PC6400
* In Dual Channel mode: There will be 2 BANKs in 2 different DIMMs that can be accessed at the same time. At this time, each bank will open a channel on Mem Controller. Each channel has a BandWidth of 64 bits so the total BandWidth of the entire system is 128 Bit => Now BandWidth = Bus Speed * 128/8 = Bus Speed * 16
+ Manufacturer: Name of manufacturer.
+ The other parts are not essential so I will ignore them.
# 6. Graphics – View information about the graphics card with CPU-Z
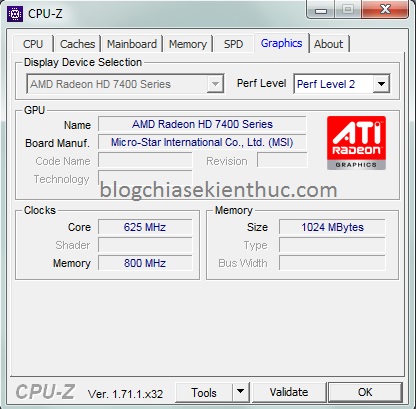
+ Display Device Selection: If there are multiple video cards, this section will light up and select the corresponding card. If there is only 1 card, this part will fade out as shown in the picture.
+ Name: The name of the graphics chip maker, most commonly, is Ati and Geforce.
+ Code name: Name of the graphics chip running on the computer.
+ Size: The capacity of the graphics card.
+ Technology: Just like in the CPU part I said, the smaller the parameter the better.
+ Type: Processing type – for example, 64-bit, 128-bit, 256-bit. The higher this number, the more advanced your card and the better graphics processing it will take.
# 7. About
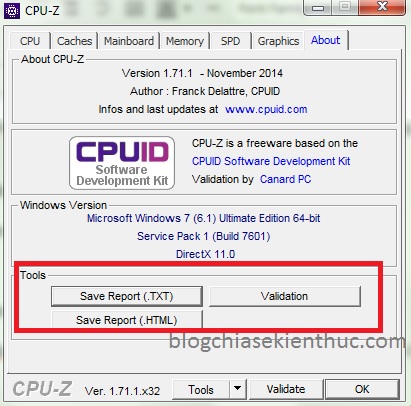
This section will display the software version information CPU-Z that you are using. We encourage you to use the latest version for more accurate checks.
And the most notable item in this section is the “Tools” section. This section will help you to export the file format .TXT or .HTML makes it easier to manage computers in a company.
II. Epilogue
Above is the full CPU-Z usage and how check computer configuration before you decide to buy it.
This software has displayed quite a lot of important parameters, so just using CPU-Z is more than enough. I think so ?
Hope the article will be useful to you. Good luck!
Kien Nguyen – techtipsnreview
See more computer tricks
Note: Was this article helpful to you? Don’t forget to rate, like and share with your friends and relatives!
Source: Download CPU-Z – Guide to check the most detailed computer configuration
– TechtipsnReview


