- Fix iPhone cannot connect to Wifi on iOS 8
- Fix, fix FaceTime error not connecting on iPhone
- How to fix Wifi error on iOS 13
- How to fix Wifi and Bluetooth errors on iOS 15
- Fix weak Wifi connection on Samsung phones
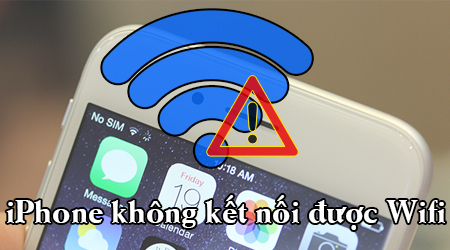
Problems related to wifi have always been one of the annoying problems for users of iOS devices in particular and other devices in general and most recently on the updated iOS 10.2 version, some users reflect that their device cannot connect to the network or frequently disconnects from wifi after successfully upgrading to iOS 10.2 on their iPhone, iPad device. Therefore, in the following article, 9mobi will send you the most detailed ways to fix iPhone not connecting to wifi error.

FIX IPHONE CANNOT CONNECT TO WIFI
Method 1: Restart iPhone
Sometimes simple ways like this are quite useful for many errors that occur on electronic devices and iPhone is no exception. At that time, try turning off and restarting your iPhone to help it rearrange the system because during use there may be some conflicts in the system leading to some features misbehaving.
Method 2: Turn wifi connection on and off again
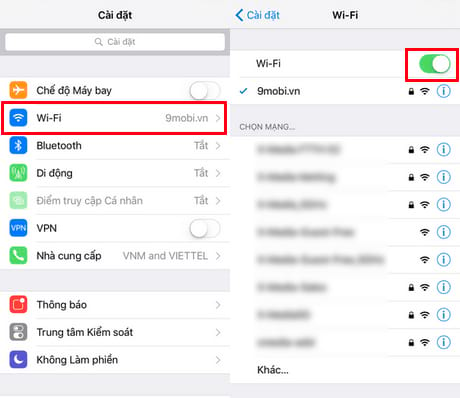
This is the simplest way that everyone can think of if they have an iPhone that cannot access wifi. Then, to do this, you access the application Settings (Settings) > WIFI and toggle the switch next to the Wi-Fi entry to OFF to turn it off. Wait a few seconds and turn the switch ON again to turn it on.
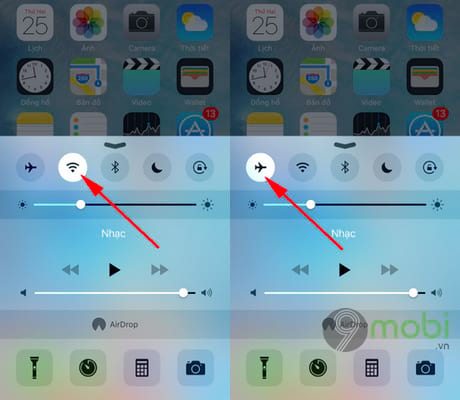
Another way to turn Wifi on and off is that you can swipe up from the bottom edge of the screen to open the Control Center. Tap the wifi icon to turn it off or activate Airplane mode for 10-20 seconds and then turn it off. This will temporarily disconnect the network completely (Wifi, 3G and cellular) and refresh everything.
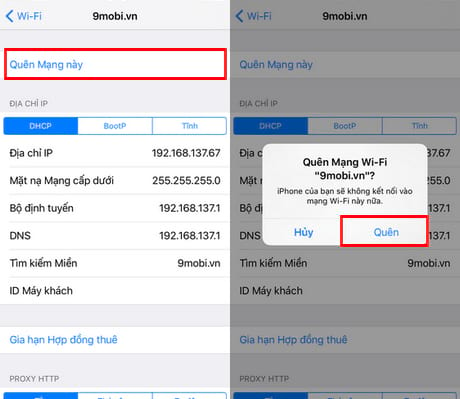
Method 3: Forget the Wifi network
Sometimes iPhone devices cannot connect to wifi due to reasons from the transmitter such as reconfiguring wifi passwords or problems with getting the connection. Now try to forget the current wifi network and reconnect to see the results.
Step 1: Access to the app Settings (Settings) > WIFI > click on wifi name failed to connect on iPhone.

Step 2: Here you click Forget this network (Forget This Network) and continue to choose Forget (Forgot) to confirm.
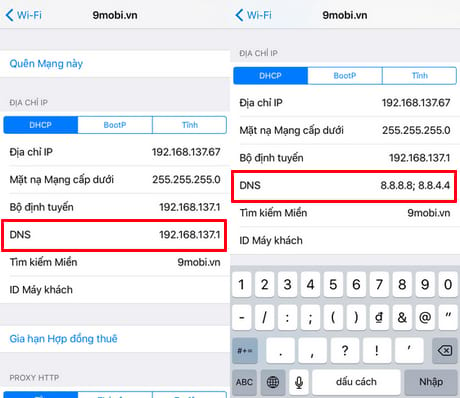
Method 4: Change DNS address
You can fix the iPhone not receiving Wifi error as well as the iPhone not accessing the internet by changing the DNS address. You can use either Google DNS’s address range (8.8.8.8 or 8.8.4.4, or both, but make sure they’re separated by semicolons), or Open DNS (208.67.220.123 or 208.67.222.123).
Step 1: Access to the app Settings (Settings) > WIFI > click on wifi name failed to connect on iPhone.

Step 2: Click on the DNS line and delete all the information there, and enter the new DNS address that 9mobi provided above.
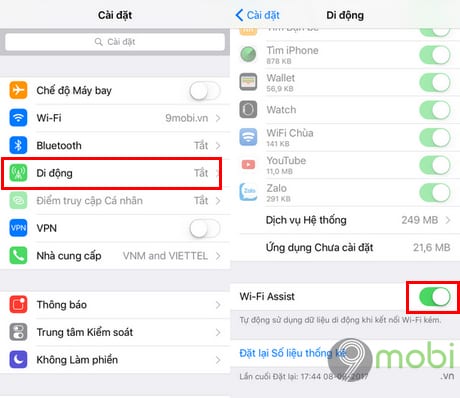
Method 5: Turn on and off the Wi-Fi Assist feature (Wifi Assistant)
Wi-Fi Assist (Wifi Assistant) is a quite useful feature to support users with stable internet connection such as when the wifi connection is weak and slow, the Wi-Fi Assist feature will automatically activate and switch to use 3G network. /4G. However, it is also because of this feature that sometimes it is the cause of hindering the error that iPhone does not recognize Wifi occurring. Therefore, you need to turn on and off the Wi-Fi Assist feature by accessing the application Settings (Settings) >Cellular (Mobile) and scroll down and turn the Wi-Fi Assist switch to OFF mode and switch to ON mode then a few seconds if you still want to use this feature.
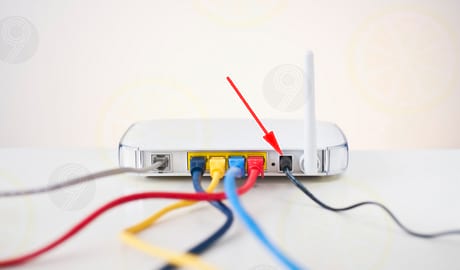
Method 6: Restart Modem and Router
If your iPhone does not accept Wifi and cannot access your home’s wifi, but it successfully connects to external Wi-Fi networks, you should restart your home’s modem and router. Then you just need to unplug these devices, wait about 10-30 seconds and then plug it back in. Wait 1-2 minutes for the device to boot up and you can connect to wifi normally.
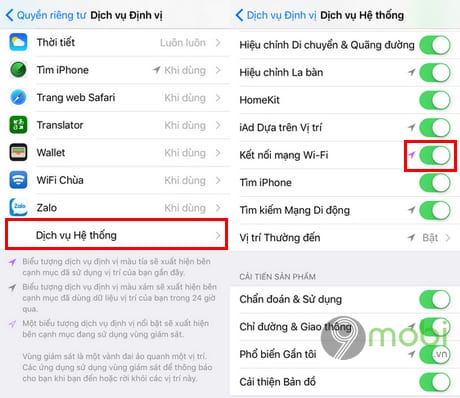
Method 7: Turn off the network location service
Step 1: From the device’s user interface, you access the application Settings (Settings) > Privacy (Privacy) > Location Services (Location service)

Step 2: Next, you slide down, click on System Services and toggle the item switch Wi-Fi Networking (Wi-Fi network connection) to OFF mode.
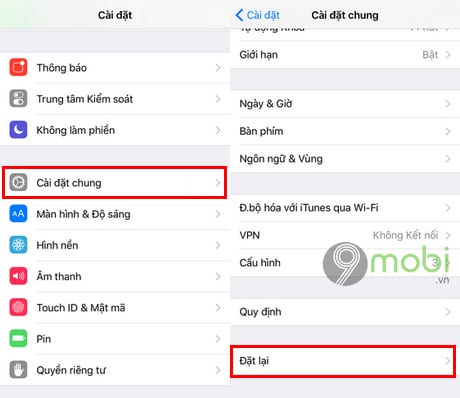
Method 8: Restore network settings
Restore network settings will help you to restore all network settings that you have previously set to default.
Step 1: Access to the app Settings (Settings) > General (General Settings) > Reset (Reset)
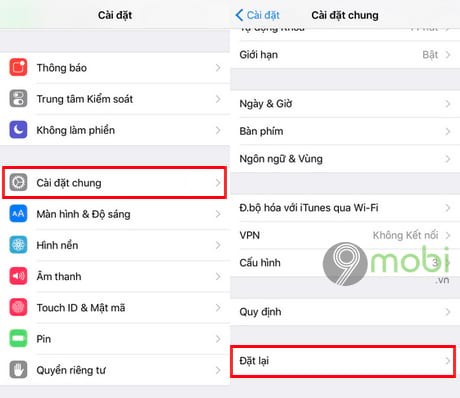
Step 2: Select option Reset Network Settings (Reset Network Settings) > Enter passcode if asked and select Reset network settings (Reset Network Settings) to confirm.

Method 9: Restore factory settings
If the above methods do not solve the problem, then it’s time for readers to factory reset iPhone. Maybe because some of the apps you just installed conflicted, leading to the iPhone not being able to connect to the network, so to proceed with a factory reset you do the following.
Step 1: Access to the app Settings (Settings) > General (General Settings) > Reset (Reset)
Step 2: Select option Erase All Content and Settings (Erase All Content and Settings) > Enter passcode if asked and press Erase iPhone (Erase iPhone) to confirm
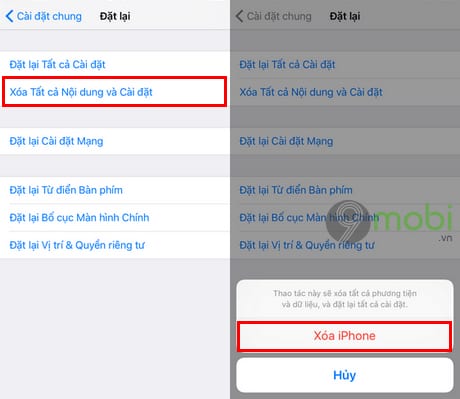
Note: This will erase all data you have saved on your device including apps, files, and settings you have customized to your needs. So, before doing this, don’t forget to back up your data.
So, with the simple ways that 9mobi introduced above, hopefully you have been able to fix the iPhone error that cannot connect to Wifi on iOS 10.2 or other iOS versions already. In addition, in case your device does not recognize Wifi by itself, you can refer to the article on how to fix iPhone that does not recognize Wifi by itself to fix this for your device. Good luck.
https://9mobi.vn/sua-loi-iphone-khong-ket-noi-duoc-wifi-tren-ios-102-9085n.aspx
Source: Fix iPhone cannot connect to Wifi on iOS 10.2
– TechtipsnReview