
Link State Power Management is part of the PCI Express Power Management Settings in Power Options, allowing users to specify an Active State Power Management (ASPM) policy to use for capable links when the link is down.
The link state of a PCIe device is switched from L0 (on) to L1 (off) when the link is not transmitting data. Hardware is automatically converted back to L0 when data is available for transmission over the link.
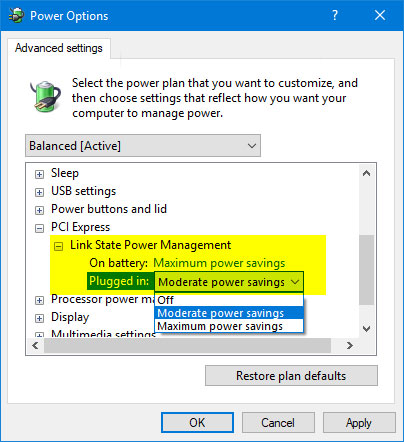
There are basically 2 levels of power management in the PCI Express options. The difference between these 2 options is the ability to save power compared to latency (time to recover from Sleep state).
Users can specify the following ASPM policies:
- Off = Disable ASPM for all links.
- Moderate power savings = The system tries to use the L0 state when the link is down.
- Maximum power savings = The system tries to use the L1 state when the link is down.
This guide will show you how to add or remove Link State Power Management settings in PCI Express under Power Options for all users in Windows 7, Windows 8 and Windows 10.
Note: You must be logged in with admin rights to add or remove this setting in Power Options.
Add/remove “Link State Power Management” in Power Options using Command Prompt
1. Open Command Prompt with admin rights.
2. Enter the command below that you want to use in Command Prompt and press Enter.
(Add – default):
powercfg -attributes SUB_PCIEXPRESS ee12f906-d277-404b-b6da-e5fa1a576df5 -ATTRIB_HIDE(Erase):
powercfg -attributes SUB_PCIEXPRESS ee12f906-d277-404b-b6da-e5fa1a576df5 +ATTRIB_HIDE3. Now you can close Command Prompt if you want.
Add/remove “Link State Power Management” in Power Options with REG . file
The .reg files downloaded below will modify the DWORD value in the registry key below.
HKEY_LOCAL_MACHINESYSTEMCurrentControlSetControlPowerPowerSettings501a4d13-42af-4429-9fd1-a8218c268e20ee12f906-d277-404b-b6da-e5fa1a576df5Attribute DWORD tính
1. Do step 2 (add) or step 3 (delete) below, depending on what you want to do.
2. To add “Link State Power Management” to enter Power Options (this is the default setting), download the Add_Link_State_Power_Management_to_Power_Options.reg file and go to step 4 below.
3. To delete “Link State Power Management” from Power Options, download the file Remove_Link_State_Power_Management_from_Power_Options.reg and go to step 4 below.
4. Save the .reg file to the desktop.
5. Double-click the downloaded .reg file to merge.
6. When prompted, click Run > Yes (UAC) > Yes > OK to approve the merger.
7. Now you can delete the downloaded .reg file if you want.
Hope you are succesful.
Source link: How to add/remove “Link State Power Management” from Power Options in Windows 10
– https://techtipsnreview.com/


