
As you all know, on June 28, 2021, Microsoft officially introduced Windows 11 version to a large number of users.
And one of the issues that users (technology lovers) are talking about the most is the compatibility of computers with Windows 11.
In fact, Windows 11 requires not too high hardware to be able to run, it is probably only on par with Windows 10. However, it is worth mentioning that in this version of Windows 11, Microsoft has paid much more attention to its security capabilities.
The proof is that Microsoft requires computers with integrated TPM 2.0 security chip to be able to install it. This is also the reason that many machines have terrible configuration, but without TPM chip, it is still not possible to install Windows 11.
You can read some of the following articles to better understand what I’m talking about:
So a question is how to bypass TPM 2.0 to be able to install Windows 11? Is there any way to get around it?
Yes, of course there is, walking around, I see there are many ways, so in this article I will summarize it into a complete article for you to follow more easily!
I. How to bypass TPM 2.0 requirement to install Windows 11?
I will constantly update new methods that I know here, so if you are interested in this issue, don’t forget to bookmark the article for easy tracking:
#first. Edit Regedit again during Windows 11 installation cài
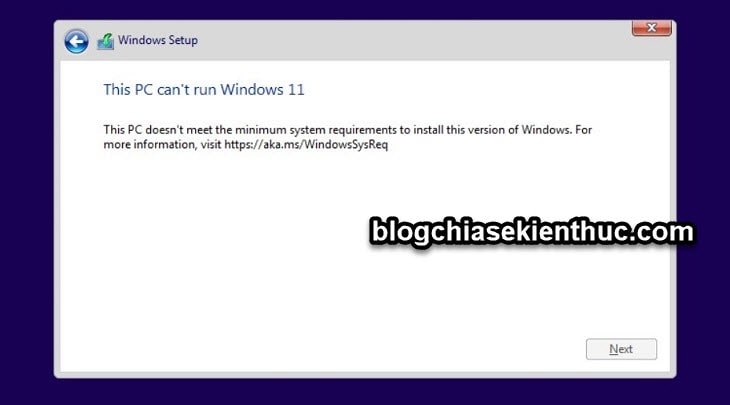
During the installation process, if you see an error message as shown below, something like this:
This PC can’t run Windows 11
This PC doesn’t meet the minimum system requirememts to install this verion of Windows. For more information, visit https://aka.ms/WindowsSysReq
Translated means:
This PC cannot run Windows 11
This PC does not meet the minimum system requirements to install Windows 11 verification. For more information, visit https://aka.ms/WindowsSysReq (Windows 11 minimum configuration requirements page). ).
+ Step 2: At this screen, press the key combination SHIFT + F10 on the keyboard to open a command line window (CMD), we will proceed to edit Regedit a bit.
+ Step 3: CMD window appears => please enter the command regedit.exe => and press Enter.
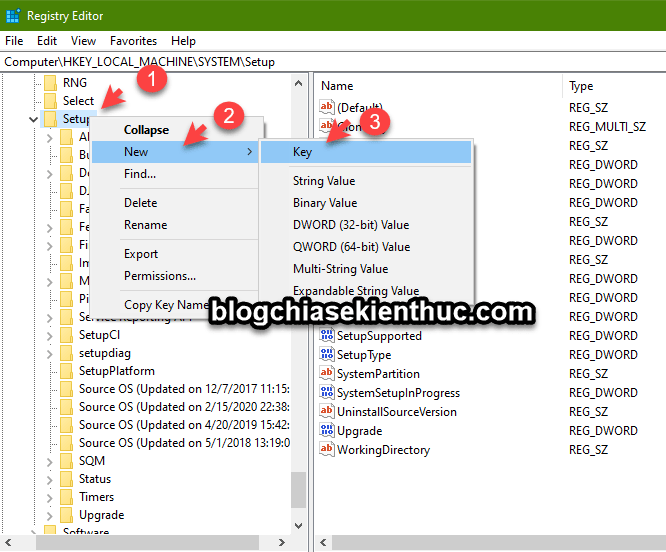
Now the Registry Editor window will appear, continue to access the path below:
HKEY_LOCAL_MACHINESYSTEMSetup
=> Then you create a new key named LabConfig by: Right-click the key Setup => then select New => choose Key => and name it LabConfig
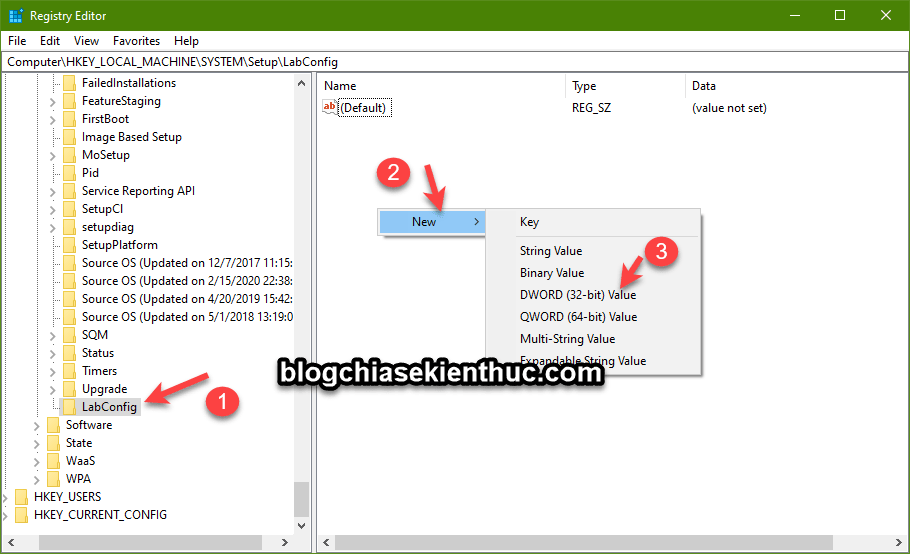
+ Step 4: Next, create 2 new DWORDs in the key LabConfig respectively with the name:
- BypassTPMCheck
- BypassSecureBootCheck
Do the following:
Right-click any empty area in the key LabConfig => then select New => and select DWORD (32-bit) Value
Then set this value as BypassTPMCheck => then double click on this value => and enter 1 in the box Value data.
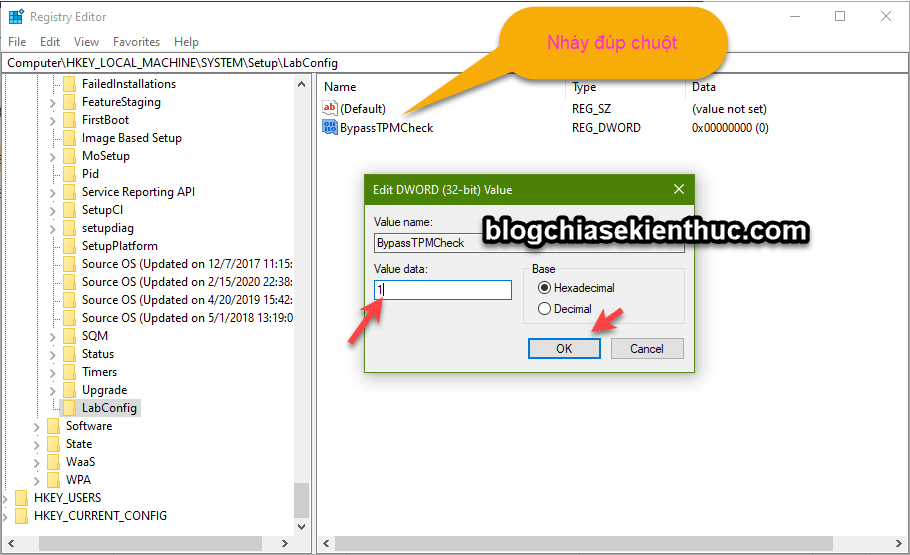
Exactly the same way, you continue to create a 2nd value called BypassSecureBootCheck => then also set the value to 1 in the cell Value data Please.

Yes, after saving and exiting, the error message above disappeared, and now you can install Windows 11 normally 🙂
#2. Use the built-in *.reg file to bypass TPM 2.0 requirements when installing Windows 11
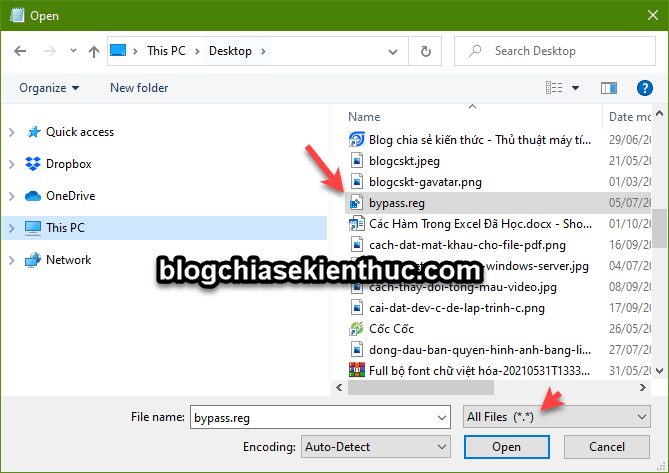
+ Step 1: For those of you who are lazy, you can download the file *.reg below about => then copy it to a USB containing the Windows 11 installer for us to use when needed.
+ Step 2: During the installation process, when an error like this appears, you also press the key combination SHIFT + F10 to open a CMD . command line window
+ Step 3: CMD window appears => you enter the command notepad => and press Enter to open the Notepad tool available on Windows 11.
+ Step 4: Notepad window appears => you enter File => choose Open.. or you can use the . key CTRL + O fast as well.
=> Then select the file *.reg that you have prepared is done.
#3. Edit the Windows 11 installation file to bypass TPM and Secure Boot (basic)
Of course, in this article I will not provide a download link for Windows 11, you can wait until the official version is available, or if you are eager to experience it right away, search on Google for the download link.
+ Step 1: Please create a USB to install Windows 10 as usual!
+ Step 2: Download the Windows 11 installer to your computer => then Mount the Windows 11 ISO file to the virtual drive (right-click the ISO file => and select Open With => choose Windows Explorer). You can see more detailed article here!
+ Step 3: Copy files install.wim of the Windows 11 installer (located in the sources)
+ Step 4: Then Paste it into the folder sources of the USB, choose to overwrite (Replace the file in the destination) if asked. Simply put, replace file install.wim of the Windows 11 installer into the Windows 10 installer :))
NOTE: If in directory sources of the USB (ie the Windows 10 installer) is the file
install.esdthen please delete it.
So it’s done
#4. Edit the Windows 11 installation file to bypass TPM and Secure Boot (advanced)
Our plan would be: Replace file evaliserres.dll in the Windows 11 installation ISO file with the evaliserres.dll file of the Windows 10 installation ISO file. This file is located in the folder source of your installer!
=> Finally, we will repack the Windows 11 installer to install it as usual 🙂
The detailed steps are as follows:
+ Step 1: Mount the Windows 11 ISO file to the virtual drive (right-click the ISO file => and select Open With => choose Windows Explorer).
+ Step 2: You find the folder source => and find the file install.wim
+ Step 3: Copy files install.wim to any partition, you should immediately copy it to the Desktop for easy manipulation in the following steps.
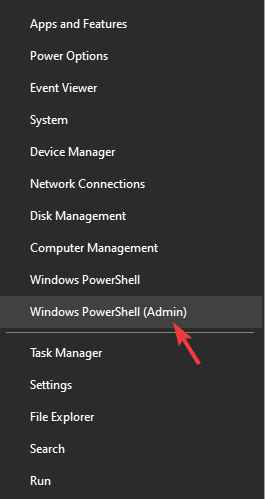
+ Step 4: You open Windows PowerShell with Admin rights by pressing the key combination Windows + X => then select Windows PowerShell (Admin)
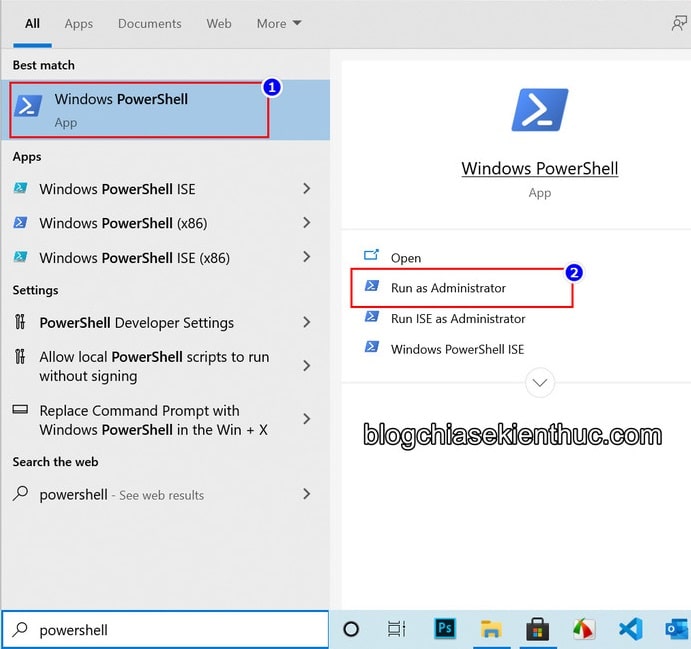
Or Another way to open is to open Windows Search (Windows + S) out => then search with keyword powershell => and select as shown below:
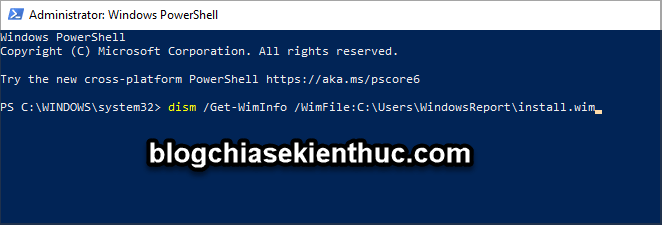
+ Step 5: Now we will create the standard command with the following structure:
dism /Get-WimInfo /WimFile:C:UsersWindowsReportinstall.wim
Inside, The red part is the path to the install.wim file that you have stored. Please customize it to suit your case.
=> Then right-click on the Windows PowerShell window to execute the paste command into the program => then press OK to execute the command. The main purpose of this command is to get information in the install.wim file.
//*read more*//
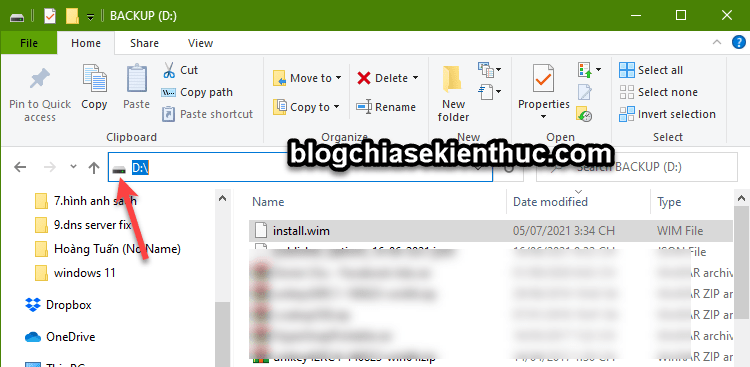
I will explain more about how to get the standard path to the file install.wim. For example, I put the install.wim file in the drive folder D then how to get it as follows:
You open the drive D out => then click on the hard drive icon on the bar Address => now will appear the path, you just need to add install.wim in the back is done. The complete link in this example would be D:install.wim
//*end of further reading*//
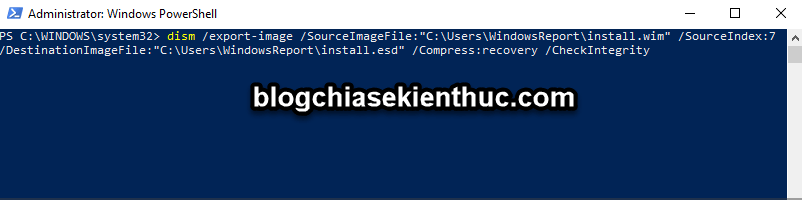
+ Step 6: Next, use the following command:
dism /export-image /SourceImageFile:”C:UsersWindowsReportinstall.wim“/SourceIndex:7 /DestinationImageFile:”C:UsersWindowsReportinstall.esd” /Compress:recovery /CheckIntegrity
Inside:
SourceIndex:7 – Remember its Index number guys, in this example it is 7 guys, you need to use the Index number of the version you want to install.
+ Step 7: Now you just sit and wait, wait for the conversion process to finish.
Actually, the steps I just instructed above are quite similar to this article (you can refer to it): Why does the Win 10 installer not have an install.wim file, but an install.esd file?
+ Step 8: The next step we will proceed to edit the ISO file of Windows 10, you did not hear wrong, download the Windows 10 installer if you do not have it.
=> Then you create a folder named Windows 11 ISO => then you mount the Windows 10 ISO file to the virtual drive => and copy all the files in that virtual drive to the folder Windows 11 ISO
+ Step 9: Next, copy the install.wim file that you created in the previous step into the sources folder in the folder Windows 11 ISO
Note: If you are asked to override it, you can override it naturally, our purpose is to replace it
Step 10: Now will be the step to repack the ISO file, repack the Windows 11 installer in the folder Windows 11 ISO there you guys
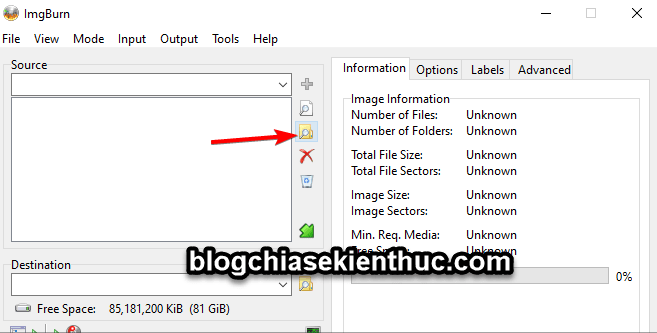
Perform: Please download the ImgBurn software here (installation version) or here (the version does not need to be installed) => then you choose the feature Create image from file.

Next, you click on the icon Browse.. (Browse folder) => select to folder Windows 11 ISO
Continue clicking the icon Browse..
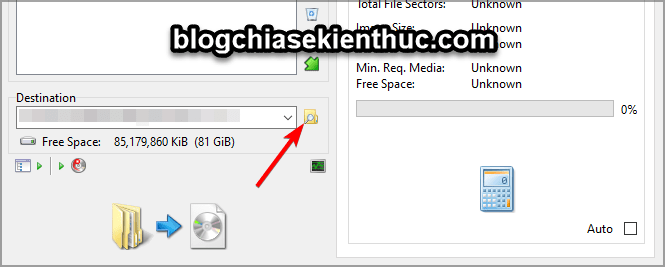
And choose the location to save the file when finished exporting.

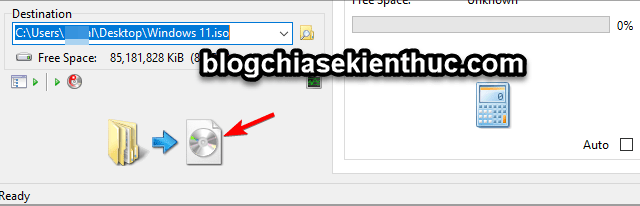
Then click on the icon as shown below.
Finally choose Yes if asked as shown below. that you wait until the program finishes running, then you have a delicious Windows 11 ISO file 🙂

In addition to how to use ImgBurn software to repack the Windows 11 ISO file, you can see more manual methods in this tutorial (I guarantee you will like):
How to create UEFI – LEGACY standard boot for Windows installer (*.iso)
+ Step 11: After you have a complete Windows 11 installer, you can see how to create a Windows installation USB according to both standards here: Instructions to create a USB INSTALL WIN on both UEFI and LEGACY standards
II. Epilogue
Well, here are ways to help you install Windows 11 without worrying about TPM 2.0 and Secure Boot. With the successful way, you will successfully fix the This PC can’t run Windows 11 error
I will continue to update other good and effective ways here, so please keep an eye on it 🙂
Kien Nguyen – techtipsnreview
Note: Was this article helpful to you? Don’t forget to rate the article, like and share it with your friends and family!
Source: How to bypass TPM 2.0 requirement when installing Windows 11?
– TechtipsnReview


