WordPress features Custom Field makes it easy for users to add extra data to a certain post type. But when using Custom Field, we can almost only do it by selecting the key name and then entering the value, which is very inconvenient.
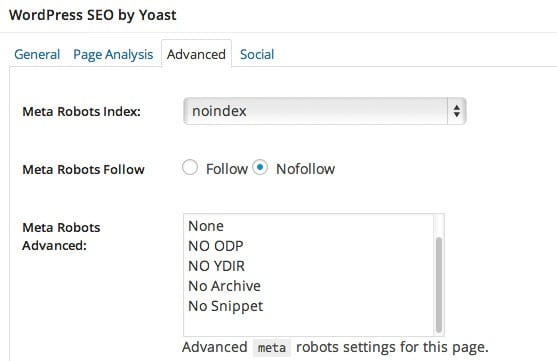
Everyone here probably knows through the SEO by Yoast plugin, right? The data related to SEO of this plugin is declared by the user through the frame as below.

Such data is also a custom field in WordPress, but it will make it easier for users to declare information more conveniently. And these frames are called Meta Box.

If you don’t like coding, the Advanced Custom Fields plugin will help you create meta boxes easily.
What is MetaBox?
Meta Box means an input box is integrated in the content editor area, and the data will be sent into the database of the website. But nowadays, Meta Box is mostly used to work with Meta Data (including wp_usermeta, wp_commentmeta and wp_postmeta).
In this article, I will show you how to create your own meta box to handle post meta data (custom field data). Something like adding or editing a value in a custom field.
Should see first:
Steps to create a meta box
Preparation – Create a new plugin
To practice in this lesson, you’d better create a new plugin yourself by creating a file demo-metabox.php in folder /wp-content/plugins/then declare plugin information.
<?php
/*
Plugin Name: Ví dụ Meta Box
Author: Thạch Phạm
Description: Hướng dẫn tạo meta box
Author URI: https://TechtipsNReview.com
*/
And remember to activate this plugin.
Step 1. Declare the meta box
In this step we will create a meta box in the pre-edit area. To create a meta box, we will use the function add_meta_box() in WordPress with the following structure:
add_meta_box( $id, $title, $callback, $screen, $context, $priority, $callback_args );
In there:
$id: The ID name of the frame.$title: Display title of the meta box frame.$callback: The function renders forms in HTML so that it works with data.$screen: The name of the post type that this meta box will be displayed, it has the values of post, page, dashboard, link, attachment or custom post type name (note that the name is written as a slug).$context: Display type meta box, including normal, advanced or side.$priority: Display priority order, including high, core, default or low.$callback_args: The parameters that you want to return to the callback function.
However, when working, we may not need to use all the parameters in this function, but only use the important parameters (first 5 parameters or less).
You must note that the function add_meta_box() cannot be called individually, you need to put it in some function of your own, then hook into the action hook is add_meta_boxes to execute.
For example, in this article, I will create a meta box with the name Contact as follows:
/**
Khai báo meta box
**/
function thachpham_meta_box()
{
add_meta_box( ‘thong-tin’, ‘Thông tin ứng dụng’, ‘thachpham_thongtin_output’, ‘post’ );
}
add_action( ‘add_meta_boxes’, ‘thachpham_meta_box’ );
In there,
- information: is $id.
- App info: is $title.
- thachpham_thongtin_output: is $callback.
- post: is $screen.
Now go to the Post area and add/edit a post to see your meta box.

Show meta box with add_meta_box . function
If you see the error call_user_func() it means we haven’t written the callback function yet, so it’s missing, we’ll do it right here.
Step 2. Set up callback
Callback means a function that will print out the content inside that box, let’s take a simple example like this to display a piece of text.
function thachpham_thongtin_output()
{
echo ‘Đây là thông tin trong meta box’;
}
Of course the result will now be like this.

But for the example in this post, I will create two cards <input> inside that for people to input, for example, if I want to create an input field to enter Link Download (using a custom field), I will rewrite it as follows:
/**
Khai báo callback
@param $post là đối tượng WP_Post để nhận thông tin của post
**/
function thachpham_thongtin_output( $post )
{
// Tạo trường Link Download
echo ( ‘<label for="link_download">Link Download: </label>’ );
echo (‘<input type="text" id="link_download" name="link_download" value="’.esc_attr( $link_download ).’" />’);
}
As a result we have:

In the above paragraph is the HTML content to create a form only, but please note that it is in the variable $link_download Above it is the variable that we will display the content that the user has entered so it will display if it has been declared.
But the problem is that if you try to enter the value now and update the post again it won’t be saved, we simply haven’t set it to save the input.
But before saving the data, we add this to the function thachpham_thongtin_output to declare to the system to understand $link_download is a variable because we have not created it.
/**
Khai báo callback
@param $post là đối tượng WP_Post để nhận thông tin của post
**/
function thachpham_thongtin_output( $post )
{
$link_download = get_post_meta( $post->ID, ‘_link_download’, true );
// Tạo trường Link Download
echo ( ‘<label for="link_download">Link Download: </label>’ );
echo (‘<input type="text" id="link_download" name="link_download" value="’.esc_attr( $link_download ).’" />’);
}
In which, the function get_post_meta I already explained it in the custom field tutorial.
Step 3. Set save input data in meta box
We’ve got the meta box, there’s already an input field, and that field will print the data out on the input box if it has a value. But the problem is that now it is not saved to the database when imported so we have to create a separate function to handle this, and this function we will hook into the action hook. save_post to execute when saving post type data.
/**
Lưu dữ liệu meta box khi nhập vào
@param post_id là ID của post hiện tại
**/
function thachpham_thongtin_save( $post_id )
{
$link_download = sanitize_text_field( $_POST[‘link_download’] );
update_post_meta( $post_id, ‘_link_download’, $link_download );
}
add_action( ‘save_post’, ‘thachpham_thongtin_save’ );
This function is very simple, it will first clean the data entered in the link_download ($_POST['link_download'] is that it retrieves data sent from the field based on the attributename in the card <input> its). Clean here means it will remove special characters like <, ; to avoid causing errors and also limit SQL Injection & XSS.
Then the function update_post_meta will proceed to save the data in the variable $link_download above into the custom field named _link_download. If not, it will create a new one.
Now try to enter the content and enter the data and save it, you will see it has been saved.

The entire code for this part
<?php
/*
Plugin Name: Ví dụ Meta Box
Author: Thạch Phạm
Description: Hướng dẫn tạo meta box
Author URI: https://TechtipsNReview.com
*//**
Khai báo meta box
**/
function thachpham_meta_box()
{
add_meta_box( ‘thong-tin’, ‘Thông tin ứng dụng’, ‘thachpham_thongtin_output’, ‘post’ );
}
add_action( ‘add_meta_boxes’, ‘thachpham_meta_box’ );/**
Khai báo callback
@param $post là đối tượng WP_Post để nhận thông tin của post
**/
function thachpham_thongtin_output( $post )
{
$link_download = get_post_meta( $post->ID, ‘_link_download’, true );
// Tạo trường Link Download
echo ( ‘<label for="link_download">Link Download: </label>’ );
echo (‘<input type="text" id="link_download" name="link_download" value="’.esc_attr( $link_download ).’" />’);
}/**
Lưu dữ liệu meta box khi nhập vào
@param post_id là ID của post hiện tại
**/
function thachpham_thongtin_save( $post_id )
{
$link_download = sanitize_text_field( $_POST[‘link_download’] );
update_post_meta( $post_id, ‘_link_download’, $link_download );
}
add_action( ‘save_post’, ‘thachpham_thongtin_save’ );
Step 4. Get the data out of the template
Of course, you already have the value in the custom field, then it’s only a small thing to display it outside the theme’s template, you just make it display with the get_post_meta function as below to get the value of the _link_download field.
get_post_meta( $post->ID, ‘_link_download’, true );
Security issue
When we work with submitting and saving data from the form, the security issue is extremely important and worth paying attention to, because when saving the data it will be saved to the database, so we must be sure that the The saved data is safe and reliable.
In addition to escaping special characters with the . function esc_attr and sanitize_text_field that I used in the article, another thing you should use when working with meta boxes is to use Nonce (Number used once).
Nonce Here you understand it will generate a validation code string (with numeric form) every time we submit data to the form. We can then validate this Nonce to see if it’s valid, if so, we’ll let it handle saving data, and if it’s not, we should let it out. This will protect you against some common attacks like XSS or CSRF.
Step 1. Create Nonce
Now let’s go back to the callback function thachpham_thongtin_output ours, here we will create a nonce with the function wp_nonce_field and give it a name and an action.
function thachpham_thongtin_output( $post )
{
$link_download = get_post_meta( $post->ID, ‘_link_download’, true );
wp_nonce_field( ‘save_thongtin’, ‘thongtin_nonce’ );
// Tạo trường Link Download
echo ( ‘<label for="link_download">Link Download: </label>’ );
echo (‘<input type="text" id="link_download" name="link_download" value="’.esc_attr( $link_download ).’" />’);
}
In there,save_thongtin is the action name we will use to test later,thongtin_nonce is the name of the nonce to get the nonce value.
Immediately after adding that paragraph, you look at the HTML source code of the content editor page and you will see that it creates a hidden field with the name info_nonce and has a value of a number, we will use that value to check. check when saving data.

Now, at the functionthachpham_thongtin_savewe just need to add two branch conditions that won’t save the data if the nonce is null and the nonce value is invalid as shown below.
function thachpham_thongtin_save( $post_id )
{$thongtin_nonce = $_POST[‘thongtin_nonce’];
// Kiểm tra nếu nonce chưa được gán giá trị
if( !isset( $thongtin_nonce ) ) {
return;
}
// Kiểm tra nếu giá trị nonce không trùng khớp
if( !wp_verify_nonce( $thongtin_nonce, ‘save_thongtin’ ) ) {
return;
}// Lưu dữ liệu nếu thoả điều kiện
$link_download = sanitize_text_field( $_POST[‘link_download’] );
update_post_meta( $post_id, ‘_link_download’, $link_download );
}
add_action( ‘save_post’, ‘thachpham_thongtin_save’ );
So that’s it then. 😀
Epilogue
In this article, I will temporarily stop creating a simple input field. And when I have more time, I will show you how to create other types of fields such as radio buttons, dropdown lists, etc. because it is quite verbose.
Source: How to create a simple Meta Box by yourself
– TechtipsnReview
![[Premium] 14 best plugins to create unique menus](https://techtipsnreview.com/wp-content/uploads/2022/09/Premium-14-best-plugins-to-create-unique-menus-400x245.jpg)