
Adobe Illustrator is commonly used for vector design. Designing vector infographics gives you an edge as they can be resized infinitely without loss of quality. This makes Illustrator a popular design choice when creating infographics, and tables are an essential element of infographics.
There are no dedicated tools in Illustrator to create tables, but that doesn’t mean you have to draw each cell by hand. If you need to incorporate a table into your design, there’s a handy shortcut that makes creating a table in Illustrator pretty simple.
How to Create Tables in Adobe Illustrator
You can use the Rectangle tool along with the table trick in Illustrator. Open or create a document and follow the steps below:
1. Select tool Rectangle from the toolbar. You can also press USA on your keyboard.
2. Click anywhere on the canvas and enter the width and height you want for your rectangle. This will be the total size of the table. You can also freehand draw the rectangle if you want.
3. With the rectangle selected, change the color Fill and Stroke from the table Properties located on the right.
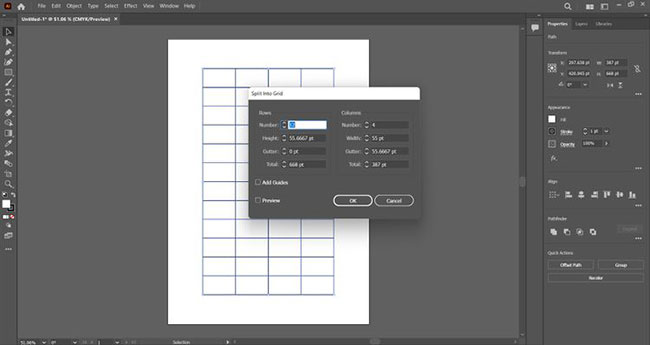
4. When you’re happy with your rectangle, keep it selected and then navigate to Object > Path > Split Into Grid from the top menu. This will open a dialog box.
5. In the dialog box, enter the number Rows and Columns you want for your table. Illustrator will automatically size each cell to fit the rectangle. You can customize the space between cells, which Illustrator calls Gutter. Changing the total size changes the size of the entire table.
6. Check box Preview so you can see what the table will look like before creating it.
7. When you’re happy with your board, click OK. Illustrator will now create a table with the dimensions you specify.
The resulting table will actually be a series of distinct squares or rectangles depending on the size you set. If you want to move or resize your board, select all shapes with [Ctrl + A] or [Cmd + A] and group them together by pressing [Ctrl + G] or [Cmd + G].
If you are not satisfied with your board and want to make some changes, there is no need to start over. Simply select the entire table and follow the same steps as above to change the number of rows and columns, or change the color and border of cells.
You can also manually resize a table by selecting all cells and dragging anchor points to make the entire table (or specific rows and columns) narrower or wider. .
Source link: How to Create Tables in Adobe Illustrator
– https://techtipsnreview.com/


