
NOTE: Welcome to the Knowledge Sharing Blog! If you encounter any errors during use, such as error in download link, slow blog loading, or unable to access a certain page on the blog … please notify me. via Contact page. Thanks!
In the previous articles, I showed you how to create USB BOOT and USB INSTALL WIN in very detail and you can do it easily, right?
But now a lot of you are wishing to create a usb containing many windows installers and bootable like other multifunctional USB.
That is why in this article I will guide you on a new method, another software for you to successfully created the usb containing many win installers and BOOT capable.
I will use a versatile tool WinSetupFromUSB to do this, so first you need to download this toolkit first.
There are 2 versions, 1 installable version (* .exe), and the other is Portable (.7z) without installation. You can choose any version, but I recommend using the Portable version.
Read more:
#first. Download WinSetupFromUSB
Note: In the downloaded file there are 2 versions of Windows 32bit and 64bit. Choose the version suitable for your computer.
#2. Advantages of the software
- Free.
- Support to create USB containing multiple installers (both 32bit and 64bit Windows versions)
- You can create a Mutiboot USB that runs in both UEFI and Lagacy standards.
- Good support for Windows 10 RTM.
- Find out more details at home page of it.
# 3. What needs to be prepared?
- WinSetupFromUSB software (link above).
- A USB, the larger the capacity the better.
- The * .iso files of the Windows versions you want to integrate into a USB flash drive (download the original Windows installer).
- You should do this on computers that are running Windows 7 or higher.
# 4. How to create USB containing many Windows installers
Okay, let’s start now. Again, you should read through it in turn before proceeding.
+ Step 1: Plug the USB into the computer.
+ Step 2: Start up WinSetupFromUSB software.
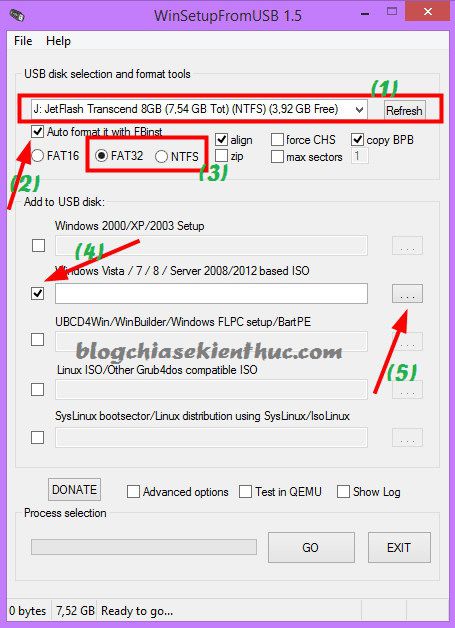
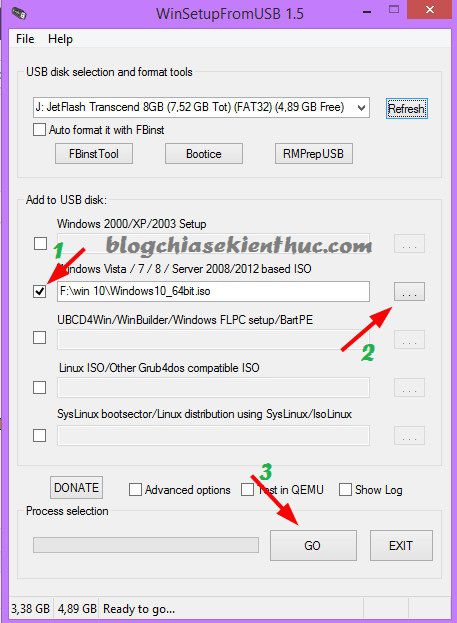
+ Step 3: Then you set up as follows:
- Select the correct device which is the USB you want to create.
- Check the option
Auto format it with FBnst. - Select Format (FAT32 or NTFS), if your computer is running UEFI standard, choose FAT32. Guide whether the computer is running UEFI or Lagacy.
- Check the line
Windows Vista/ 7/ 8/ Sever 2008/2012 based ISO. - Check it
...and navigate to the Windows installer you want to add to the USB key.
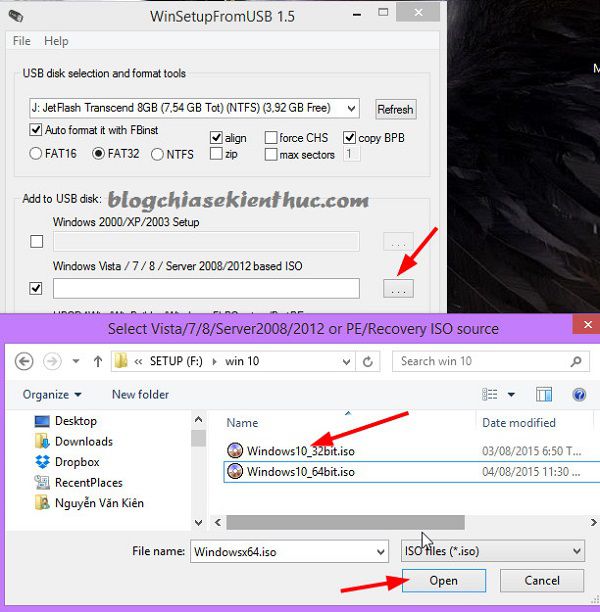
+ Step 4: In the next window, navigate to the folder containing the Windows installation that you have prepared earlier.
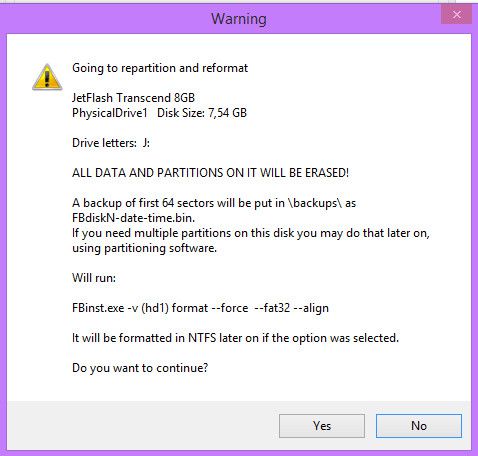
+ Step 5: Click GO to begin. At this time, a message will appear appearing Yes to agree.
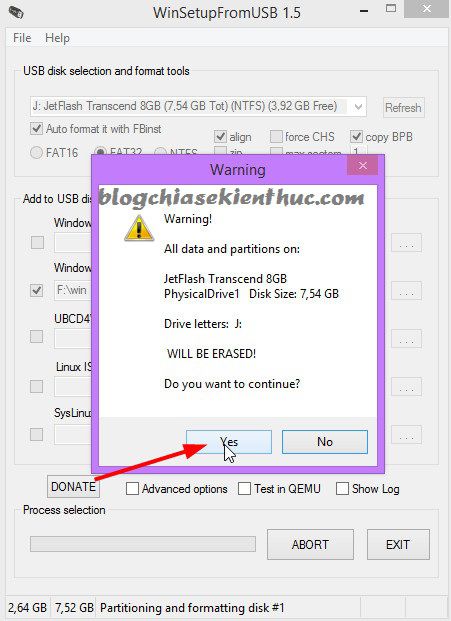
Another warning appears, you choose YES to continue
+ Step 6: The process of writing data to the USB starts, or how quickly or slowly it will depend on the size of the installer and your computer’s configuration.
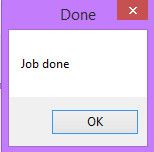
Then, wait until the recording is finished, there will be an announcement Jod done ie done, press OK to agree.
+ Step 7: You keep the WinSetupFromUSB software window, do not turn it off yet. Please select the Win you want to add. Here I will add Windows 10 64bit version so I will tick the option Windows Vista/ 7/ 8/ Sever 2008/2012 based ISO.
If you want to add a Linux installer or other versions of Windows, check the corresponding option.
+ Step 8: Wait for the recording program to finish and you have a USB that contains many Windows installers already. Too simple, right ?
And here are the results after I’m done.
—— Do part time if you like —–
But for many of you, that is not enough (like me ?), and you will feel it has too little effect.
If you want it more versatile and want to integrate more Hiren’s Boot or DLC BOOT … then follow the instructions below.
You tick the option Linux ISO/ Other Grub4dos compatible ISO and navigate to the set of tools you want to integrate. For example, if I want to integrate more Hiren Boot into this USB, you can download the Hiren boot and do as shown below.
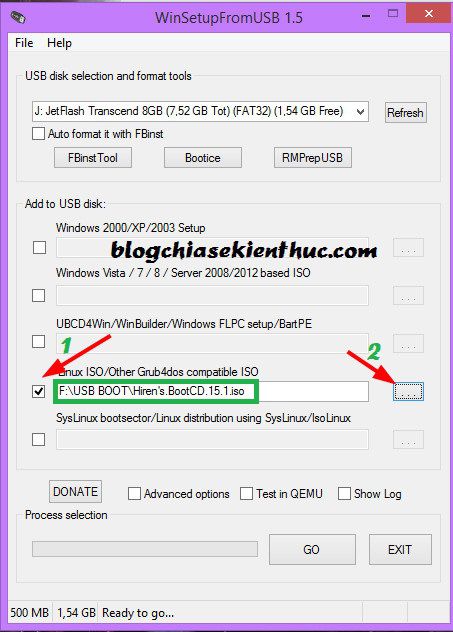
After selecting, click GO let the software proceed to integrate Hiren Boot into USB.
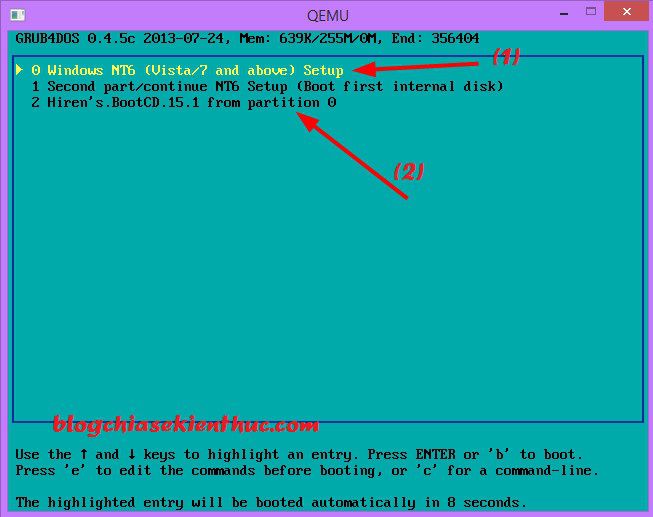
- Select the 1st line: Let you access the list of Windows versions you want to install.
- Option 2: Access to Hiren’s Boot.
Tips: Alternatively you can do the same to add anything to the USB flash drive you want.
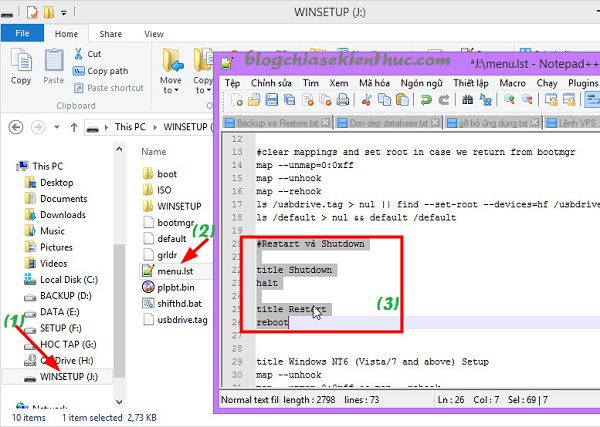
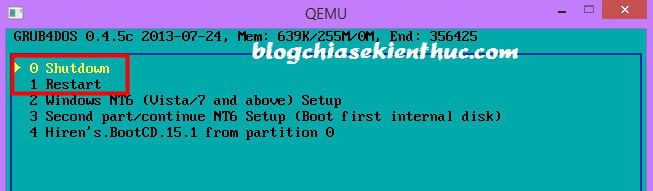
Done, you can stop at the step above okay, but if you like to add commands Shutdown and Restart In the boot menu, you will do the following:
Open the Mitiboot USB flash drive just created and open the file menu.lst in Notepad or Notepad ++ and add the following line of code and save:
#Restart and Shutdown
title Shutdown
halttitle Restart
reboot
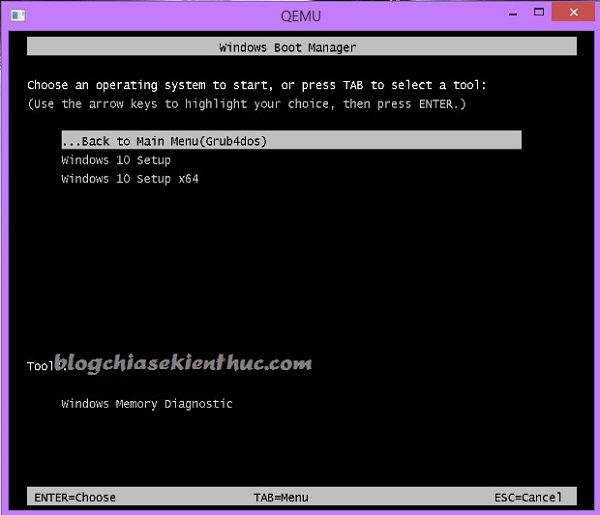
Finally, USB BOOT contains many completed Windows installers.
# 5. Epilogue
So, with just a few extremely simple steps, you have successfully made one USB BOOT contains many Windows installers and that.
With WinSetupFromUSB software, you can completely create yourself an extremely professional USB BOOT to rescue the computer ?
Hope this article will be useful to you, wish you success !!
Kien Nguyen – techtipsnreview
Note: Was this article helpful to you? Don’t forget to rate, like and share with your friends and relatives!
Source: How to create USB BOOT containing many Windows installers (XP / 7/8/10)
– TechtipsnReview


