Windows power plans are essential in laptop management. Here’s what you need to do if you want to save energy and extend battery life!
How to switch Windows power plan
There are several ways you can switch between power plans in Windows 10.
Switch power plan on desktop
On desktop, the fastest and easiest method is to type power plan into the search bar in the menu Start and choose the most suitable option from the results.
Page Control Panel Power Options will open. Please choose the plan you want.
Alternatively, you can press Windows + I, then enter power plan into the app search bar Settings. Choose Edit power plan to open the page Control Panel.
Switch power plan on laptop
If you’re using a Windows 10 laptop, you have an alternative power plan management option. When you are using battery-powered equipment, there is a battery icon in your system tray.
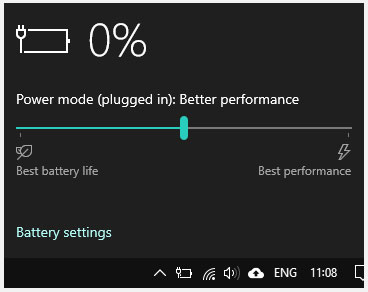
Select the battery icon to display the power plan slider. Swipe left and you’re increasing your laptop’s battery life (Power Saver plan). Swipe right and you are increasing your laptop’s performance (High-performance plan).
You can right click on the battery icon and select Power Options to open the internal power plan Control Panel Power Options or use the shortcuts in the previous section.
Create custom power plans to save battery power and reduce power consumption
Sometimes, there is no default power plan that suits your needs. You can use a laptop with a portable battery and want to extend the battery life of both devices. In that case, you can customize the power plan to suit you.
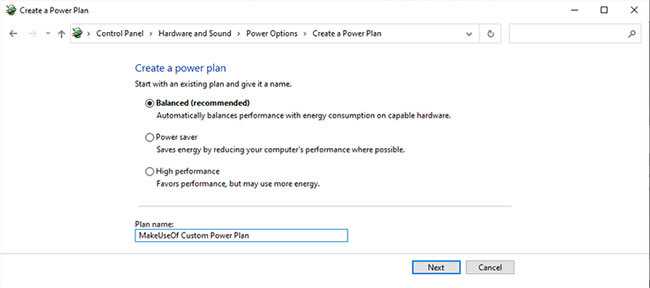
To create a custom power plan, select Create a power plan from the menu Control Panel Power Options, on the left side of the window. Name your power plan and choose the existing plan that you want as the basis of your plan.
When you create a custom power plan on Windows 10, there are several settings for you to consider.
1. Turn off the monitor and put the computer into Sleep mode
The first two settings are the easiest to tweak. How long would you like your monitor to stay on standby before shutting down and how long should the computer sleep before it goes into sleep mode?
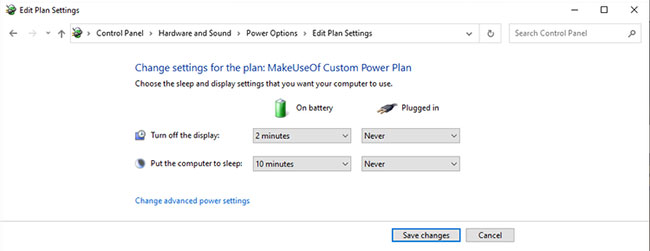
On mobile devices, Windows 10 offers the option On battery and Plugged in. You may have to consider the time it takes to find your niche. If your custom power plan is intended to save power and preserve battery life, set the numbers as low as possible.
Screen brightness
Don’t know where the screen brightness switching setting is? Microsoft removed the option to set the screen brightness (as well as adaptive brightness) via power plan in its Windows 10 Update 1809 update. This move is outraged as the screen brightness option is a factor. Other useful energy savers you can customize.
You can still change the screen brightness without switching. Click on the icon Notification at the bottom right of the screen to open Action Center. At the bottom of the panel is an adjustable brightness slider.
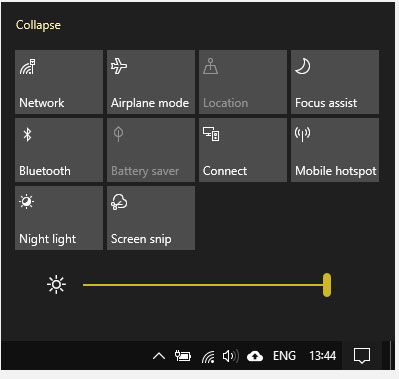
The power savings will vary between monitors. Reducing a computer’s screen brightness from 100% to 70% can “save up to 20% of the screen energy use”. You may not notice that a 30% brightness drop has too much of an impact, but you’ll definitely see an extra battery life!
2. Advanced Sleep Settings
Sleep timer in basic settings isn’t the only tuning option. Windows 10 power plan advanced settings hide a bunch of customizable options. Choose Change advanced power settings to open the advanced menu.
You will find 3 additional Sleep options: Sleep after, Allow hybrid sleep and Hibernate after. Hybrid sleep tries to combine Sleep and Hibernate into a single and desktop mode, so let’s ignore that.
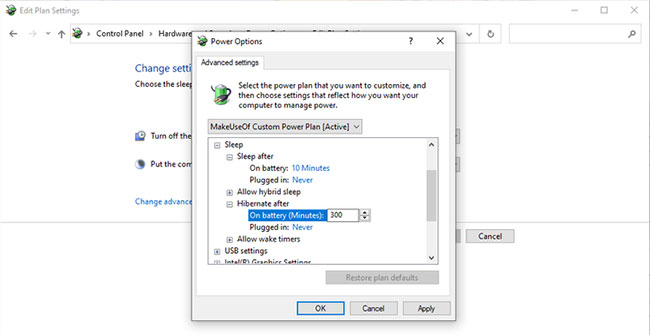
You can switch the option to hibernate the computer by using a combination of options “Sleep after” and “Hibernate after”. If you set the sleep timer to Never and set a time for the hibernation timer, your computer will hibernate instead of going to sleep after a certain amount of time.
The best option to maximize battery life is to combine the two. Allow your computer to hibernate after a certain amount of time, rather than just keeping it in sleep mode (using more overall energy).
3. Optional Processor power management
Screen brightness reduces power consumption and increases battery life. But it’s not the only thing that affects the power consumption on your custom power plan. The amount of power the CPU consumes depends on how you use it. Running a high-energy program (or multiple programs) can dramatically increase your power consumption, no matter what power plan you use.

Option Processor power management Control your CPU output, providing percentages for minimum and maximum status.
If your maximum status is set to 100%, your CPU will use up its full capacity when requested. Meanwhile, if you set the maximum status to 50%, your CPU will use less capacity. That is, if you have a 2.0GHz processor and set the processor state to a maximum of 10%, the laptop won’t just use its potential 200MHz.
Option Processor power management somewhat like an overclocking tool, allowing you to use less CPU resources. In return, you’ll save some energy and extend battery life.
It’s not perfect. You will have to experiment with the best option for your device along with the apps you run frequently.
4. Install graphics and wireless adapter
If you are using an Intel system, you will find the option Intel Graphics Settings in the advanced power plan menu. This option allows you to define default graphics level for your integrated CPU graphics settings, switching between Balanced, Maximum Battery Life and Maximum Performance. If you are looking to prolong battery life and reduce power consumption, move on Maximum Battery Life.

Another power saving option in your custom power plan is Wireless Adapter Settings. Your Wireless Adapter may periodically shut down the power to save battery power. Changing this setting will adjust the amount of time before the WiFi adapter goes into sleep mode. For maximum battery life, switch to Maximum Power Saving.
5. Other settings
There are a ton of settings to look for in the advanced power plan options. However, there are some settings that don’t have a noticeable impact, even if they work correctly. Unrelated settings include those listed in desktop background settings, USB settings, power button and cover, and multimedia settings.
Some of these, like desktop backgrounds, have nothing to do with power consumption. Whether your desktop background changes every minute, 3 minutes, or 10 minutes is completely irrelevant.
Other options, like changing the speed at which the hard drive is shut down, are theoretically helpful. However, this component is mentioned to use very little power so it is difficult to notice its impact on battery life, aside from carefully constructed device tests.
A mechanical hard drive, for example, requires 1 to 3 watts while operating – but spends most of its time idle, consuming only a few tenths of a watt. SSDs use less power.
You can spend weeks experimenting with these settings and never get the same effect as lowering your screen’s brightness. Don’t waste your time; Focus on the fundamentals.
Source link: How to customize Power Plan to increase laptop battery life
– https://techtipsnreview.com/


