
Windows 10 comes pre-installed with a cross-platform tool called PowerShell. This is a very important tool that helps users to perform many tasks just by entering simple commands.
This article will guide you on how to disable PowerShell on Windows 10.
1. Disable PowerShell on Windows 10 using Security Policy
Local Security Policy allows you to disable access to PowerShell features in Windows 10. Here are the steps:
- Press the button Start then enter Local Security Policy and click on the first search result
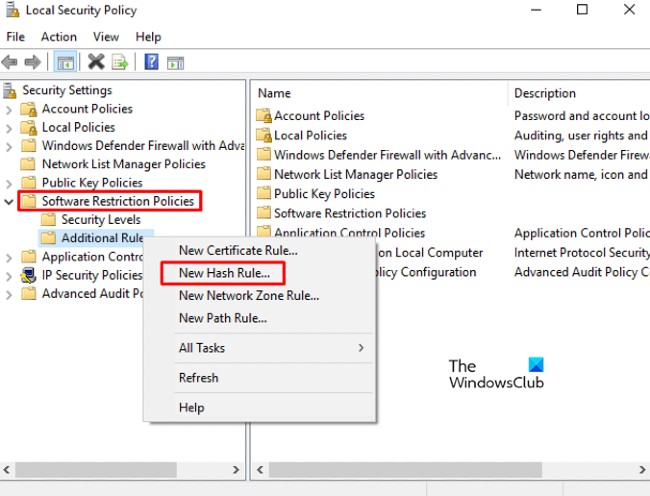
- Search in the box to the right and then expand the item Software Restriction Policies
- Right click Additional Rules and choose the option New Hash Rule
- If you can’t figure out how to expand it Software Restriction Policies then right click on it and select New Software Restriction Policies

In the window New Hash Rule, click Browse. Now, press Windows + E to open File Explorer and enter the following path in the address bar.
%SystemRoot%system32WindowsPowerShellv1.0You will have access to 32-bit version of PowerShell. You choose powershell.exe in the list and click Open> Apply> OK.
Disable PowerShellISE
If you want to disable PowerShellISE on your Windows 10 computer, you need to choose powershell_ise.exe (instead of powershell.exe) from the list.
After you have completed the steps above, restart your computer to save the changes. Once opened, PowerShell on your computer will be disabled.
2. Disable PowerShell on Windows 10 using Group Policy
Local Group Policy Editior is a powerful tool on Windows 10 Pro or Enterprise with the ability to perform many tasks on your computer. Windows 10 Pro or Enterprise users can use Group Policy to disable PowerShell by following these steps:
- Press Windows + R to open the dialog box Tremor
- Import
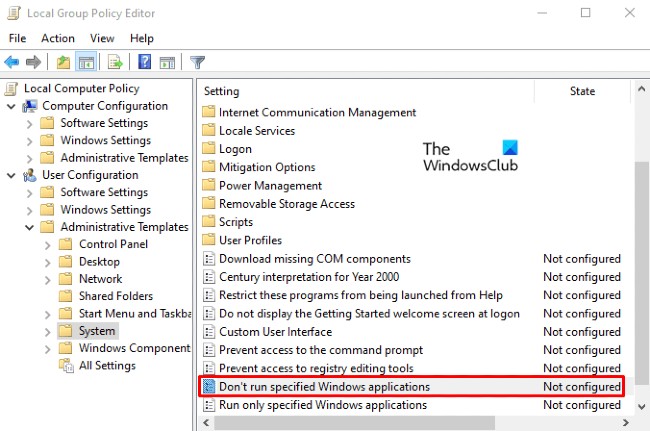
gpedit.mscinto the Tremor then press Enter. In the window Local Group Policy Editor, go to the following link:
User Configuration > Administrative Templates > System- Move to the right cell and double click Don’t run specified Windows applications
- In the new window that appears, click options Enabled. Next counter Options and click the button Show
- Now you need to open new elements in the column Value, import powershell.exe and click the button OK to disable PowerShell
- You can disable PowerShellISE by typing powershell_ise.exe and press OK
- If you want to disable PowerShell 7 you need to enter pwsh.exe and press OK
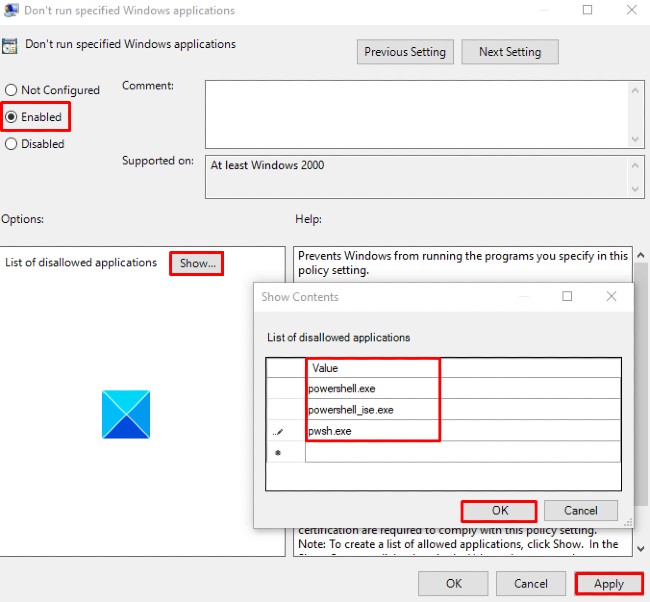
- Finally, press Apply> OK to save changes
- After you complete the above steps, you will no longer be able to access PowerShell.
3. Disable PowerShell 7 on Windows 10
If you have PowerShell 7 on your computer, you can disable it by following these steps:
- Press the key combination Windows + I to open Settings
- In Settings click Apps
- Next choose Apps & features
- Scroll down and search for the app PowerShell
- Press the button Uninstall
- Uninstall confirmation
Follow the onscreen instructions to complete the app uninstall process. Once done, PowerShell 7 and its data will be removed from your computer.
I wish you success and invite you to refer to many other great tips on makeover:
Source link: How to disable PowerShell on Windows 10
– https://techtipsnreview.com/


