
Advanced Host Controller Interface (AHCI) is an Intel specification that specifies the operation of the Serial ATA (SATA) host bus adapter. AHCI enables features like Native Command Queuing and Hot Swapping. The main benefit of using AHCI is that a hard drive using AHCI mode can run at a higher speed than a hard drive using Integrated Drive Electronics (IDE) mode.
The only problem when using AHCI mode is that it cannot be changed after installing Windows, so you need to set AHCI mode in BIOS before installing Windows. Luckily, there is a fix for this, so don’t waste your time, learn how to enable AHCI mode in Windows 10 with the help of the guide below!
Note: Make sure to create a point-in-case restore point.
Method 1: Enable AHCI mode via Registry
1. Press Windows + R, then enter regedit and press Enter to open Registry Editor.
2. Navigate to the following registry:
HKEY_LOCAL_MACHINESYSTEMCurrentControlSetServicesiaStorV3. Select iaStorV, then from the right panel, double-click Start.

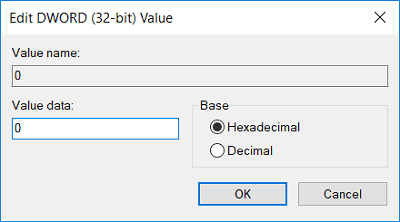
4. Change its value to 0 and then click OK.

5. Next, expand iaStorV then choose StartOverride.
6. Again from the right window, double-click 0.

7. Change its value to 0 and click OK.
8. Now navigate to the following registry key:
HKEY_LOCAL_MACHINESYSTEMCurrentControlSetServicesstorahci9. Select storahci Then in the right pane, double-click Start.
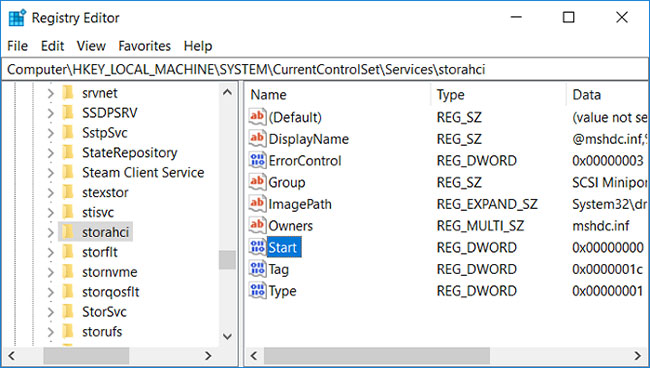
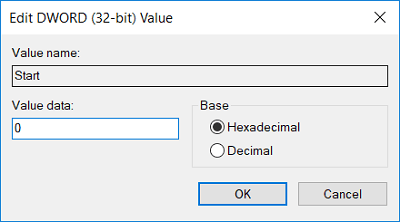
10. Change its value to 0 and click OK.

11. Expansion storahci then choose StartOverride and double click 0.

12. Change its value to 0 then click OK.
13. Boot your PC into Safe Mode, then don’t boot into Windows but go into BIOS and turn on AHCI mode.
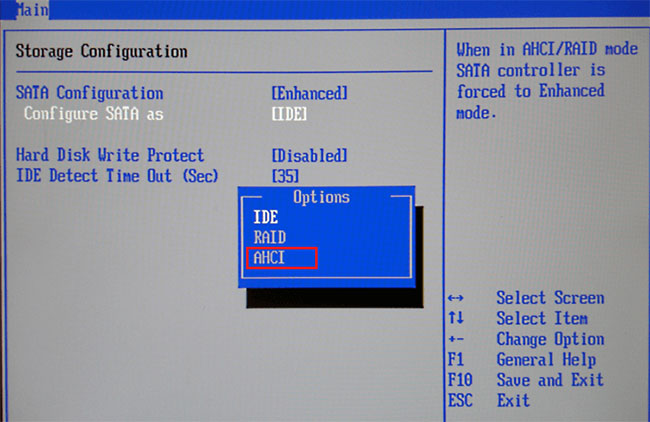
Note: Locate the memory profile then change the content setting “Configure SATA as” and select the ACHI mode.
14. Save changes then exit BIOS setup and boot your PC normally.
15. Windows will automatically install the AHCI driver and then reboot again to save the changes.
Method 2: Enable AHCI mode via cmd
1. Press the key Windows + X then choose Command Prompt (Admin).
2. Enter the following command cmd and press Enter:
bcdedit /set {current} safeboot minimal3. Boot the PC into the BIOS and then turn on AHCI mode.
4. Save the changes then exit BIOS setup and boot the PC into Safe Mode.
5. Living Safe Mode, open Command Prompt, then enter the following command and press Enter:
bcdedit /deletevalue {current} safeboot6. Reboot your PC normally and Windows will automatically install the AHCI driver.
Method 3: Turn on AHCI mode by removing StartOverride
1. Press the key Windows + R, then enter regedit and press Enter.
2. Navigate to the following registry:
HKEY_LOCAL_MACHINESYSTEMCurrentControlSetServicesstorahci3. Expansion storahci then right click StartOverride and choose Delete.

4. Open Notepad, then copy and paste the following text:
reg delete “HKEY_LOCAL_MACHINESYSTEMCurrentControlSetServicesstorahci” /v StartOverride /f5. Save the file as AHCI.bat (very important .bat extension) and word Save as type, choose “All Files”.

6. Now, right-click on AHCI.bat and select Run as Administrator.
7. Reboot PC, enter BIOS and turn on AHCI mode.
Source link: How to enable AHCI mode in Windows 10
– https://techtipsnreview.com/


