
You don’t always have a damaged memory dump file, which is very rare. The reason is simply because this condition makes your PC virtually unusable and that’s why it’s called the blue screen of death error.
Another reason why memory dump files are damaged is not very common, such as when you have a virtual machine operating in a cluster environment on a Windows Server 2012 or Windows Server 2008 R2 platform, or because the option to monitor the virtual machine’s heartbeat index is enabled.
Here’s how to fix a corrupted memory dump file
How to fix corrupted memory dump file
1. Use specialized repair software
To fix corrupted memory dump file, the best way is to use specialized BSOD repair software. Manually fixing BSODs can be difficult, but there are specialized tools that can help.
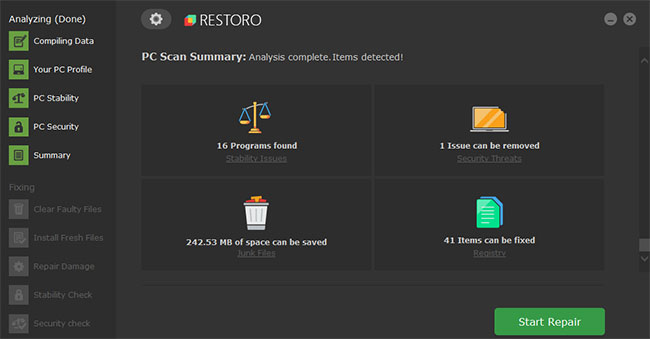
Restoro with its online database features the latest feature-rich system files for Windows 10 PCs, allowing you to easily replace any element that might be causing the BSoD error.
The software can also help you out by creating a restore point before repair starts, allowing you to easily restore a previous version of your system if something goes wrong.
Here’s how you can fix registry errors using Restoro:
As soon as the repair is complete, your PC should be working with no problems. You won’t have to worry about BSoD errors or slow response times anymore.
2. Change settings via GUI
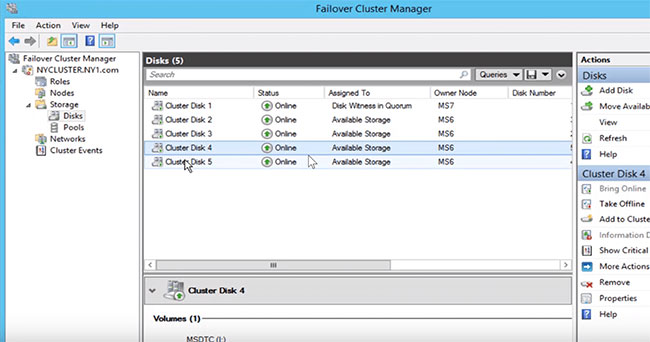
- Open it first Failover Cluster Manager and click Roles.
- Search for virtual machine resources and click Resources.
- In the tab Resources, right click on the virtual machine.
- Click Properties and choose Settings.
- There in Heartbeat Setting, clear the check box Enable automatic recovery for application health monitoring.
- Likewise, clear the check box Enable heartbeat monitoring for the virtual machine, then click OK for the setting to take effect.
This will help prevent corrupt memory dump files from being created on Windows. However, this is not the best long-term solution.
3. Change settings via Windows PowerShell
Get-ClusterResource- Next, enter the following command to check 2 options Enable heartbeat monitoring for the virtual machine and Enable automatic recovery for application health monitoring is it enabled or not:
Get-ClusterResource <VirtualMachineName> | Get-ClusterParameter CheckHeartbeat- Enter the following Windows PowerShell command to set the value CheckHeartbeat Fort 0:
Get-ClusterResource <VirtualMachineName> | Set-ClusterParameter CheckHeartbeat 0- However, in case you want to cancel the option Enable automatic recovery for application health monitoringRun the following Windows PowerShell command:
(Get-ClusterResource <Object>).EmbeddedFailureAction = 1- Exit Windows PowerShell and restart your PC.
By following the steps mentioned above, you should be able to get rid of any corrupted memory dump files that could affect the system.
Hope you are succesful.
Source link: How to fix corrupted memory dump file
– https://techtipsnreview.com/


