
You may see a “Start PXE over IPv4” error when trying to start your computer because the system is trying to boot from PXE. The computer is trying to boot over the IPv4 network, and so you see this error message. In today’s post, Quantrimang.com will guide how to fix Start PXE over IPv4 error in Windows 11/10 with the help of some simple solutions.
What is PXE?
PXE or Preboot Execution Environment is used to boot a computer with a client-server interface before deploying the PC image. Both DHCP (Dynamic Host Configuration Protocol) and TFTP (Trivial File Transfer Protocol), are used to perform PXE network boot. Normally, PXE is enabled on the computer, but you can disable it from the BIOS (discussed in the following section).
What does Start PXE over IPv4 error mean?
You will see the error message “Start PXE over IPv4 ″ when the computer tries to boot on the LAN. Your computer does this when it fails to boot from the boot drive. This usually happens due to wrong BIOS configuration.
How to fix Start PXE over IPv4 error
This error usually occurs because there are no other boot devices such as hard drives. So we’ll set it as the default boot device. The article will also cover other solutions that can fix the error. These are the things you can do to fix the Start PXE over IPv4 error in Windows 11/10.
1. Disable Secure Boot and Legacy Support
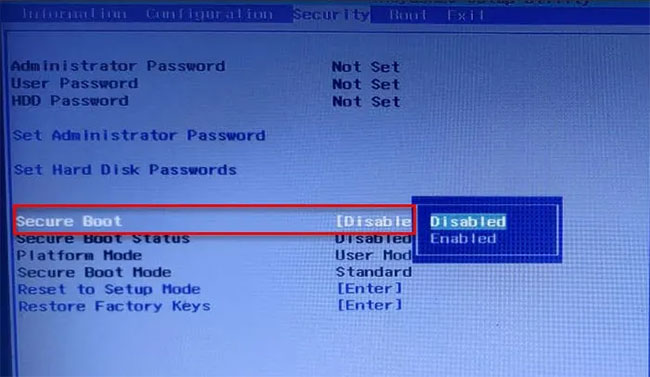
Secure Boot and Legacy Support are two of the main culprits in changing the system boot order. Therefore, disabling them should fix the problem. You can follow the given steps to disable Secure Boot and Legacy Support.
B1: Boot into the computer’s BIOS.
B2: Go to tab Security with the arrow keys.
B3: Now, let’s enter Secure Boot and disable it.
B4: Then choose Legacy Support and disable it.
B5: Finally, save the settings and exit the BIOS.
When you restart your computer, you may see a message stating that the boot order has been changed and asking you to enter the number displayed.
If you don’t see anything, just continue with the normal boot process. But if you see the message, here’s what you need to do:
B1: Enter these numbers and press Enter. (Note: You will not be able to see the entered number).
B2: Now, turn off the computer from the power button.
B3: To enter BIOS, go to tab Boot and choose Boot from Hard Drive (some settings may vary depending on OEM).
Finally, restart the computer and check if the problem is fixed.
2. Disable Boot to LAN
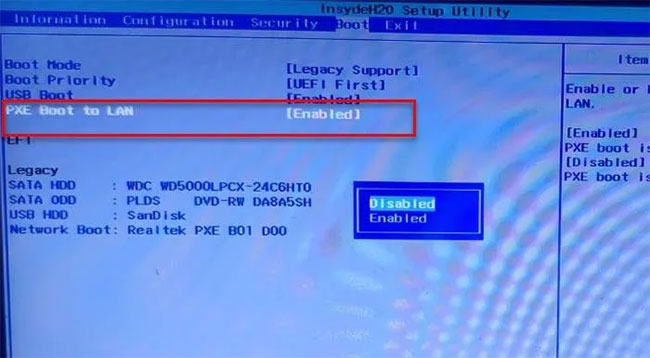
Another thing you can do to fix the error is to disable Boot to LAN. Your system may have a different name, depending on the brand of laptop. However, the process is often the same.
So follow the given steps to disable Boot to LAN option.
B1: Boot into the BIOS.
B2: Go to tab Boot.
B3: Turn off options PXE Boot to LAN.
B4: Save and exit.
Restart the computer and check if the problem is fixed.
Hope you are succesful.
Source link: How to fix Start PXE over IPv4 error in Windows 11/10
– https://techtipsnreview.com/


