The Breakout Rooms feature allows you to create sub-meetings in Teams meetings for smaller groups of participants to collaborate and discuss. Up to 50 breakout rooms can be created for a meeting.
Breakout Rooms feature on Microsoft Teams
Microsoft Teams received support for Breakout Rooms in 2020, and it basically allows meeting organizers to set up different rooms for participants to encourage thinking, pre-addition discussion. cooperate with others.
Microsoft is currently planning to take the Breakout Rooms experience to the next level by adding support for timers, room keeping, and reassigning participants.
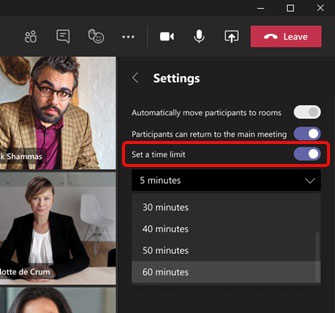
As shown in the screenshot above, Microsoft is adding support for setting time limits, which will allow you to set a timer for breakout rooms from settings. The session will end automatically and rooms will be closed when the scheduled time is up and the user will be moved back to the main meeting.
The second new addition to Breakout Rooms is “Room assignment retention”. As the name suggests, this feature provides you with controls for maintaining configuration and specifying rooms across multiple sessions.
In addition to these two new features, Microsoft Teams will also let you change participants’ rooms once it’s open.
How to enable Breakout Rooms
To get started, you need to enable Breakout Rooms.
1. Click your profile picture in Teams
2. Select Settings.
3. On the tab General, choose the option “Turn on new meeting experience” in section “Application”.
4. Restart Teams (your computer may need to be restarted).
5. You can double-check that the setting is working correctly by starting the meeting and verifying that the meeting opens in its own window.
Note:
Make sure the meeting organizer and all participants are using the latest version of Teams. Participants on Android, iOS mobile or tablet devices must download the latest update from the App Store.
Before the meeting
You must be the meeting organizer and use the Teams desktop app to access the Breakout Rooms option, manage this feature, and the participants. If you want to use Breakout Rooms, you’ll need to start a Meet Now meeting in a channel or calendar, or schedule a private meeting with selected participants or a channel. Chat view calls do not support this feature as they are not considered meetings.
Meeting attendees and presenters won’t see an option to Breakout Rooms. Cannot transfer or share organizer capabilities.
The breakout room cannot be set before the meeting, and the breakout room must be created after the meeting has started.
During the meeting – As the meeting organizer
Breakout Rooms is available if you join any Meet Now or individually scheduled meetings (including recurring meetings) you have organized with a Teams desktop application. The Breakout Rooms icon is located on the meeting menu between the reaction controls and a 3-dot displaying additional actions.

Breakout Rooms setup and management
1. Join meetings from the Teams desktop app.
2. Once the meeting has started, select the Breakout Rooms icon.
3. In the settings window that appears, choose the number of breakout rooms you want to create and how participants will be assigned:
- Automatically – Those who have joined the meeting will be assigned to equal sized rooms. The meeting participants after automatic allocation will need to be assigned manually.
- Manually – Allows you to assign participants to rooms as desired.
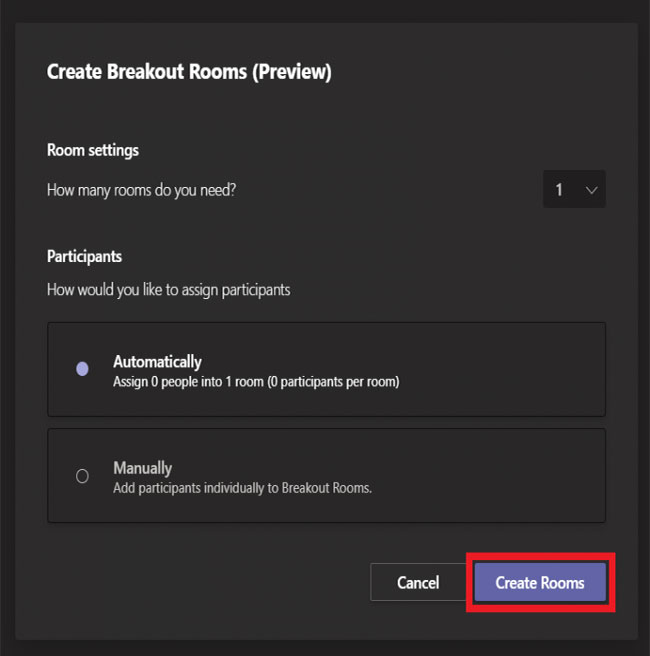
4. Select Create rooms. A menu will appear to the right of the Teams meeting window displaying the management options, the title (room name), the participants, the status of the breakout rooms, and the status of the participants.
To manually create additional rooms, select Add room.
– To assign or move a participant manually, select a closed room or the section to which the participant is currently assigned. Check the box (s) next to the name of the participant (s) you want to move. Choose “Assign” and choose any rooms you want to include them in. Participants who have not been assigned to the room will appear in the section “Assign participants”.
Note that participants via the Teams desk phone or mobile app cannot be assigned and will still participate in the main meeting.
– To edit a room name or delete it, hover your mouse over the status icon next to the room name:
- Rename room – Change the title of the selected room. It’s a good idea to create a specific headline as the chat log remains accessible to the participants after the meeting, and a special name will help increase discoverability.
- Delete room – Delete selected room. All assigned participants will be moved to the list of unassigned participants. To delete all rooms and install at once, see “Recreate rooms” in the next step.
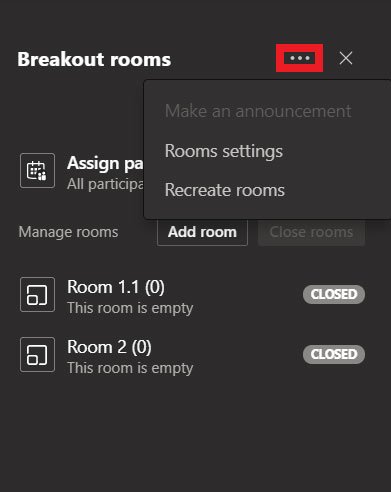
To open additional master room settings, select the ellipsis icon next to the title “Breakout Rooms” and choose “Rooms settings” while all rooms are closed:
- “Automatically move people into opened rooms” – Choose to automatically move participants in and out of specified rooms when you open or close breakout rooms. Participants will receive a notification that they will be moved automatically with a 10-second advance notice. If this option is not selected, the participant will be prompted to choose whether to move in or out of the breakout room.
- “Let people go back to the main meeting” Choose to allow participants to move between the main meeting and the specified breakout rooms when the meeting rooms are open. If this option is not selected, participants will be able to return to the main meeting by selecting Return or return to the Breakout Room by choosing “Join room”.
- “Recreate rooms” – Erase all existing rooms and settings to start over.
Start Breakout Rooms
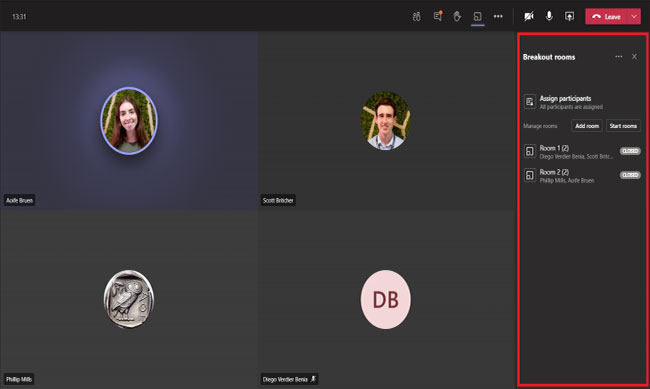
Once you are satisfied with the allocation and installation of Breakout Rooms, you need to open the rooms to allow participants to access them.
- To open all rooms at the same time, select “Start rooms”. Status icons next to the rooms will change from “Closed” Fort “Open”.
- To open individual rooms, hover over the status icon “Closed” of the room and select the ellipsis icon. Choose “Open”.
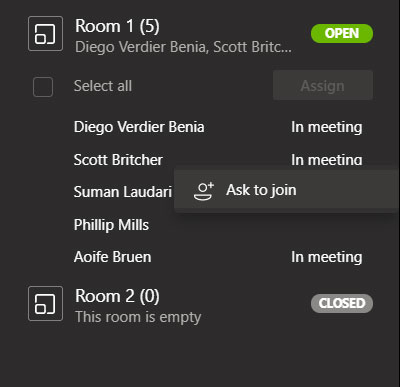
When participants are in the breakout room, “In meeting” displayed next to their name. If this status is not shown next to the name, you can prompt the participant to enter the breakout room by selecting their name and clicking. “Ask to join”.
Manage Breakout Rooms
Notification
1. To send notification notifications to all open breakout rooms at the same time, select the ellipses icon next to the menu title.
2. Select “Make an announcement” and enter your message. Notifications will show up in all breakout rooms with labels “Important” Red.
Join Breakout Rooms
1. Hover the mouse over the status icon Open of the breakout room that you want to enter.
2. Select Join room.
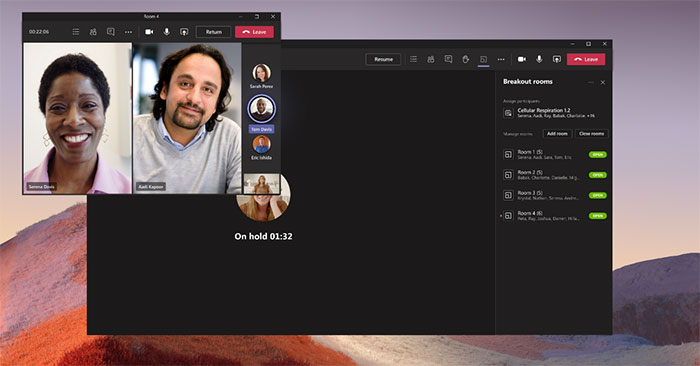
3. You will be added to the breakout room and be able to interact with all of the meeting’s features. While you are in a breakout room, you will be in state On Hold in the main meeting and it will be impossible to know if participants have entered the main meeting until you return to the main meeting.
4. Select the button “Leave” to leave the Breakout Room and return to the main meeting.
Add room
Choose Add room to create another breakout room at any time. Note that participants from open rooms cannot be transferred to another room until their current room is closed.
Close Breakout Rooms
To close all open rooms at the same time, select Close rooms.
To close individual rooms, hover over the status icon Open of the room and select the ellipsis icon. Choose Close.
End meeting
At the end of the meeting, you can leave the room open or closed.
- Open – Allows participants to continue collaborating with the conversation in the breakout room and reopen the meeting in the breakout room after the main meeting ends. If the meeting is recurring, breakout room settings and allocations will be saved and maintained for subsequent meetings.
- Close – Breakout Rooms conversations are readable to all participants after the meeting ends and cannot be reopened. Breakout Rooms settings and allocations are not saved for subsequent meetings.
>> See also: How to pin and change video frames in Microsoft Teams
During the meeting – as a meeting participant
Entering a Breakout Room
If the selected meeting organizer does not automatically move the participants, the participants will see a pop-up message with options when the Breakout session starts and ends.
- When the breakout rooms open – participants can choose Join room to enter the breakout room or Later to continue to participate in the main meeting. If a participant chooses Later, the breakout room can be accessed while remaining open by selecting Join room on the main meeting menu.
- When the breakout rooms are closed – Participants can choose Join to go back to the main meeting either Leave meeting to exit the meeting completely.
Switches between the primary and specified breakout room
If this feature is enabled by the meeting organizer, the participant can return to the main meeting at any time while the room remains open by selecting Return. Participants can return to the specified breakout room from the main meeting while the room is open by selecting Join room.
Note: Participants cannot switch between breakout rooms unless the meeting organizer assigns them a new room.
Source link: How to use Breakout Rooms on Microsoft Teams
– https://techtipsnreview.com/


