
If you’ve ever used Microsoft Word, chances are you’re familiar with tables. Tables allow you to present information in an easy-to-understand format – in rows and columns. This can be useful when preparing reports, listing features, or displaying data in Word.
Perhaps you already know how to add a table in Word using the function Insert Table popular. But have you ever tried drawing your own custom panels?
In this article, Quantrimang.com will learn with you how to use the Draw Table feature in Microsoft Word to quickly draw a table, then customize the table you draw.
What is Draw Table in Microsoft Word?
As the name suggests, features Draw Table in Word allows you to draw and design your own tables by hand using the mouse and pen tools.
Draw Table is one of 5 methods of creating tables in Word. 4 other methods include Insert Table, Convert Text to Table, Insert Excel Spreadsheet and Quick Tables.
Draw Table allows you to customize your table in more ways. For example, you can place the table exactly where you want it and manage its scale on the fly if you draw it yourself.
On the other hand, if you use the option Insert Table, the table will expand to fit the page. Then you’ll need to start scaling with the table format tool.
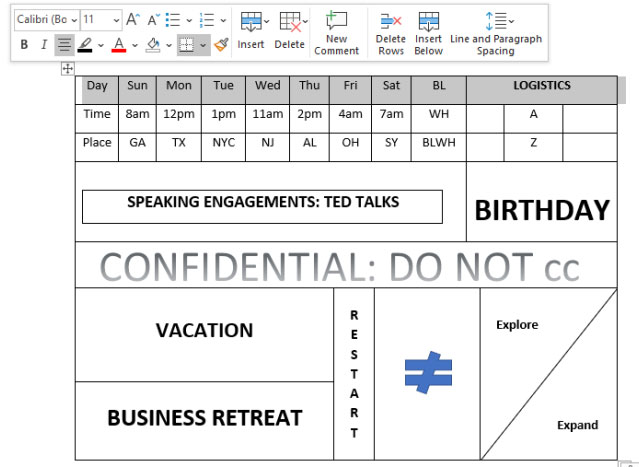
Moreover, with Draw Table, you can draw diagonal lines and small cells within large cells. Here is an example of what can be done with Draw Table.
The Draw Table feature is not available in the Microsoft Word mobile app. Here’s how to use this feature in Microsoft Office 365.
How to use the Draw Table feature in Microsoft Word
Here’s how to draw a simple 10×5 table in Microsoft Word using the Draw Table feature.
1. Launch the Microsoft Word desktop application on your PC and open the document where you want to insert the table.
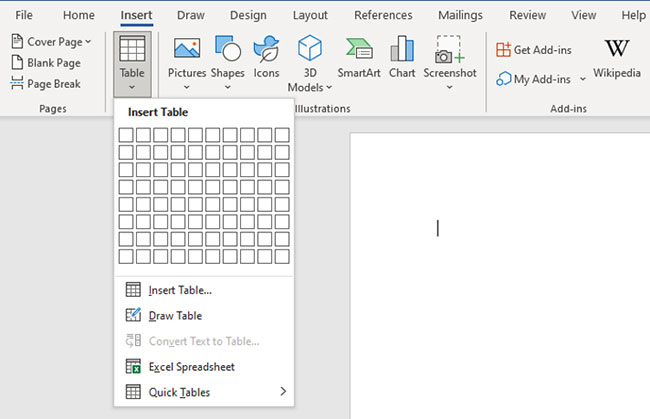
2. Click on the tab Insert in the ribbon area and select Table from the menu options.
3. Scroll down and click Draw Table. This will activate the pen tool that you will use to draw your board.
4. Now click and drag down to create a 1-cell outline for the table.
5. Use a pen to draw a vertical line that divides this cell into two equal parts to create a 2 × 1 table.

6. Click outside the panel to deactivate the pen tool. Now place the mouse pointer at the midpoint and click the . button +. This will add more columns to the right. Repeat this operation until you have a 10×1 board.

7. Place the cursor at the top left of the table to show the same button + from earlier. Click on it until you have 4 more rows.

8. You have now created a 10×5 table using the Draw Table feature. Notice that the cells have the same scale.
And just like other tables, you can format and customize this table to your liking.
Hope you are succesful.
Source link: How to use the Draw Table feature in Microsoft Word
– https://techtipsnreview.com/


