Note: Please read the article carefully before proceeding! If you encounter any errors during use, such as error in download link, slow blog loading, or unable to access a certain page on the blog … please notify me. via Contact page. Thanks!
This article I will guide you in detail how Create a fully functional USB BOOT, and this is an improvement that author TranDuyLinh shared with the community. I will guide the most in detail (in pictures) to create a fully functional USB BOOT and support the new UEFI computers to ensure you will be satisfied.
I. How to create a fully functional USB BOOT
Tools need to prepare
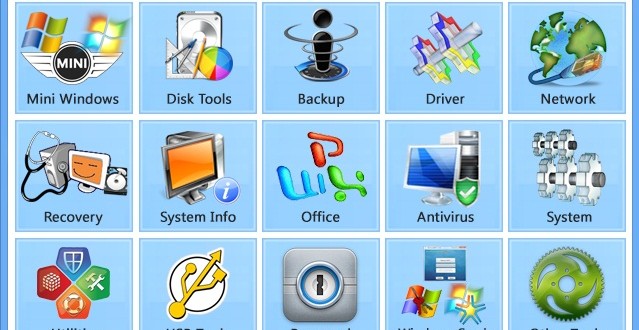
II. Computer rescue tools are integrated in DLC BOOT


You can switch to Vietnamese language to use for easy, here are some features and tools in this USB BOOT:
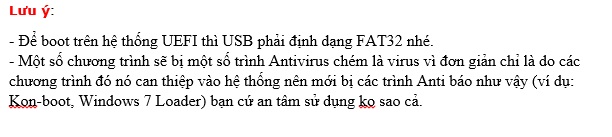
- Support booting on both UEFI and LEGACY standards if you Format USB with FAT32 format.
- Mini Win support such as: Mini Win XP, Mini Win 7 and Mini Win 8
- Partitioning tool without data loss: Partition Winzard
- Backup tools such as True Image, Ghost 32, Onkey Ghost ..
- Driver update tools such as: 3DB Chip, Driver Genius, Double Driver.
- Internet tools such as IDM, Teamview…. and browser for internet access.
- Tool to view system information, card like: CPU-Z, HWiNF032, GPU-Z, GetDiskSerial ..
- Office tools like Word, Excel, PowerPoint, Unikey, MsPaint….
- Virus scanning tool KAS Virus Remove, KAS TDSSkiller …
- System tools like Your Uninstall, Total Uninstall, .. NetFramework…
- File management tools such as: Total Commander, 7-zip, UltraISO, Winrar, Express Burn, Ccleaner … ..
- USB Tools: Test USB, Rufus, USB Show …
- Password cracking tool: Reset Pass of computer, Remove Deep Free freezing software….
- Tools for Windows.
- … .. Lots of other tools ..
There are many more, this version is extremely complete, I’ve been using it for nearly a year and have not been bored with installing the device yet. If you are looking for a computer rescue tool, this is a great tool for you. Good luck!!!
How to start:
1 / How to create USB BOOT with DLC BOOT 2013
+ Step 1: After you have installed the UltraISO software and downloaded the DLC, open the DLC BOOT file by double-clicking on the file or clicking File => select Open => then navigate to the DLC Boot file you just downloaded.


+ Step 2: Next you choose Bootable => select Write disk image to burn iso file to USB.
Next at the line Disk Drive You choose the USB you want to create, at the line Write Method you choose USB-HDD+ . Follow the picture below:

+ Step 3: Click select Write let the program start burning. Wait for a while for the burning process to finish, then open up your USB stick there will be folders like this:

Now Your USB flash drive already has BOOT capability Okay, you can switch from SysLinux to Grub4DOS.
Perform:
Click DLC1Menu.exe choose Other Tools then click SysLinux Grub4DOS and follow the instructions of the program.
+ Step 4: Next you can convert USB format from FAT32 to NTFS to be able to store files> 4GB. Then you should freeze the USB to prevent VIRUS from entering the USB. You can follow this tutorial:
At this point you have a great computer rescue tool, make sure after using this USB BOOT you will not want to switch to other types. ^^
Note: If you want to create USB BOOT to access a standard UEFI computer, you cannot convert it to NTFS format. Because if you convert to NTFS format, your USB BOOT will not work on this standard.
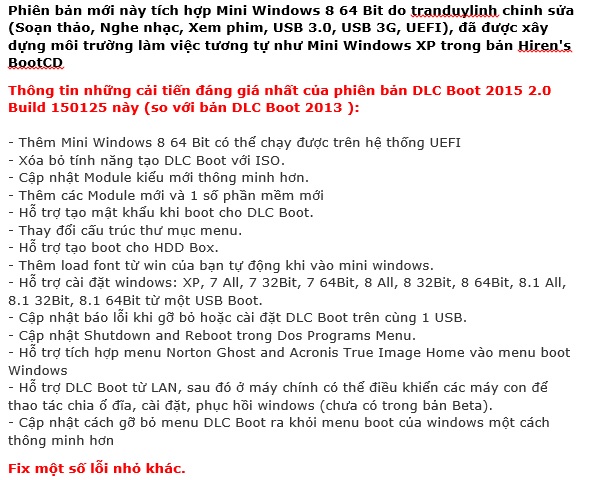
2 / UPDATE BOOT 2015 DLC version (Full instruction)
The version above I have shared is very empty, but if you like to experience the latest version (version 2015), you can download it at the following address:
Note: Download link in preparation (beginning of article)
This version has some interesting changes as follows:
User guide by video here or download Here .
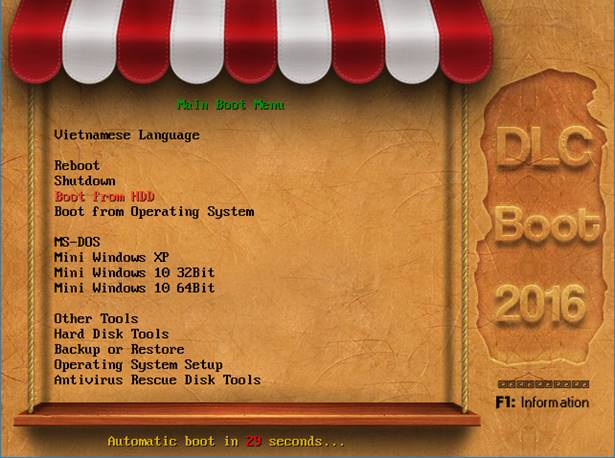
3 / UPDATE BOOT 2016 DLC version (Full instruction)
Yes ! In 2016, Tran Duy Linh continues to release DLC BOOT 2016 with a pretty interface and updates with many new tools.
What’s special about this 2016 BOOT DLC?
- Support boot on all current standards and specifically Boot on UEFI, LEGACY.
- Support booting from USB, HDD BOOT, LAN, Android.
- Integrated Windows 10 32bit and 64bit.
- Integrated Mini Windows XP extracted from Hiren’s BootCD 15.2, has been built and optimized extremely standard.
- Full integration of rescue tools from simple to advanced.
- There are many other features that have been added and updated.
Defect:
The size of this version is quite heavy (1.7 GB), but it is very complete and has been packaged into a single iso file so it is easy to use and store.
Download DLC BOOT 2016 – professional computer rescue
Note: Download link in preparation (beginning of article)
Tips: You can watch the video on how to create a bootable usb version 2016 and some basic instructions here.
Integrated Window installer into USB DLC BOOT 2016
There are many of you have asked yourself how to add Windows installer to USB BOOT created with DLC BOOT 2016.
In my opinion, there is no need to integrate and do anything, you just need to copy the entire Windows installation you want into that USB BOOT, then into Mini Windows to install Win extremely simple, fast the reset is even faster. But if you still want to integrate more, it’s fine, you do the following:
+ Step 1: Download the Module of the Windows version you want to integrate, for example if you want to integrate the Windows 10 installer, download the file with the corresponding name. You are here to download.
+ Step 2: Download the Windows installer file you want to integrate. You are here to download the original installer from Microsoft.
+ Step 3: Select the last icon on the right Dos Soft Manager & Win Soft Manager depending on whether you add the Module running on Windows or DOS-based.
+ Step 4: Click on the three blocks icon, choose to file Module 7z => this time the program will automatically integrate for you, please wait a little bit because the process takes place a bit.
+ Step 5: Select the path to the Windows installation file you want to integrate.
Tips: Watch the video on how to integrate the Windows installer module: See here !
4 / UPDATE BOOT 2017 DLC version (Full instruction)
Note: Download link in preparation (at the beginning of the article, in the preparation tool section)
Video tutorial on creating DLC BOOT 2017 with hidden partition.
Video tutorial on creating DLC BOOT 2017 with normal partition.
5 / UPDATE 2019 BOOT DLC version (Full instruction)
DLC BOOT 2019 version already exists, I have a separate article for this version. You can see detailed instructions in this article:
Epilogue
So I have very detailed instructions for you how to create bootable usb with DLC BOOT 2013, 2015, 2016 and 2017 already. I am still using the 2013 version and I feel quite complete, depending on your needs.
The article is so long, but the way to do it is extremely simple. I write them together for you to follow.
Choosing any version is also good, depending on your needs, let’s use it ? Wish you success!
Kien Nguyen – techtipsnreview
=> Create USB BOOT
Note: Was this article helpful to you? Don’t forget to rate, like and share with your friends and relatives!
Source: Instructions for creating a fully functional USB BOOT
– TechtipsnReview


