![LEGACY]Create professional USB Multiboot with 1 click](https://techtipsnreview.com/wp-content/uploads/2020/12/LEGACYCreate-professional-USB-Multiboot-with-1-click.jpg)
NOTE: Welcome to the Knowledge Sharing Blog! If you encounter any errors during use, such as error in download link, slow loading blog, or unable to access a certain page on the blog … please notify me. via Contact page. Thanks!
Yes ! There are many good options at techtipsnreview to help you create a rescue boot usb.
All previous and even future articles will always be complete, have detailed instructions and, importantly, it works in the most stable way.
I affirm one thing that at this blog, I just share what I have tested successfully or that many people have done it successfully.
Okey! And to continue with the topic of creating rescue usb for computers, in this article I continue to share with you how create a USB Multiboot With a lot of attractive features, stable operation, beautiful interface and most importantly, it works very well on both popular current computer standards, which are UEFI and LEGACY.
Note: This product is yours niemtin007 in VNZ, a person that I think is quite good at computers.
I. What’s so special about this Multiboot USB?
- Support Boot into Legacy standard computers using Grub2 and Grub4dos.
- Support booting into UEFI standard computers with Grub2 and rEFInd boot manager
- Support booting between bootloaders without having to reboot
- The menu displays features matching the Legacy or UEFI boot standard
- Support booting Linux live ISO (integrated with many available boot codes – only show menu when there is ISO file)
- Support booting Antivirus live ISO used to scan viruses outside Windows environment.
- Support booting WinPE SE to rescue computers in depth.
- Split hard drive, save data, test computer hardware through WinPE SE
- Install Windows indirectly through WinPE SE
- Runs Linux distros directly without having to use any USB-integrated tools (can install linux in live ISO environment)
- Run rescue tools, antivirus based on linux such as Acronis True Image, Parted Magic, Bitdefender Rescue CD …
- Run hacker distro live with powerful tools in pentesting, hacking, anonymity, forensic, confidentiality …
- Boot into Windows / Linux / MacOS in UEFI mode (only support real macs, not hackintosh yet) via rEFInd in Multiboot OS
=> In addition, features will be updated and changed according to new versions. If interested, you can see the changelog file at each download link.
II. What needs to be prepared?
1. A USB> 2GB for comfort.
2. You can use 1 of the following versions.
3. Link to download some software and applications that you want to integrate into the usb near the end of the article.
Important changes in MultibootUSB 1.0.4 Final:
Support booting UEFI with NTFS format: In this latest update version, the default boot partition is NTFS, which means that you do not need to Format USB in FAT32 format, but you can still boot into UEFI standard.
This is great for us, now you can simply save files> 4 GB in size ?
And if you want to close with USB BOOT to protect the USB virus, it’s okay. Specifically change what you read in the Changelog section in the download file!
III. [UPDATE] Newer Multiboot versions from time to time
IV. Watch Video for detailed instructions on how to create USB Boot with Multiboot
V. Instructions on how to create USB Multiboot UEFI -LEGACY
+ Step 1: You download the 2 files at the link above (note that you should put them together in 1 folder or to temporarily both downloaded files on the Desktop for easy doing).
+ Step 2: Right-click the fìle MultibootUSB_install.exe => and select Run as adminstrator to run as administrator.
At this point, the program’s interface will list out a list of devices that are connected to the computer.
Please select the USB you want to make usb multiboot. Enter the character of the current usb, my here is K > press Enter to perform.

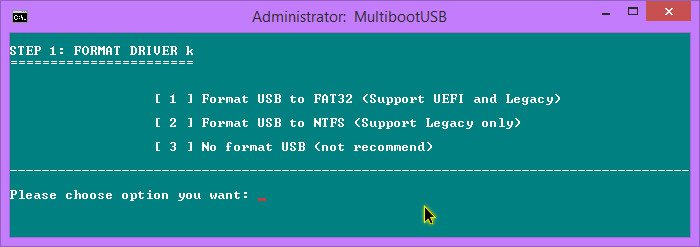
Select the Format for USB, because here we are creating usb running on both UEFI and LEGACY standards, so we will choose FAT32 format. Import 1 and press Enter.
You wait a moment for the program to re-format your USB, after it is finished it will be notified Press any to next step. You press Enter to continue.

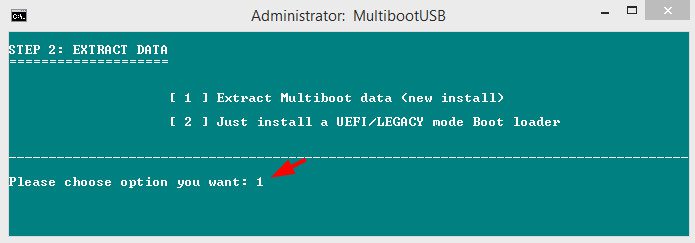
Next up we are Extract Data to usb. Please press 1 let the program begin extracting.
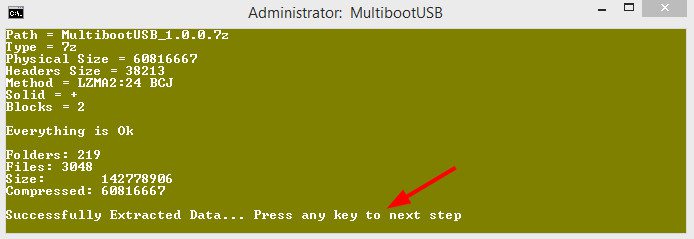
The decompression process begins, you wait a moment until it shows a line Press any to next step then press Enter to continue.
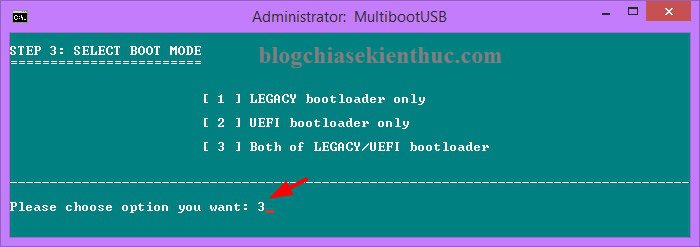
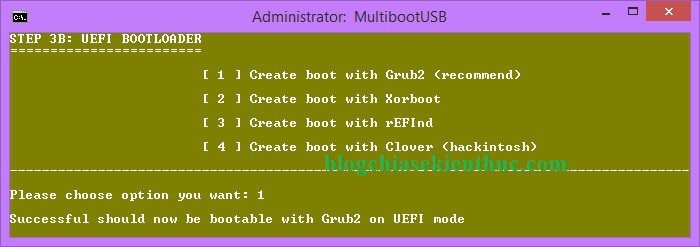
Select boot type: To boot on both standards, you enter the option 3 and press Enter.
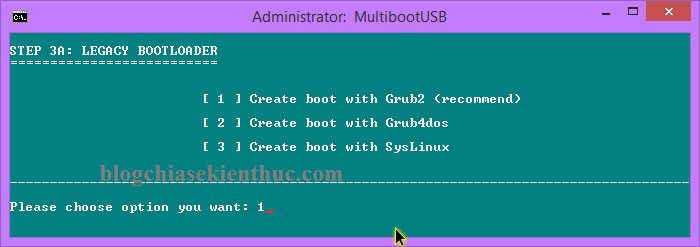
Select boot type on standard Legacy: Enter 1 and press Enter to create
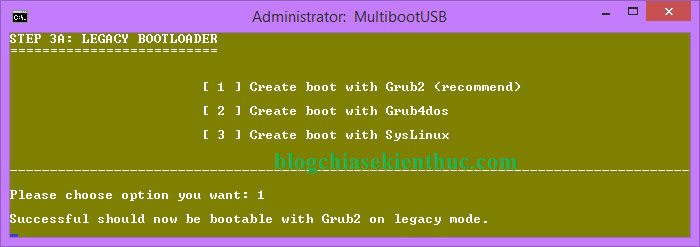
The line “Successful should now be bootable with Grub2 on legacy mode ” you press Enter to perform.
Continue to create boot on UEFI standard: You enter 1 and press Enter to perform.
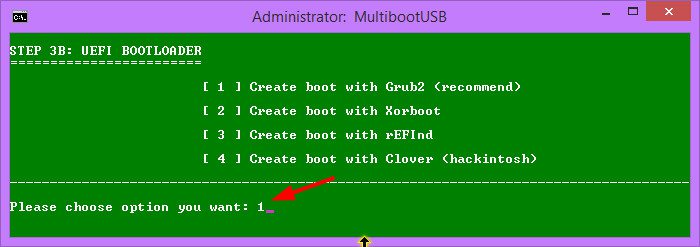
Continue to import 1 and press Enter: The line “Successful should now be bootable with Grub2 on UEFI mode ” => you press Enter to complete.
That’s it, in general it’s easy, but I still took pictures for you to more easily imagine.
BECAUSE. Test USB Multiboot to see if it works?
Now your USB is bootable on both UEFI and LEGACY standards.
But to be sure, you should perform the USB boot test before proceeding to the last steps.
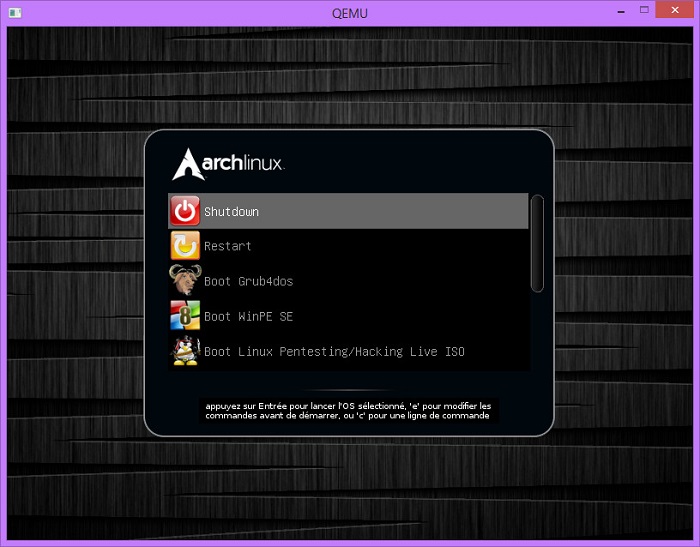
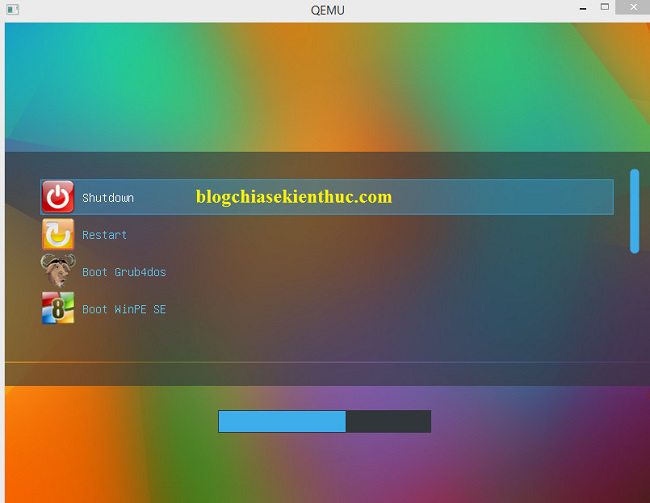
Okey! So it was successful. Basically the boot menu will look like the image below.
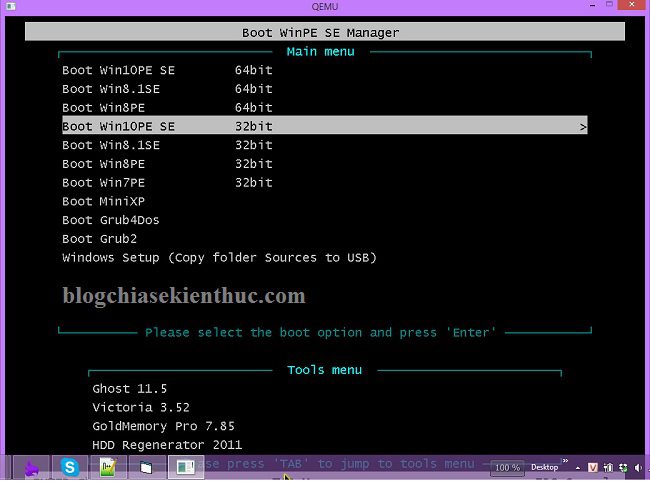
Select Next Boot WinPE SE will have an interface like this. A function menu list is waiting, and of course you have to download the necessary files into the respective directory before you can run it.
VII. Download Module integrated into Multibooot
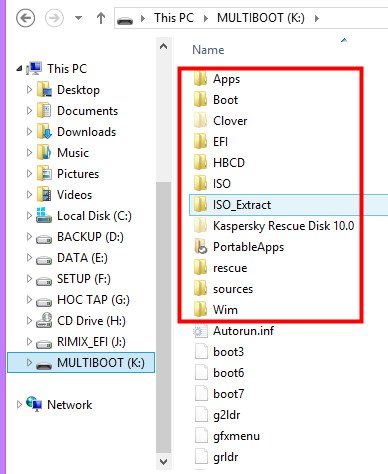
You open the Multiboot USB that you just created, there will be folders like this:
In these folders there will be a tutorial file named readme.txt. Please open this file to see instructions.
Note: You should only download what you use often, for example for an average user, just care about Win8PE or Win10PE and the Apps cho WinPE Well, you can also integrate some antiviruses.
VIII. Change Theme for USB Multiboot
There is an author’s guide in the usb multiboot that you just created, but many of you may not notice so I will public it out here. To change the theme, do the following:
Navigate to the file main.cfg follow the link /Boot/grub/main.cfg or type the filename as main.cfg on the Search bar of Explorer, navigate to Notepad ++ or any editor dòng số 52 là:
set theme = $ prefix / themes /
breeze/theme.txt
Rename “breeze” to the corresponding theme name below
——————————————————————————————————————
archlinux
ask-larry
Axiom
bluec4d
breeze
Eternity
FagiadaBue
gentoo
Grau
huayra-limbo
journey
Oxygen
powerman
Steam
StylishDark
ubuntu-lucid
You can see the detailed background image here.
——————————————————————————————————————
IX. Epilogue
Okey! It’s very simple like that, everything is already set by the author, so there is no difficulty in creating at all.
Actually this is one way create USB Multiboot quite good and very worth the experience.
Once again I would like to thank the author niemtin007 has created such a great product for the community ?
Hope this article will be useful to you, wish you success!
Author: niemtin007
The post has been edited in the style of the blog!
Note: Was this article helpful to you? Don’t forget to rate, like and share with your friends and relatives!
Source: LEGACY]Create professional USB Multiboot with 1 click
– TechtipsnReview


