![[UEFI-LEGACY] Create HDD BOOT fast and extremely professional!](https://techtipsnreview.com/wp-content/uploads/2020/12/UEFI-LEGACY-Create-HDD-BOOT-fast-and-extremely-professional.jpg)
NOTE: Welcome to the Knowledge Sharing Blog! If you encounter any errors during use, such as error in download link, slow loading blog, or unable to access a certain page on the blog … please notify me. via Contact page. Thanks!
There is an article that techtipsnreview has instructed you how to create bootable for a portable hard drive, but in that article, it only works on standard computers as LAGACY.
So how to create a HDD BOOT Dual Boot, ie support for both UEFI and Lagacy standards? The answer will lie in this article…. Interesting yet ?
Note: This is a tutorial by a reader to make and submit tutorials for me, I have tested it successfully so you can rest assured that you can follow step by step for 100% success!
To the main point, before you start, you need to prepare yourself some of the following tools and software in advance to ensure the most delicious tutorial.
#first. What needs to be prepared?
#2. Guide to create bootable for portable hard drive (HDD BOOT)
Note: I tested on a portable hard drive and there was no data loss, but some of you who followed it lost all data.
Therefore, it is best to copy all important data to your computer before doing it!
[UPDATE] More posts: [UEFI/LEGACY] Create versatile HDD BOOT, no data loss
In addition, now there are many professional tools to support creating HDD Box.
Therefore, if your removable hard drive has data and cannot be applied according to the way in this article, please refer to the Multiboot version in this tutorial, the way it is completely similar to USB. .
+ Step 1: Divide the boot partition for the removable hard drive
Now create a partition about 5> 10GB to store boot files.
Because we create dual boot UEFI – LAGACY, you must leave this partition in FAT32 format.
Implementation: Open the software RMPrepUSB and set up like in the picture below.
- Partition Size (MiB): You enter the amount of space you want to be the boot partition.
- Volume Lable: Enter the name of the boot partition.
- Check FAT32 and Boot as HDD (C: 2PTNS).
=> After the setup is complete, you click Prepare Drive.
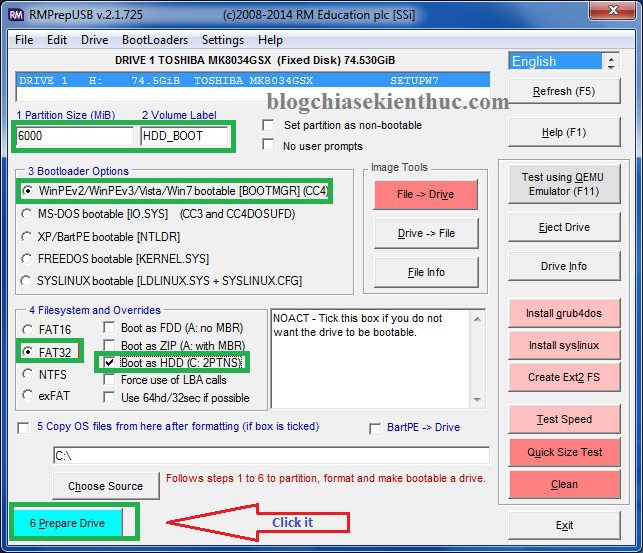
Now the partition you just created has been Set Active and then bootable.
Tips: If your portable hard drive has a large capacity (> 130GB) then it may not show up in the software interface RMPrepUSB. To solve this problem, press
Ctrl + ZPlease.
+ Step 2: Extract WIN_8_PE_64.ISO file to HDD
Next step you open the file WIN_8_PE_64.ISO with UltraISO software.
Now to extract the HDD, please click Actions => select Extract as shown below.
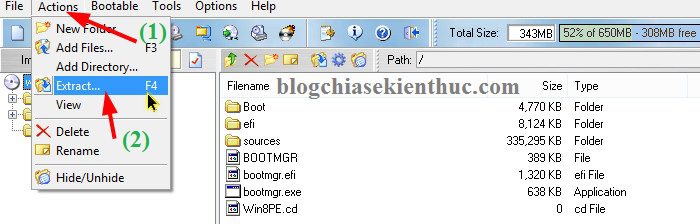
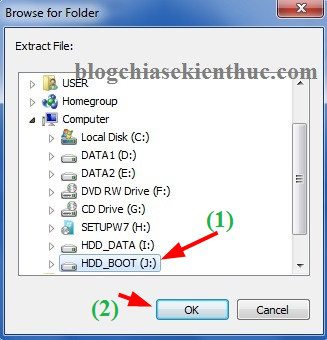
Continue to select the boot partition of HDD => and press OK to agree.
+ Step 3: Copy the folder Apps into the boot partition of the hard drive
Now unzip the file [Blogchiasekienthuc.com]Apps.rar out, we will get a folder named Apps. Please copy this directory to the boot partition of the removable hard drive.
Finish ! Now your HDD BOOT is bootable on both UEFI and Lagacy standards.
For UEFI standard computers, the computer will automatically boot straight into Win 8 PêE.
Once you are in WinêE, you can do whatever you want, with a very complete set of tools for the rescue of your computer.
In addition, to have more useful software running on Win Pi platform, please click here to download.
Read more articles:
# 3. Epilogue
Okey! It’s too simple, isn’t it? So with only 3 steps, you have successfully created one HDD BOOT to rescue the computer already.
On the blog there are many other tutorials on how to create a bootable usb or other for you, choose for yourself one that suits your needs.
If you are having difficulties or problems, please comment below. I will support as soon as possible and do not forget to like and share the article if it is useful!
Kien Nguyen – techtipsnreview
Note: Was this article helpful to you? Don’t forget to rate, like and share with your friends and relatives!
Source: [UEFI-LEGACY] Create HDD BOOT fast and extremely professional!
– TechtipsnReview


