![[UEFI-LEGACY] USB BOOT rescue Mr. Hoang Kiem's computer](https://techtipsnreview.com/wp-content/uploads/2020/12/UEFI-LEGACY-USB-BOOT-rescue-Mr-Hoang-Kiems-computer.jpg)
NOTE: Welcome to the Knowledge Sharing Blog! If you encounter any errors during use, such as error in download link, slow loading blog, or unable to access a certain page on the blog … please notify me. via Contact page. Thanks!
In this article, I will introduce and share with you another great computer rescue toolkit of the author Hoang Kiem – a person with a lot of computer experience. I also use his products very often, and the good news for KTV is that recently, the author Hoang Khiem has built another extremely professional and effective computer rescue toolkit that is HKBoot. . I have just finished testing and are very satisfied with this toolkit so I want to share it with you.
An introduction to HKBoot series by author Hoang Kiem
Just like other Win PèE suites that I introduced to you before, this WinêE set is also very complete for you to rescue your computer from basic to advanced.
Specifically, you will later demo for you some pictures of her. Basically, after successfully creating this bootable usb, you can boot and rescue your computer on both UEFI and LEGACY standards.
Not only that, you can also surf the web, watch movies…. right in the Win Pi environment.
What should be prepared before creating usb boot?
- A USB 2 GB or more.
- Ultraiso software – if you do not have it, you can download it here => then install it on your computer.
- The tools needed (click Like to unlock the link, guys)
Note: The tool may be updated and updated more to fix the error, so please bookmark it for easy tracking. If you are using HKboot 2016, please see the instructions here Please.
Update: Win PêE rescue kit has just been updated with a new update day May 7, 2017. You can download it to experience it ?
Instructions on how to use HKBoot 2017
Note: The process of creating USB BOOT using HKBoot is very simple like the tools that I introduced earlier. And there is one more note that when downloading the 1_Click file and using it, some anti-virus software will mistakenly identify it as a virus and may delete the file immediately. Please turn off the antivirus before proceeding.
Method 1: Use the 1-click tool of author Hoang Controller
Note: Please put the file 1 click and the * .ISO file of the author into the same folder.
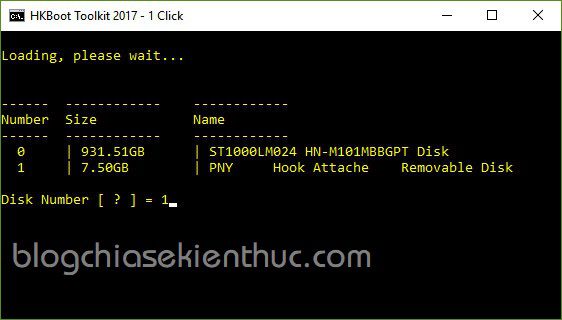
+ Step 1: Download Tool 1 click of Mr. Hoang Controller. (The download link is in the preparation section above) => right-click on the downloaded file and select Run as administrator to run as administrator.
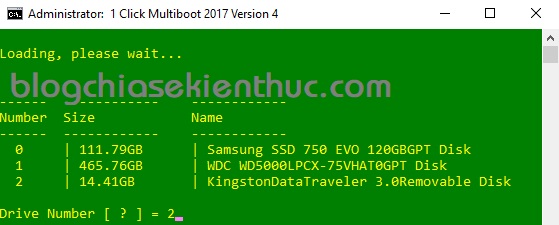
+ Step 2: A window appears, where it will list all the devices that are currently connected to the computer. You choose the usb device that you want to boot. Here I choose the example 1 and press Enter.
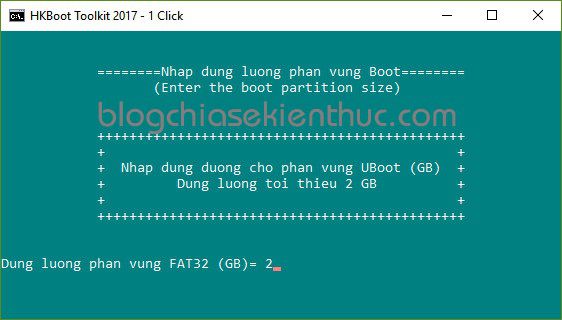
+ Step 3: Tool 1 Click this will divide your USB into 2 partitions, 1 hidden partition formatted with FAT32 format, containing the necessary tools and boot files. The partition is also formatted with NTFS format to hold your data.
Please enter a minimum of 2 GB for the hidden partition. If your USB flash drive has a large amount of space, a little more is fine. Here I will enter 2 and press Enter.
That’s it then there, the rest is to wait. File copying is in progress.
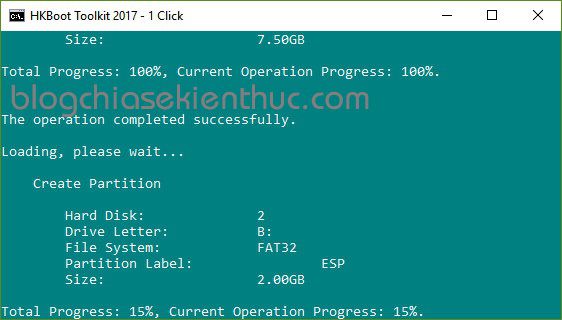
You wait until finished to have 1 USB BOOT with both UEFI and LEGACY standards.
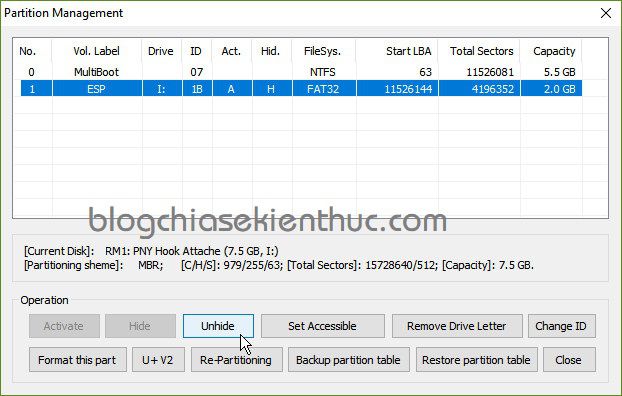
+ Step 4: If you want to show the hidden partition to copy more rescue tools there, do the following. Use BOOTICE (Download link is available in the preparation section.)
=> Select your USB => then click Parts Manage.
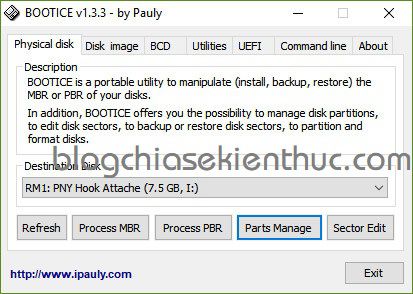
The hidden partition is the partition ESP, to display this file, you just need to select Unhide is done. On the contrary, if you want to hide it as at first, click Hide.
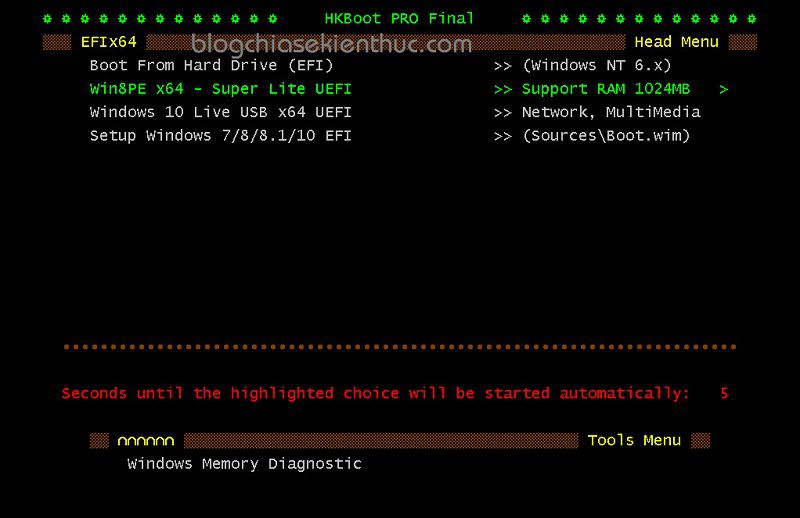
+ Step 5: Test USB BOOT to see if it was successful ?
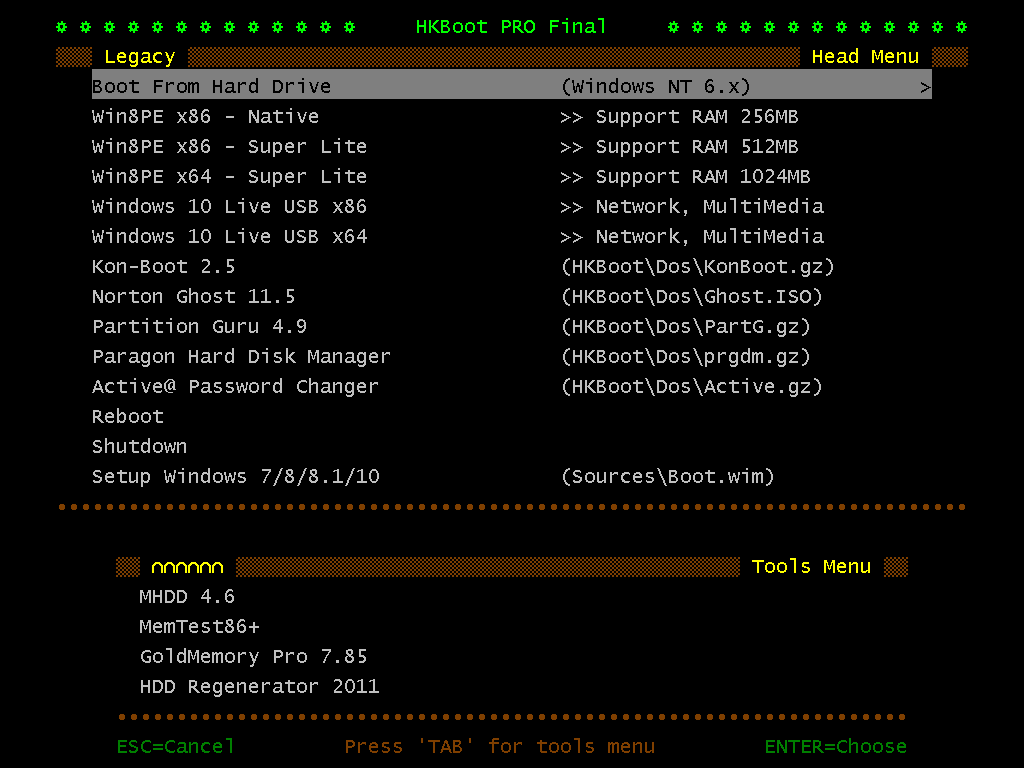
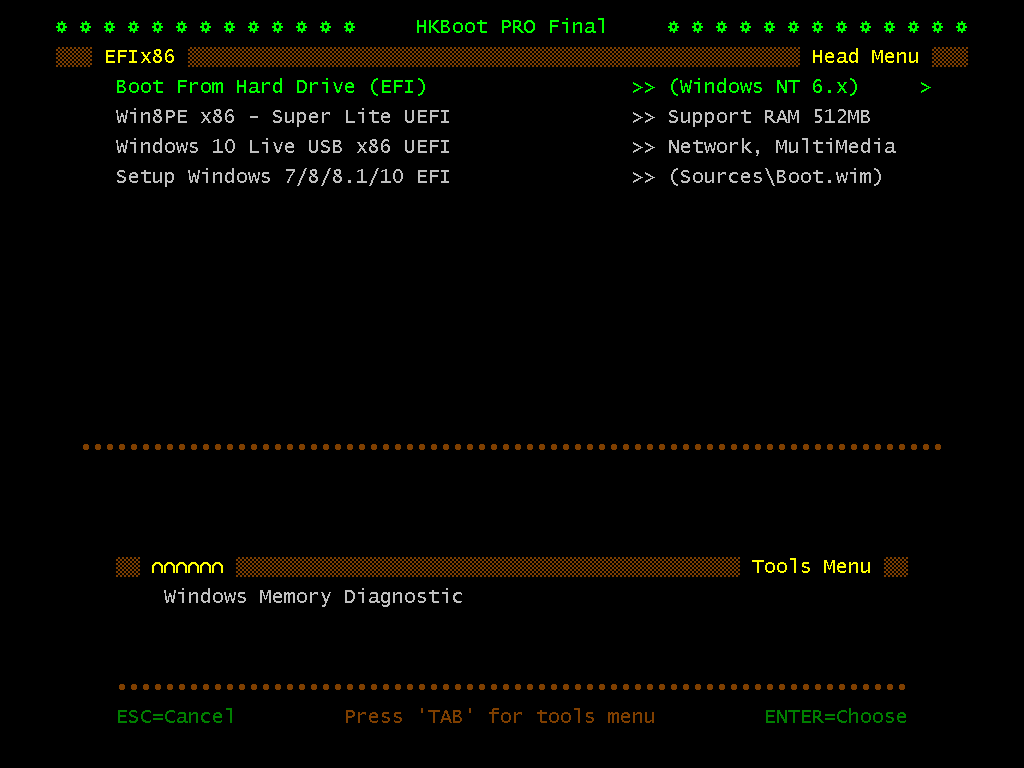
This is the Boot Menu in UEFI standard.
And this is the Boot Menu in Legacy standard.
Done! Done that guys.
____________Or___________
Or to make it simpler, you can use your package file LeHa, this file is packaged as a run file * .exe, supports creating boot for both USB and HDD. After creating the boot, your USB / HDD will also be divided into 2 partitions, 1 FAT32 partition containing MultiBoot and 1 partition using NTFS for you to contain DATA (your data). For HDD Box, it will create a new partition and completely not lose data already in your HDD Box.
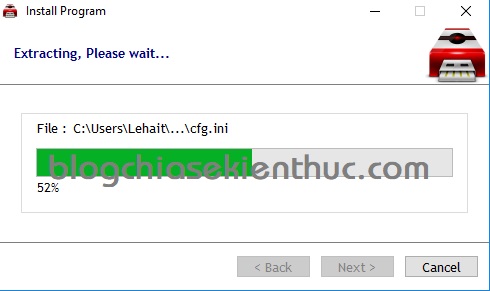
Yes, after the download is complete, you just need to run the * .exe file and wait a while for the program to unzip.
Note: Before running the file, please turn off the anti-virus software present in the computer first, because it may identify this one-click tool as a virus and of course the boot creation process will fail.
Now a dialog box appears, choose USB or HDD Box that you want to create boot.
Note: If you want to create Multiboot for HDD Box, you still enter
Driver Numberas usual and there will be an extra step in the lineSet multiboot Partition size [GB] = tối thiểu 2 GbPlease.
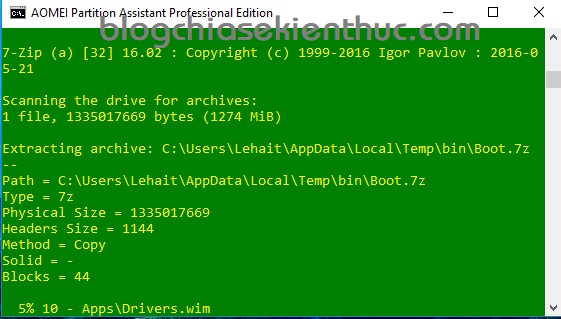
Okey, then wait for the file decompression to finish. You already have a perfect USB / HDD Multiboot ?
Tips: Guide to fix files Mount PETools
Yes ! During the process of using this WinPE, you may get an error as shown below. Error when entering WinPE it does not automatically Mount the application package.
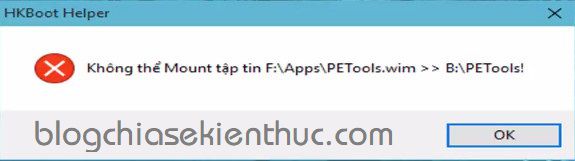
To fix this error is also very simple, but you need to remember so that if you accidentally get it, you know how to fix it.
Click on the icon Pecmd => UnRamDisk and Delete VHD.
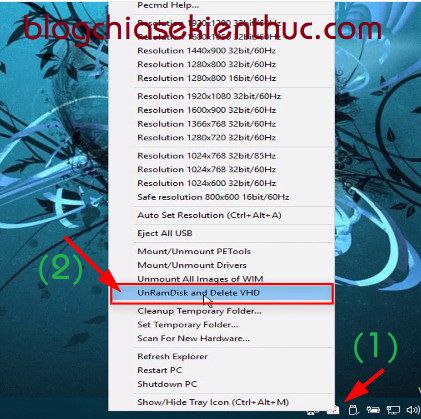
Press Yes to agree.

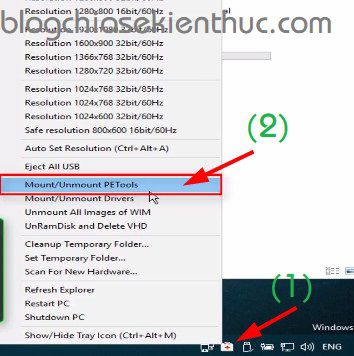
Then click Mount/Unmount PETools
So that’s it then.
Read more:
Method 2: Use UltraISO to create USB BOOT
Note: Format before with FAT32 format.
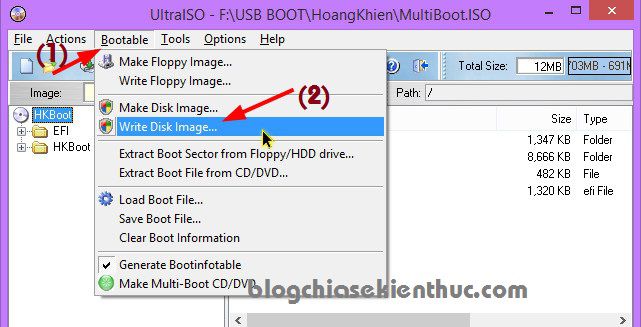
+ Step 1: Open the file HKBoot_2016_Update_1.ISO by UltraISO => Then click Bootable => select Write Disk Image....
+ Step 2:
- At the Disk Drive: You choose your USB.
- Write Method: You choose to be
USB-HDD+ - Then click
Writeto start recording to USB
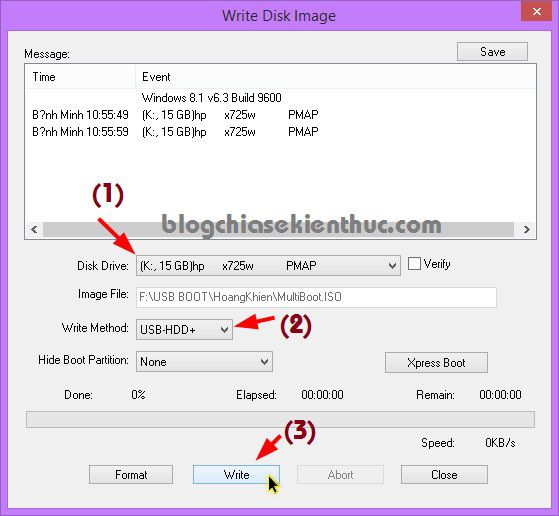
A message appears, click Yes to agree to USB Format.

+ Step 3: OK, guys, now it can be used. The USB BOOT is ready for rescue ?
Method 3: Use Rufus software to create Boot capability
The Rufus software is compact and extremely efficient. It is very useful for those inexperienced by simple way. In the last post, I have instructed you to create a bootable usb with Rufus in great detail, and in this article I will guide you to create a bootable usb with Rufus software.
+ Step 1: Guys come in to download Rufus software (You should choose the Rufus Portable version to not have to install).
+ Step 2: Download the package file with a single link (already integrated the necessary tools of the author Hoang Controller – Link at the beginning of the article)
+ Step 3: Plug the USB into the computer.
+ Step 4: Right-click on the downloaded Rufus file => select Rus as administrator to run as administrator, then set up as shown below.
- You choose to be ” Arrange MBR partition for BIOS or UEFI “
- The file system you let format is
FAT32 - Name the USB BOOT.
- Click the disc tray icon and choose the path to the * .ISO file that you downloaded in
bước 2Italy. - Then click
Startto start writing to USB.
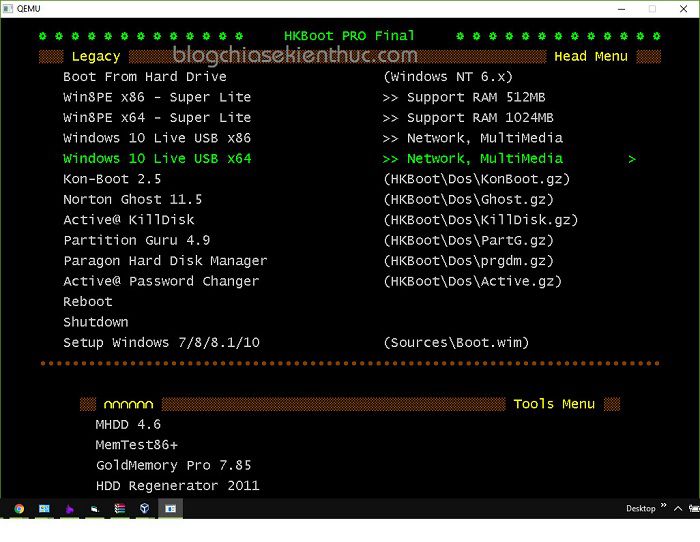
A few pictures about after creating the usb boot with HKBoot
And this is the main interface of Win Pi 10

Epilogue
So I gave you very detailed instructions on how create a USB BOOT from Hoang Kiem’s computer rescue toolkit already. If you have difficulties or problems, please comment below to solve them.
Hope this article will be useful to you, wish you success!
Kien Nguyen – techtipsnreview
Note: Was this article helpful to you? Don’t forget to rate, like and share with your friends and relatives!
Source: [UEFI-LEGACY] USB BOOT rescue Mr. Hoang Kiem’s computer
– TechtipsnReview


