
Normally, if you want to separate the background from your photos, you will often think of professional photo editing tools, such as Photoshop. However, in reality, if you are in need of separating the background from a simple photo, with a background that is not too complicated or with too many details to edit – you can completely use the familiar office application. Excel.
First, open the Excel app and insert a picture (Insert> Picture) you want to separate the wallpaper.

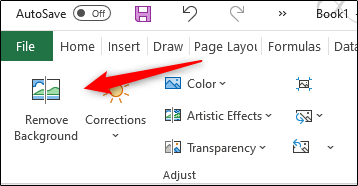
As soon as the picture has been inserted in the worksheet, you will automatically be taken to the tab “Picture Format“. Here, click on the option “Remove Background“, Can be found in the option group”Adjust“.
After you click “Remove Background”, Excel will automatically recognize the background of the image and highlight it in magenta. Meanwhile, the main details of the photo will not be affected and will remain intact. In short, the part of the image marked in magenta is the background, and the area will be erased.

Overall, Microsoft Excel’s ability to accurately highlight areas of the background that you want to remove from an image is pretty good, but it’s not always 100% accurate. In most cases, you’ll need to do some small, simple manual editing.
To highlight the areas that you want to delete on the image (but not marked by Excel by default), click the option “Mark Areas to Remove“. This option is in the group “Refine“Tab”Picture Format“. For areas highlighted by Excel but you want to keep, click “Mark Areas to Keep“.

In either case, your cursor will automatically be changed to a pencil. Just click and drag your cursor around the areas you want to delete.

Similarly, click and drag the cursor around the locations you want to keep.

Next, click anywhere outside of the image to apply the changes.

Accomplished! The background of the image is now removed.
Source link: How to separate a background from a picture in Excel
– https://techtipsnreview.com/


