
Safe browsing is what all of us want to aim for, especially at a time when the Internet is full of bad guys, full of fraudulent property appropriation, cyber attacks …
Solutions that are often selected to help users browse more safely can include Fake IP, use VPN services, or install Internet Security software for example.
However, many of you may not know that on our Windows 10 operating system already has a feature that makes browsing more secure and secure, it is called DNS over HTTPS.
And in this article I will guide you in detail How to enable DNS over HTTPS for all apps on Windows 10!

#first. What is DNS Over HTTPS?
DNS over HTTPS (DoH) is a new feature in Windows 10 that allows the DNS system to establish a connection through a secure protocol. HTTPS, instead of plain-text DNS.
Internet service providers (ISPs) will often tend to block your connection to websites based on DNS traffic monitoring.
But with DNS over HTTPS, you can bypass these barriers, increase the security of your connection and improve your privacy when using the Internet.
For example, when you’re using a public network, like Wifi, enabling DNS over HTTPS will prevent other people on the same network from seeing the web pages you visit.
Besides, this is also an effective method to combat phishing, proofing, …

In fact, in the web browsers that we still use often have a DoH feature already, but you have to activate it yourself.
So the job Enable DNS Over HTTPS on Windows 10 will force all existing apps to use this feature.
By default, DoH is only available on Windows Insider, but this move indicates that DoH will soon launch on official Windows versions such as Pro, Enterprise, Education, …
So if you want to use DoH requires you to be using Windows Insider Build 19628 or higher, you can open the Run dialog (Windows + R) up => then type the command winver To test.
NEW UPDATE: Currently, on Windows 10 version 2004 that has this feature updated, you do not need to install Windows Insider anymore.

Yes, once you meet the above conditions, you can now try the DNS over HTTPS feature on Windows 10.
#2. How to enable DNS Over HTTPS on Windows 10
To enable this feature, we will need to make some modifications to the system’s Registry, so make sure to back up the entire Registry in case you make a mistake.
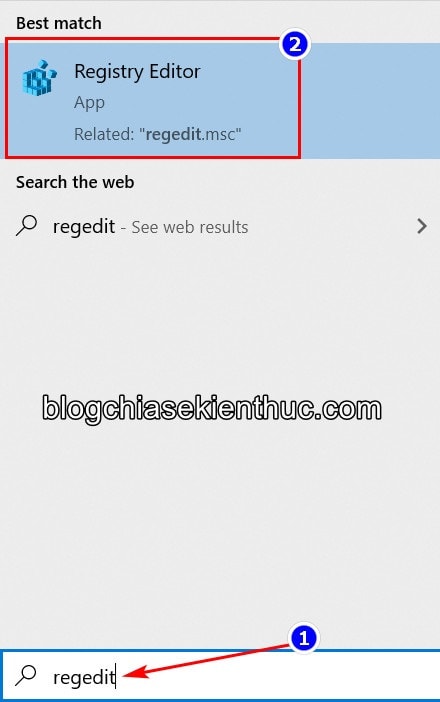
+ Step 1: At first, open the Run dialog box (Windows + R) => enter the command regedit => and press Enter to access the familiar Registry Editor tool.
NOTE: You can also search with keywords registry editor in Windows Search (Windows + S), or run the command directly regedit in the Taskbar search box to open the tool again.
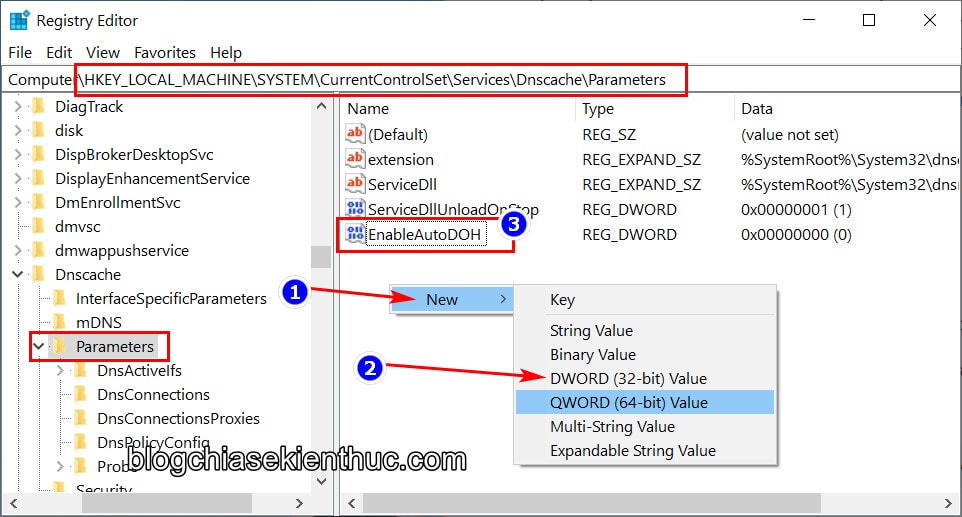
+ Step 2: Access to the directory Parameters Follow the path below, you can directly paste this path into the Registry Editor’s address bar for faster access:
HKEY_LOCAL_MACHINE SYSTEM CurrentControlSet Services Dnscache Parameters
See also: Tips to quickly open any path in the Registry – 1 Click
+ Step 3: In this folder, there will be 3 keys available by default as shown below, if not, you do not need to care, because we will not use them.
Now right click on the cell showing the values on the right and select New => DWORD (32-bit) Value to create a new key.
Name this key EnableAutoDOHIf you do not have a name or give it wrong, you can right click on it => then select Rename to fix it.
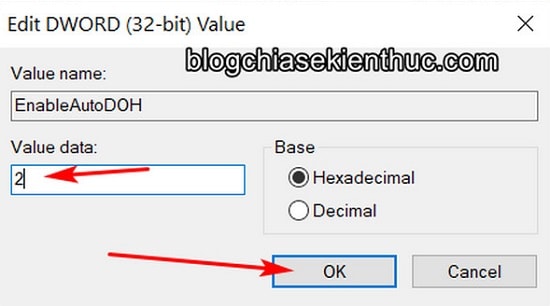
+ Step 4: Double-click on the lock EnableAutoDOH Just created to edit its value, please edit the value in the cell Value data from 0 Fort 2 to enable DNS over HTTPS on Windows 10.
The rest remain => then press OK to save => Now restart your computer for these changes to take effect.
+ Step 5: Then, you open up the old Control Panel by searching with keywords Control panel in Windows Search (Windows + S), or you can open the dialog box Run (Windows + R) => enter the command control => and press Enter.
Besides, You can also refer to how to add Control Panel to Windows + X menu to open faster here.
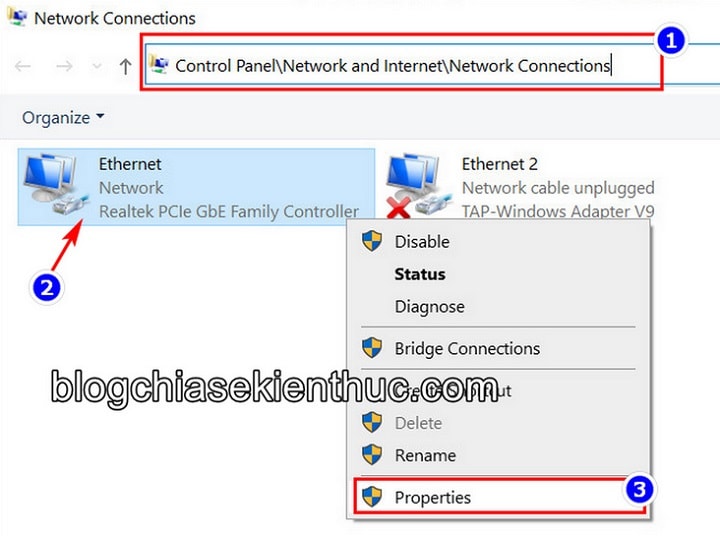
Window Control Panel appears, please paste this path in the address bar as shown => then Enter for quick access to the settings Adapter Windows 10 network.
Control Panel Network and Internet Network Connections
//*read more*//
Also, there’s a very quick way to access Network Connections that is: Open the Run dialog box (Windows + R) => enter the command ncpl.cpl => and press Enter is done.
This is a command I use very often, and I recommend that you remember as well. Because in the process of using the computer we will really need it.
// * end of further reading * //
=> Then, right click on the network adapter you are using => and select Properties to establish.
The way to determine the Adapter is also very simple, whichever you are using it will appear first in the list, using Wifi has the icon of Wifi, while using the wired network will have the icon as shown below.
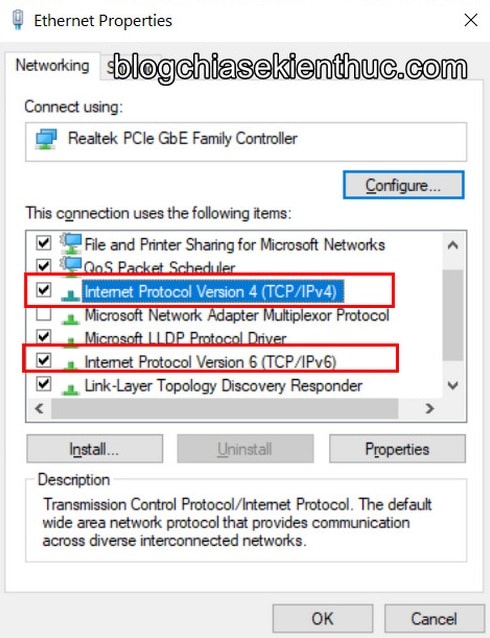
+ Step 5: In the window PropertiesScroll down, find and double-click on the line Internet Protocol Version 4 (TCP/IPv4) or Internet Protocol Version 6 (TCP/IPv6).
In section This connection uses following items or both if your computer uses both to go to the next step. Anything that has a check mark on the left means it’s being used.
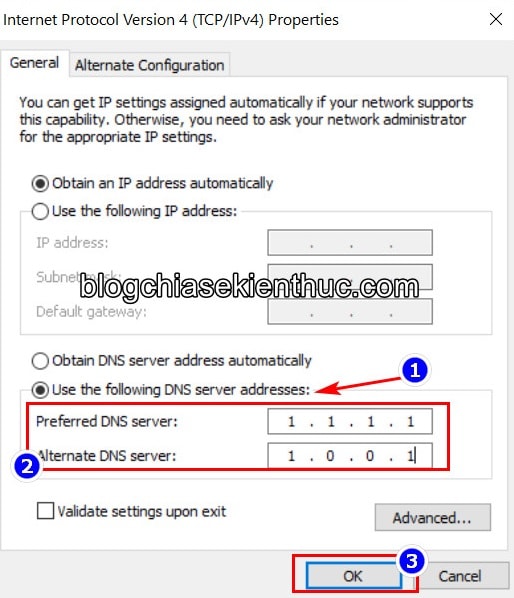
Here, please tick the line Use the following DNS server addresses => then enter the corresponding addresses of the free DNS services that support DNS over HTTPS yourself to be available below and OK to save it.
Do the same with IPv6 if needed. Many of you are not strange with this because many of you here use this way to access the page that has been banned from Pornhub football a few months ago =))
# 3. Update DNS list
– Cloudflare
- 1.1.1.1 (IPv4)
- 1.0.0.1 (IPv4)
- 2606: 4700: 4700 :: 1111 (IPv6)
- 2606: 4700: 4700 :: 1001 (IPv6)
- 8.8.8.8 (IPv4)
- 8.8.4.4 (IPv4)
- 2001: 4860: 4860 :: 8888 (IPv6)
- 2001: 4860: 4860 :: 8844 (IPv6)
– Quad9
- 9.9.9.9 (IPv4)
- 149.112.112.112 (IPv4)
- 2620: fe :: fe (IPv6)
- 2620: fe :: fe: 9 (IPv6)
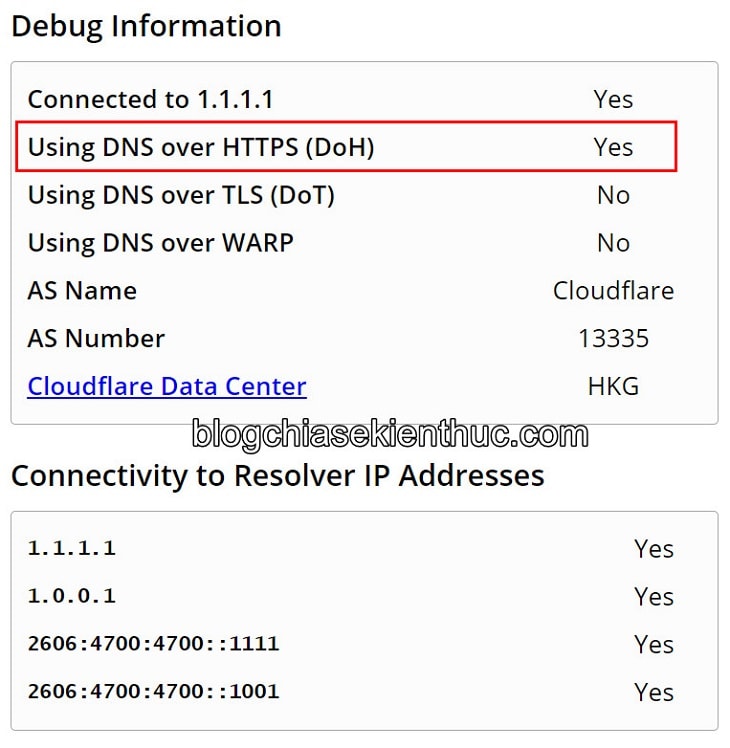
That’s it, you don’t need to reboot, go to the help page (https://1.1.1.1/help) of Cloudflare DNS 1.1.1.1 to check if DNS over HTTPS is working. .
There is a lot of information, but you don’t need to mind, check your status Using DNS over HTTPS, if Yes congratulations successfully enabled DNS Over HTTPS on Windows 10 and now you can browse the web safely.
If so No Please double-check all the steps and start over if necessary!
# 4. Epilogue
So I have just finished showing you how Enable DNS over HTTPS on Windows 10 to browse safely.
This is a very useful feature that helps protect you in the Internet environment against the attacks of bad guys.
If you want to turn off this feature, just re-enter the Registry and delete the key EnableAutoDOH Go is okay. Hope this article will be of help to you. Good luck !
CTV: Nguyen Thanh Tung – techtipsnreview
Note: Was this article helpful to you? Don’t forget to rate, like and share with your friends and relatives!
Source: Enable DNS over HTTPS for apps on Windows 10
– TechtipsnReview


