
The game industry has been growing extremely strongly in the past decade or so, the plot has been focused more on building, the game graphics are more and more realistic, sharper and more realistic …
This has erased the real-virtual boundary, when we experience it, we feel like we are watching a Hollywood blockbuster, not playing a game anymore.
The upgraded game graphics are a good thing, but to play these games, the computer configuration must be strong, but one of the components that decides whether to play the game or not is the card. graphics (also known as GPU, VGA).
However, in some cases, although the processor in the graphics card is more than enough to pull the game you are playing, VRAM is not enough to make the game lag, unable to play.
So what are the VRAM parameters that have such a big impact on the performance of such a machine? Is there a way to increase the amount of VRAM of the graphics card?
Yes ! All of the above questions will be answered in detail in the article right below, you are invited to join us!

I. What is VRAM on the graphics card?
Just like the computer’s RAM, VRAM on the graphics card is a clipboard – used to store the data the graphics card is working on and display it on the screen for you to see.
If in a certain period of time that VGA has to process too many effects, objects and images, while its VRAM is not enough to store it all, then of course the lag will happen. If this happens, the object in the game won’t load in time – it looks annoying.
VRAM capacity has also increased gradually with the development of technology, if previously only a few megabytes, it is now up to tens of GB, typically NVIDIA’s Geforce RTX 3090 VGA. 24GB GDDR6X VRAM and its selling price is of course very expensive 🙂
You will hear more about this information on the discrete graphics card than the onboard card, because the onboard graphics card will take a portion of RAM to make VRAM so the capacity is not much.
The way to check the VRAM capacity of the graphics card is very simple, if it is a discrete card, you just ask Mr.Google with the syntax tên card Or you can too tìm trên vỏ hộp, or the manufacturer’s product website to see only.
If you are a “young” who does not know much about technology, just have access to computers, just follow the steps I instructed below, with detailed explanations!
II. How to view the amount of VRAM on the graphics card
+ Step 1: First, right click on the desktop => select Display Settings.
Or You can press key combinations Windows + I to open Windows Settings => then access System => Display to open the settings displayed on Windows 10.
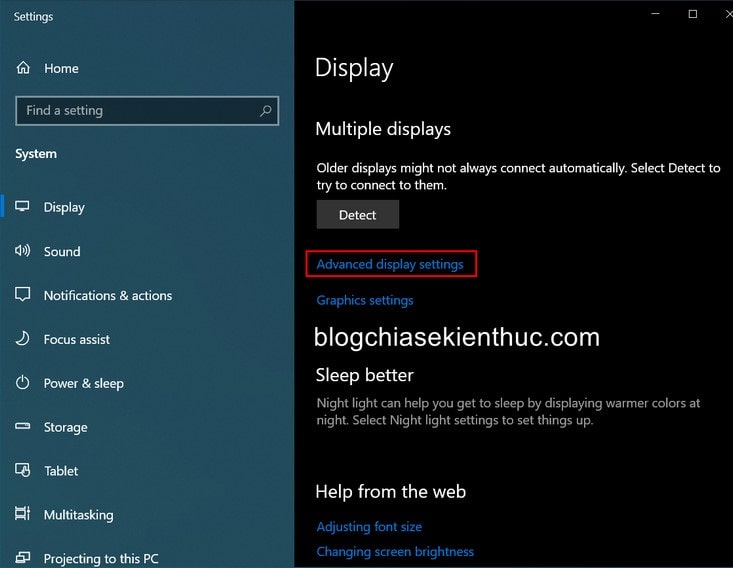
+ Step 2: In this window, scroll down to the item Multiple Displays and click on the line Advanced display settings to access more advanced settings.
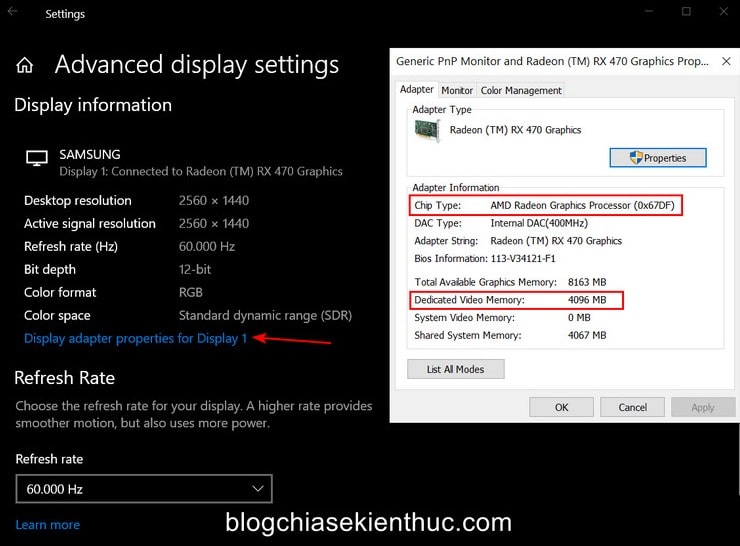
+ Step 3: Next, please click on Display adapter properties for Display 1 to view detailed information of the graphics card.
If your computer has multiple cards then you need to make sure that what you want to check is being used to output the image to the screen.
In the window Properties Hey, line Dedicated Video Memory indicates the amount of VRAM your graphics card currently has, your VGA is 4GB exactly like the NSX equipped.
Besides that, the line Chip Type will also indicate that you are using your discrete graphics card AMD (AMD Radeon Graphics Processor) good NVIDIA (Geforce GTX/RTX).
If the case is your discrete graphics card, you will have no way to increase the amount of VRAM other than buying a new higher-end card.
Also if the line Chip Type Write is Intel HD Graphics good AMD APU (AMD Accelerated Processing Unit) then that means your machine is using onboard card and can apply this trick to increase VRAM capacity, slightly improve graphics processing performance.
In addition, the Admin has also had a detailed tutorial on the concept as well as how to identify and distinguish the discrete graphics card and the onboard card, you can read it again to understand better.
#first. Increase graphics card VRAM in BIOS / UEFI settings
Because the graphics card’s VRAM is taken from the system’s RAM, so you can completely go to the BIOS to adjust it according to your wishes, and this is also one of the reasons why Windows does not receive enough RAM as normal. .
Most of the PC motherboards will support this feature, and the Laptop is very lucky, guys. So for more details, you can go online to learn about your laptop, and my laptop won’t fix this so I can’t guide 🙁
Perform:
+ Step 1: To do this, please restart the computer => and then use the corresponding keyboard shortcuts of each company to access the BIOS, if you do not know how, you can see the instructions (link attached to your home). .
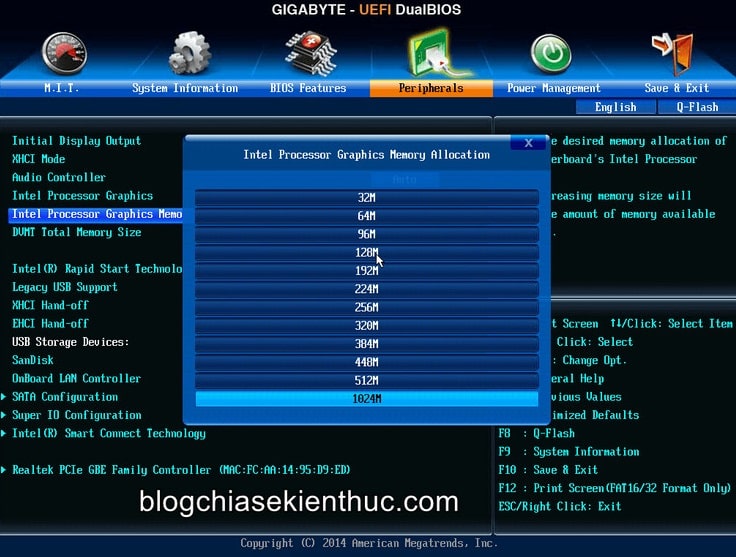
+ Step 2: Then go to the settings section Chipset Mainboard with names like:
Advanced, Advanced Features, Advanced Chipset Features, Advanced Chipset Setups, … with its main Gigabytes are usually located in the section Peripherals / Chipset as shown above.
+ Step 3: Next, you need to find the VRAM capacity setting, it is usually named Internal Graphics Memory Size, Framebuffer Size, DVMT Pre-Allocated, Share Memory Size.
Once you have found this setting, the rest is to reinstall the amount of VRAM you want, but it also has a certain limit to avoid installing too much VRAM making the system lack RAM.
For example if the machine you have 2GB RAM, the maximum amount of VRAM will be 256MB, 4GB then you let be 512MB, or 8GB you let be 1024MB and keep increasing like that.

#2. Increase VRAM for your graphics card with Registry Editor
If you cannot find the above settings, or your BIOS / UEFI doesn’t support changing the size of VRAM, don’t worry – we can also use Registry Editor to do this.
And because you have to edit in the system’s Registry, you should back up the entire Registry first, so that in case you accidentally make a mistake, you can restore it.
+ Step 1: First, access Registry Editor by opening the dialog box RUN (Windows + R) => and then enter the command regedit window => and then press the key Enter.
You can use the search box on the Taskbar or any way you want, as long as you find it most convenient.

+ Step 2: Then, access the Registry path below by pasting it in the Registry Editor’s address bar.
HKEY_LOCAL_MACHINE Software Intel
Note that if you use the onboard graphics card AMD then correct Intel in the city path AMD is fine.
HKEY_LOCAL_MACHINE Software AMD
NOTE: You can also access the path above in the Registry with just one click, for details see the Admin’s instructions.
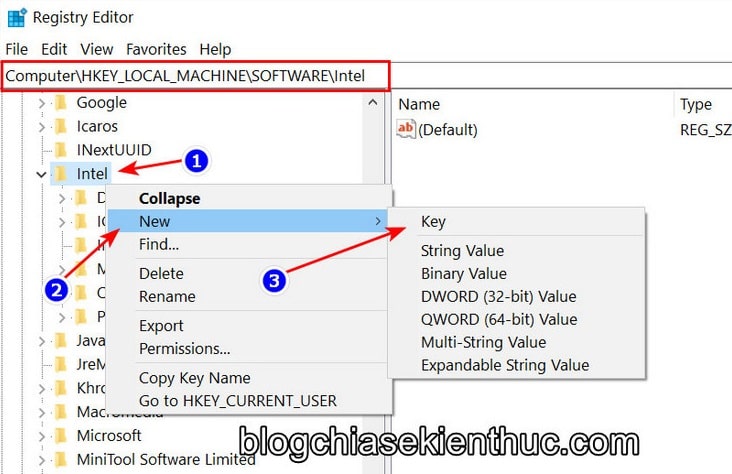
+ Step 3: Next, you right-click on the folder Intel (or AMD) that you have just accessed => and select New => Key to generate a new key.
Please name this new key
GMM, if there is an incorrect name, right click on the key => andRenameIf you are correct, you can move on to the next step.
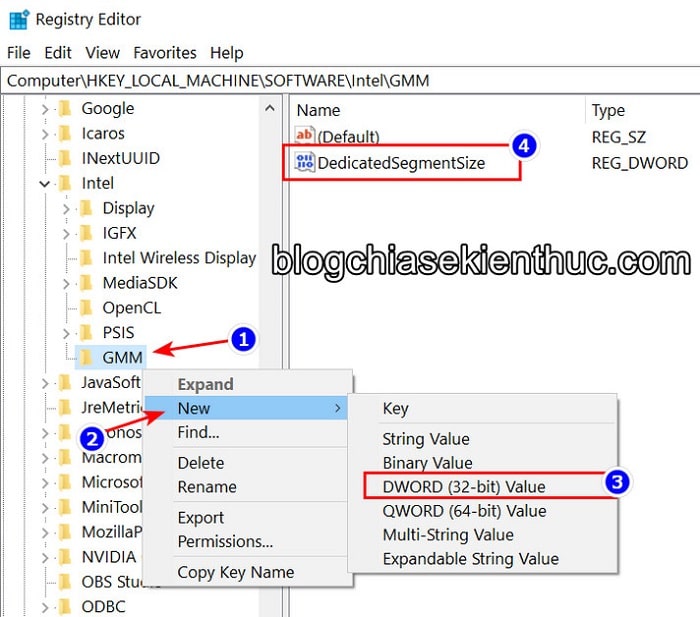
Continue, right-click on the folder GMM just created select New => DWORD (32-bit) Value to generate the key specifying how much VRAM you want for the Onboard graphics card.
Please name this new key DedicatedSegmentSizeOnce created, you double-click on this key to edit its value.
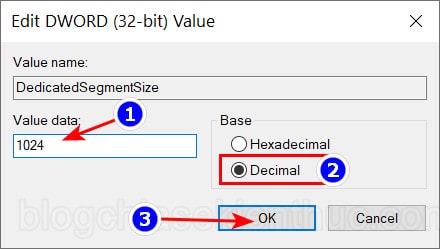
+ Step 4: Window Properties appears, first convert the word data type Hexadecimal Fort Decimal => then enter the amount of VRAM you want in the box Value Data.
The amount of VRAM here is still regulated as in the BIOS, ie 2GB RAM should only be maximized 256MB VRAM, 4GB max 512MB and I have 8GB RAM so I will let it be 1024MB guys.
Done press OK to save it, then exit the Registry and restart Windows 10 when possible for the changes to take effect.
If after restarting Windows, go to the section again Display adapter properties for Display 1 that found the line Dedicated Video Memory if displayed correctly with the value you just set in the Registry just now, congratulations.
… You have just improved your system’s graphics performance and you can play better games 🙂
III. Epilogue
So I have just finished guiding for you How to increase the amount of VRAM for the onboard graphics card on Windows 10 already.
This is one of the quite useful ways that you can apply to your computer to optimize and improve its gaming performance.
However, as I said above, it is also quite unlucky because there is a machine that can make it, and my Laptop is among the unlucky ones.
Hope this article will be useful for you. If you find this trick good, don’t forget to share it so that more people can know. Good luck !
CTV: Nguyen Thanh Tung – techtipsnreview
Note: Was this article helpful to you? Don’t forget to rate, like and share with your friends and relatives!
Source: How to increase VRAM for Onboard graphics card on Windows 10
– TechtipsnReview


