
If the file size of a JPG image is too large, you can shrink or reduce the JPG file size in Windows 10 without losing image quality. Here’s how to do it.
JPG – The popular image format in Windows
When it comes to image formats, JPG or JPEG is one of the most popular formats out there. In fact, almost every photo you take will be in JPG format. Not only photos but also other images you find from a variety of sources, such as the web, will also be in JPG format. Some of the reasons JPG has become so popular is that it has built-in lossy compression, the ability to display more than 16 million colors, supports higher resolutions and a smaller file size. with other options.
In general, the size of a JPG file is entirely dependent on the camera, its resolution, and the scene you’re trying to capture. The higher the resolution and the more complex the scene, the larger the size of the JPG file.
For most cases, this shouldn’t be an issue. However, if you are trying to back up photos or send them via email attachments, then large file sizes could be an issue. In those cases, you can compress the JPG file without losing its quality too much or resizing it. That way, you get 2 benefits at the same time, while reducing the file size while maintaining the same quality.
In this quick and simple Windows 10 tutorial, let Make tech easier Show you how to reduce the size of the JPG file without losing image quality in Windows 10!
Reduce the size of JPG files in Windows 10
To reduce the size of a JPG file without changing its size or quality, you must use specialized image compression software. The good news is that there are many free image compression software available for Windows that work just fine. In this particular case, we’ll use a free and lightweight tool called Cesium Image Compressor. The software itself is quite easy to use and has all the essential features you need.
1. First, download the Cesium Image Compressor from this website. If you want, you can download a portable version instead of the regular installer. In case you don’t know, the portable version lets you use the app without installing. If you downloaded the portable version, extract the folder in the zip file to your desktop.
2. Open the Cesium Image Compressor application with a shortcut on the desktop. If you downloaded the portable version, open the unzipped folder and double-click the file Caesium.exe.
3. Click Options File> Add pictures in the application window.

5. In the application window, set the image quality to 80 in Compression options. As a general rule of thumb, setting an image quality between 80% and 90% will provide a good balance between file size and image quality. In case you’re wondering, the lower the quality setting, the smaller the file size will be. Next, select the checkbox Same for all and choose JPG from the drop-down menu Format.
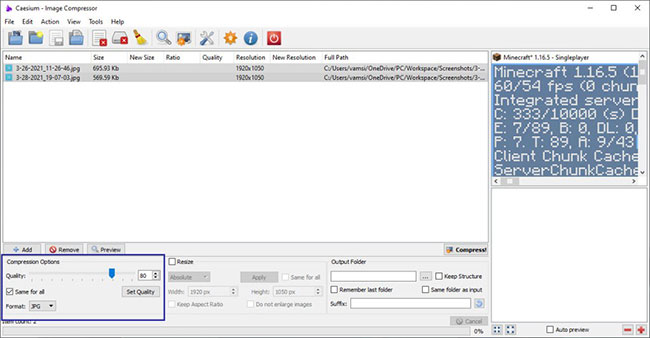
6. Select the check box Same folder as input in section Output. Then make sure “_Compressed” is added to the Suffix field in the same section. If you want to select some other output folder for saving the compressed JPG files, deselect “Same folder as input”, click the button Browse and choose the desired folder.

Finally, click the button Compress.
8. As soon as you click the button, the program will compress the image to reduce the JPG file size. Once done, you will see a warning message letting you know. The application displays the old and new file sizes in the main window. In our case, the size of the JPG file is reduced by 36%.

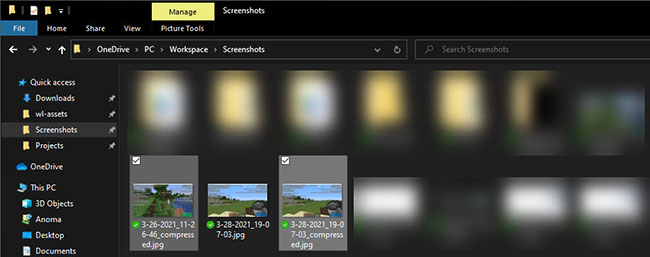
9. Since the output folder is the same as the input folder, you will find the compressed images along the source images. The compressed images will be available “_Compressed” at the end of their filename.
That’s all there is to it! It’s easy to reduce the JPG file size in Windows 10, right?
Hope you are succesful.
Source link: How to reduce the size of JPG files in Windows 10
– https://techtipsnreview.com/


