![[Woocommerce] How to use Action Hook and Filter Hook](https://techtipsnreview.com/wp-content/uploads/2022/09/Woocommerce-How-to-use-Action-Hook-and-Filter-Hook.jpg)
Before we dive into the settings in Woocommerce, let’s try out a few simple products first to get an idea of how it works. Although currently Woocommerce supports many different types of products, in this article I only mention simple products, at the same time we will test through the ordering function of Woocommerce and then in the following articles we Learn more about product formats.
I. Add products simply
I.1) Enter product information
To add a product, go to [textmarker color=”247BFF”]Products -> Add products[/textmarker].

Menu add products
Here it will be the same as the add post page, but it will have its own functions for adding a product.
The title and content part we will enter it as the product title and the detailed description of the product.
![[Woocommerce] Add a simple product 15](https://thachpham.com/wp-content/uploads/2022/08/banner2.92022-728x90-1.png "[Woocommerce] Add a simple product 16")
 Enter the title and detailed description of the product
Right below it is the Product datahere you choose is Simple product. Below that frame are the sections where you enter product information such as price, product code, inventory management, etc. Specifically, I will talk below.

Where to enter product information
- Shared: This section will enter the price information of the product.
- Standard price (Regular price): This is the item’s selling price for a product.
- Promotion price (Sales price): If you want to discount the product, enter the price after it has been reduced here.
- Inventory inventory: This section will set the number of products in stock and the status of goods in stock.
- Product code: If you want to manage products by code (SKU), enter the product code here.
- Warehouse Management?: You want to set the number of goods in stock, then tick.
- Warehouse status: The status of this product is in stock or out of stock. If you turn on the inventory feature, when the customer buys all the set quantities, it will return to the state of out of stock.
- Soild Individual (Sold separately): Check if you want customers to buy only 1 piece of this item in one order.
- Delivery: Set the weight, size of the product and the type of delivery.
- Weight: Enter the weight of the product, the unit will be set at [textmarker color=”247BFF”]Woocommerce -> Settings[/textmarker].
- Size: Enter the length, width and height of the product, the unit will be set at [textmarker color=”247BFF”]Woocommerce -> Settings[/textmarker].
- Delivery type: Choose the type of delivery, this I will talk more about in another post.
- Connected products: Connect products together so that buyers can easily find those products and suggest customers to buy more.
- Up-sells (Extra sale): Suggest customers buy a product instead of the current product they are viewing. For example, if you later have a better product than this product, you can add it to this section.
- Cross-sells (Cross-selling): Suggest customers to buy more while viewing the cart, for example, if you sell iPhone 6S, you should add products such as chargers, phone cases to the cross-sell section for them to buy more.
- The group: Select the product group to include. Product group means they buy in a group, not individually, this I will talk about separately in another section.
- Properties: Set product attributes such as color, size, etc., but I will talk more about it in another section.
- Advanced: Some extra settings for the product.
- Purcahse note (Payment Notes): Notes that you want to send to customers after making a purchase.
- Order menu: Priority order number of products in the cart, the smaller the number, the higher the priority.
- Allow rating: Checkmark if you want to let customers rate the product.
But For now, you should only set up the product in General only, the other parts we should leave as is and will be detailed in the following articles.

Continue to scroll down, you will see the section Short description of the product. This section lets you enter a short description, such as a short description of the product, as it will show up just below the product price in the product’s detail page.

I.2) Setting up a product list
Continue to look to the right hand side of the page to add products, you will see the product category setting, in general it is the same as the Category function in the article. If not, you can add a new category and select it.
 I.3) Setting up product keywords
Product keywords are keywords that you think are related to the product. For example, if you set the category as T-shirt, you should choose keywords such as lacoste shirt, crocodile shirt, pike shirt, for example.

set up product keywords
I.4) Product photos
Each product should have a product photo, also known as a product image.

I.5) Product image gallery
Right below the product image section is the product image gallery section, to be more precise, this is a list of many images that you want it to display in the form of a slide (photo slideshow) in the product page. You should select some other photos of this product here, when selecting an image, press Ctrl to select multiple photos.

Gallery of a product
Done, we only do those parts for now, now let’s press the post button.

Post products
To view the product just posted, you must go to the store page. Go to the Pages section of the admin page and click the view store page button.

And you see the product you just posted on it like this.

[alert color=”orange” type=”alert-message-background” title=”Nếu không xem được sản phẩm” size=”small”]If you can’t see the product, you may need to go to Settings -> Static Paths and hit the Save Changes button again.[/alert]
And when clicking on a product detail page it will display like this.

Looks pretty nice, doesn’t it?
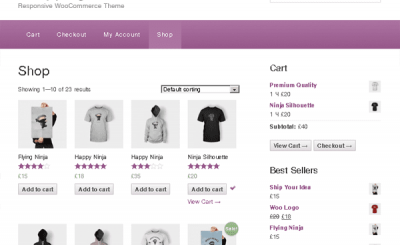
II. Test shopping cart and checkout functionality
Now try adding your product to the cart. Now you will see it to a notification that the product has been added to the cart.

And when you click on the cart, it will display like this.

And press the button Pay to view the payment page. Note that the checkout page can be a bit ugly because this article I performed on a default theme and it does not display well with Woocommerce.

Well, now that you have an idea of what the ordering steps are, and based on that we will easily understand the settings in Woocommerce that we will present in the next section.
III. Turn off the comment box on the shopping cart and checkout pages
As you can see now, when you go to the comments and shopping cart page, you will see a rather ungainly comment box below. Simply because it is Page in WordPress so there will be that frame. To turn it off, you just need to edit the cart and checkout page, then look up at the top right and select Display options. And tick Discussion.

Then uncheck the two options under the frame Discussion.

That’s it, very simple. 😀
Epilogue
This post may seem a bit long to go through the functions when posting new products and learn the ordering process on the website, but because I want you to really understand it before diving into the detailed settings in Woocommerce. should try to follow. Through the following article, I will guide you to install a very beautiful and completely free Woocommerce display support theme, why you need to use the optimal theme for WooCommerce, I will talk about it in the next post.
Source: [Woocommerce] Add a simple product
– TechtipsnReview
![[Premium] 14 best plugins to create unique menus](https://techtipsnreview.com/wp-content/uploads/2022/09/Premium-14-best-plugins-to-create-unique-menus-400x245.jpg)