
After a long period of use, there are files that are no longer useful, you no longer want to use them. In addition, these files take up a lot of space on your hard drive, so you want to delete them to free up space.
Deleting stubborn files, deleting files that cannot be deleted will help free up memory and help junk your device. But how to delete these stubborn files? Read our instructions below.

Sometimes, in some cases when you delete a file that is not needed to free up space on the hard drive, the screen displays a message that you cannot delete the file:

This usually happens when the file you need to delete is stored on a hard drive partition with the file system format as NTFS, and the reason why you can’t delete these files may be because the file is being used by a program. Some process, or files related to that file are being used, or it could be caused by an error while copying files to the hard drive.
If the file cannot be deleted because it is in use, you just need to turn off the programs that are using it and you can delete it easily. Otherwise, you cannot delete files in the normal way. Even if you don’t know how, you need to reformat the hard drive in order to erase it. However, reformatting the hard drive is one of the darkest things that computer users can think of.
1. Reboot the system

Rebooting the system is probably the simplest solution for the least stubborn files. Reboot the system and delete it in the usual way.
2. Use the delete command in DOS
If the above method still cannot delete the file you want to delete, you can use the delete command in DOS.
To do this, first open a DOS window by clicking the button Start of Windows, select Tremor.
Next enter cmd into the Run dialog box, and then click Enter. At this point, a Command Prompt window will appear on the screen.
Here, you use DOS commands to navigate to the directory where the file is to be deleted and use the command Del in DOS to delete the file.

3. Through Task Manager
In this way, first open a Command Prompt window.
Then press the key combination Ctrl + Alt + Delete to open the Task Manager window. In the window Task Manager, select the tab Processes, and navigate to process explorer.exe, right click on it and then select End Process.

After the process is finished, your desktop will disappear entirely, except for the Command Promt window that was opened earlier. Now, you use the command DEL in DOS to delete files you need to delete.
After executing the DEL command, you enter the next command Explorer enter the Command Promt window to start Windows working again.
Or if, after executing the Del command, you accidentally close the Command Promt window, press the key combination. Ctrl + Alt + Delete to open the Task Manager window.
In the window Task Manager, select File > New Task (Run) and enter explorer.

However, to do this, you need a basic knowledge of DOS as well as its commands. Therefore, if you do not have this knowledge, try other ways.
4. Delete the folder containing the files you want to delete
If you still cannot delete the files you want to delete, please try the method of deleting the folder containing the files. If that doesn’t work, try the following: For example, we call the folder that contains the file you need to delete as A, and this folder A is in folder B. Your job is to try to delete the whole folder. B (containing folder A and files that are to be deleted). Sometimes they work. However, keep in mind that the necessary data contained in A and B must be moved to other locations before deleting the entire directory.
5. Change File Explorer process settings
By default, File Explorer launches all of its windows in a single process (explorer.exe). However, it may be because your settings force File Explorer to launch separate processes, which could cause a conflict between other processes.
Press Windows + E to open File Explorer. Go View> Options> Change folder and search options.

If this option was not selected in the first place, you can try to see if selecting it solves the problem.
6. Turn off the Preview Pane in File Explorer
File Explorer previews can cause conflicts like “File is open in another program” error. Press Windows + E, switch to tab View and press Alt + P to close Preview Pane.
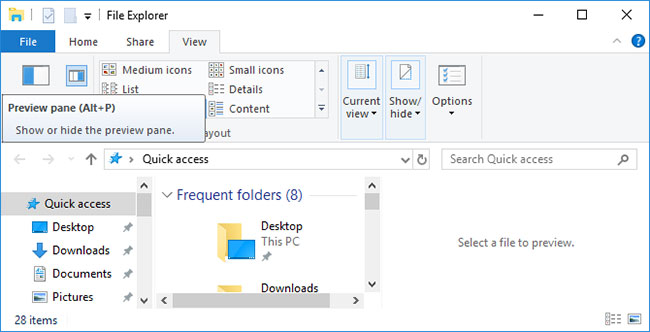
After closing Preview Pane, try the operation again and see if the “File in use” error disappears.
7. Use 3rd party apps
Sometimes, problematic file is locked. If trying to delete a file through the Command Prompt doesn’t work or if the task is too difficult, use one of these tools.
Microsoft Process Explorer
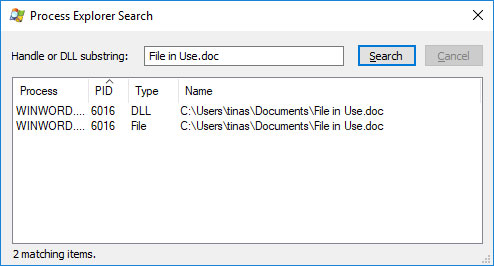
Process Explorer is a more powerful File Explorer. It not only lists all running processes but can also tell you which process took your file hostage. Just open Process Explorer Search through Find> Find Handle or DL (or press Ctrl + F), enter the filename and wait for the list of processes to access your file.
You cannot close progress from the search window, but you can use it Process Explorer or Windows Task Manager to close the application causing the error.
Unlocker
If you have applied all the methods and still do not fix the error, your last option is to seek help from a 3rd party application.
One of the first apps for this was Unlocker. Unlocker is an application and software that is completely free. The application allows analysis of the file you need to delete to find the reason why it was not deleted, then, with just 1 click to finish each system related to the file you need to delete, Finally, you can delete the file in the usual way.
Download Unlocker to your device and install it here.

Unlocker will automatically add it to the Context Menu (right-click menu). Just right-click the file you want to delete, then select Unlocker.
Next click Kill Process or Unlock / Unlock All. The kill process will close the application, then you can proceed to delete the files you want to delete.
LockHunter
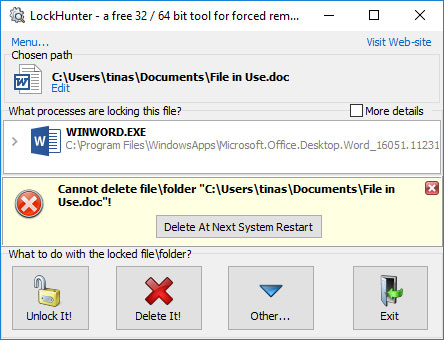
LockHunter will add itself to the Windows context menu. Once installed, just right click on the locked file and select What is locking this file? This will bring up a window containing all the file usage processes. Now you can choose Unlock, Delete at next system restart or Unlock & Rename file. In my case, I couldn’t unlock the file, but deleting it the next time the system reboot worked.
There are also some other file deletion software that you can apply to delete this stubborn file such as: Any File Remover, IOBit Unlocker, …
See some more articles below:
Good luck!
Source link: Delete the most stubborn files on Windows
– https://techtipsnreview.com/


