Currently, the need to create a USB to install Windows 10 is very popular because of its convenience and simplicity of implementation. To install Windows 10 with USB, we must first know how to create a USB to install Windows 10 first. Today GhienCongListen I will guide you in detail step by step Create USB to install Windows 10 according to the UEFI standard.
On Windows 10, there are at least two tools to create USB Boot. You can use the Microsoft Media Creation Tool to download files to removable storage with support for both types of firmware (UEFI and legacy BIOS). Or you can use Rufus, a free third-party tool that makes it easy to create a UEFI-standard Windows installation USB. The following article will show you how to create a USB to install Windows 10 with the two software above, and how to create a USB to install Windows 10 for Mac.
Advertisement
Prepare for creating USB to install Windows 10
- Make sure the USB supports the UEFI standard.
- USB at least 8Gb.
- The computer supports USB UEFI boot.
Media Creation Tool is Microsoft’s available option to create a bootable USB to perform an in-place upgrade or clean installation of the Windows 10 operating system.
To create a USB to install Windows 10, connect the USB with a capacity of at least 8GB and perform the following steps:
Advertisement
1. Visit the page Windows 10 download Official Microsoft.
2. In the “Create Windows 10 installation media” section, click the . button Download tools now to download the installer.
Advertisement
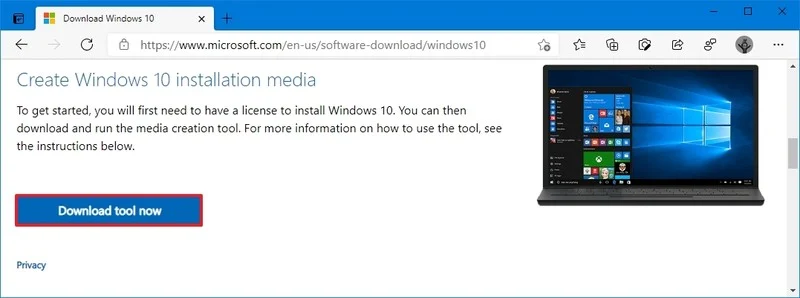
3. Double-click the file MediaCreationToolxxxx.exe just downloaded to launch the tool.
4. Click Accept to agree to the applicable license terms.
5. Mark option Create installation media (USB flash drive, DVD, or ISO file) for another PC.
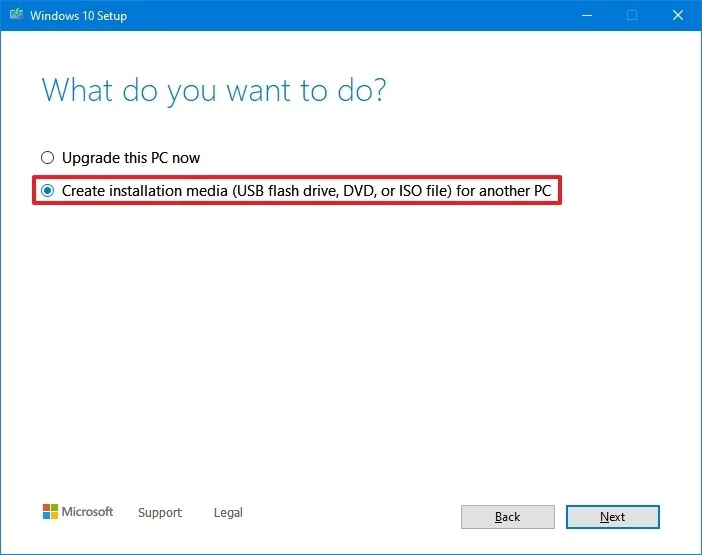
6. Click next. Then in (Options) turn off the tick Use the recommended options for this PC.
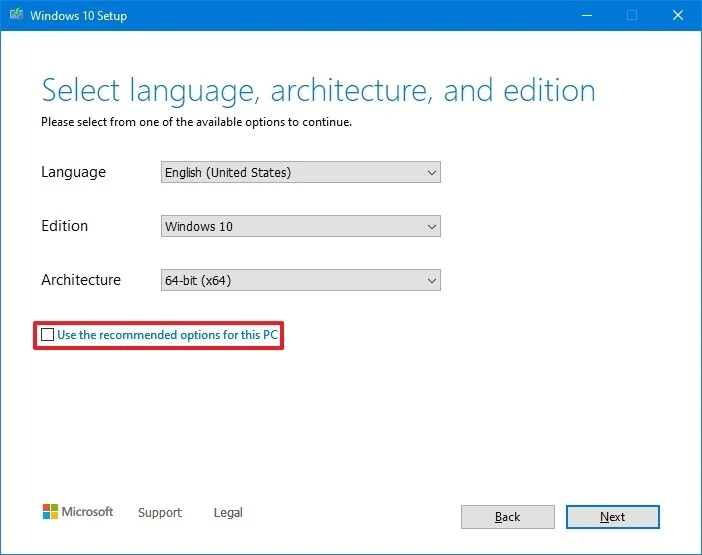
7. Select the correct language, computer architecture and version of Windows 10 (if applicable). Quick tip: If you want to install Windows on multiple 32-bit and 64-bit devices, select Both at the “Architecture” drop-down menu to create media that will work on both systems.
8. Click next and choose USB flash drive.

9. Click next and select the connected USB drive to complete the USB Boot creation process. (If you don’t see the device, click Refresh drive list).

10. Click next and keep clicking finish.
After completing the steps, the Media Creation Tool will download the files and create a USB Boot that you can use to install Windows 10 on a computer that supports UEFI and BIOS.
How to create a USB to install Windows 10 with Rufus
If the Media Creation Tool doesn’t work or you don’t want to use it, try Rufus, a free and most popular tool that allows you to create installation media with support for UEFI devices. Rufus provides two ways to create installation media, including using an existing ISO file or downloading the image directly from the Microsoft server on the Rufus application.
Create Windows 10 installation USB from ISO file
To create a USB with an existing Windows 10 ISO file, connect a drive with at least 8GB capacity and perform the following steps:
1. Open download page Rufus.
2. In the “Download” section, click on the latest release (first link) and save the file.
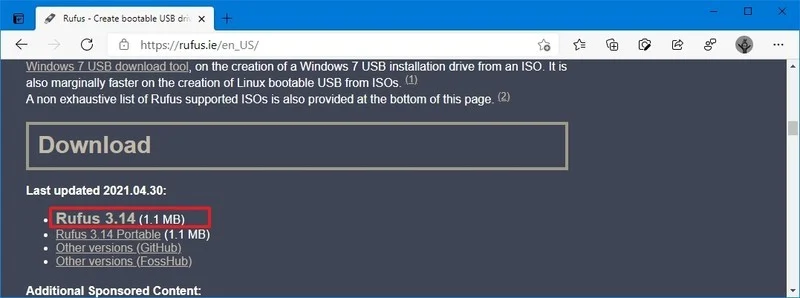
3. Double click on the file Rufus-x.xx.exe just downloaded to launch the tool.
4. In the “Device” section, select the USB flash drive.
5. In the “Boot selection” section, click the . button Select on the right side.
6. Select file Windows 10 ISO from the directory location.
7. Click Open.
8. Click the “Image option” drop-down menu and select Standard Windows installation.
9. Click the “Partition scheme” drop-down menu and select GPT.
10. Click the “Target system” drop-down menu and select UEFI (non CSM).

11. Under “Show Advanced drive properties” do not change the default settings (unless you know what you are doing).
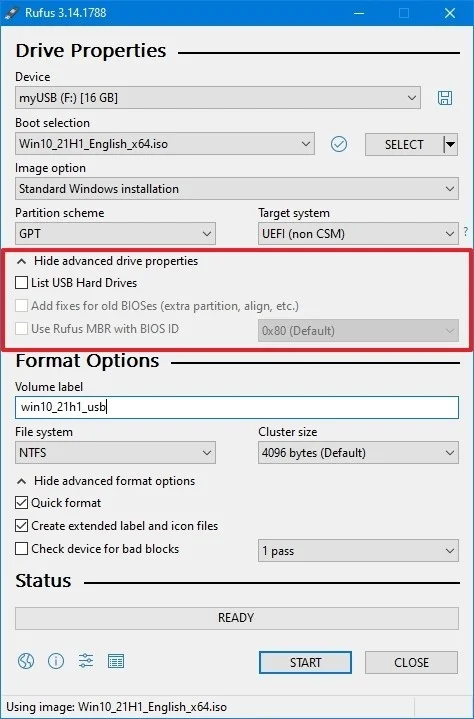
12. In the “Volume label” section, specify a name for the drive – for example, “win10_21h1_usb”.
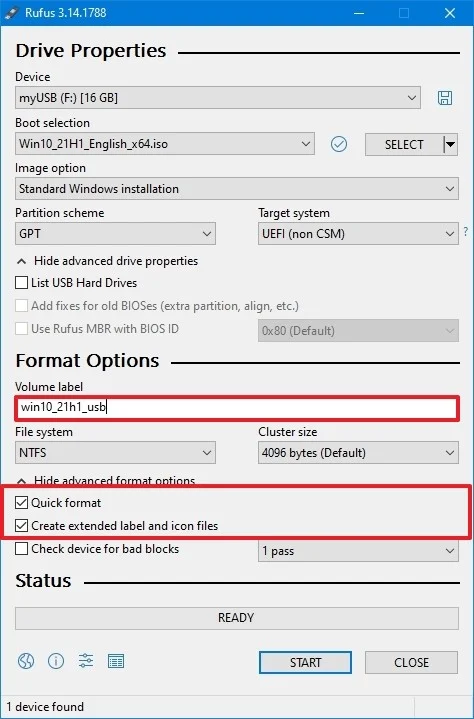
13. In the “File system” and “Cluster size” options do not change the default settings.
14. Click Show advanced format options.
15. Tick option Quick format.
16. Tick option Create extended label and icon files.
17. Click Start.
18. Click OK To confirm.
19. Click Close.
After you complete the steps, Rufus will create a USB to install Windows 10 on the device using UEFI.
Create Windows 10 installation USB from automatic download
Rufus also features a Windows 10 ISO file download feature, which you can then use to create a Windows 10 installation USB.
The trick to create UEFI-enabled installation media with Rufus includes the following steps:
1. Open download page Rufus.
2. In the “Download” section, click on the latest release (first link) to save the file.
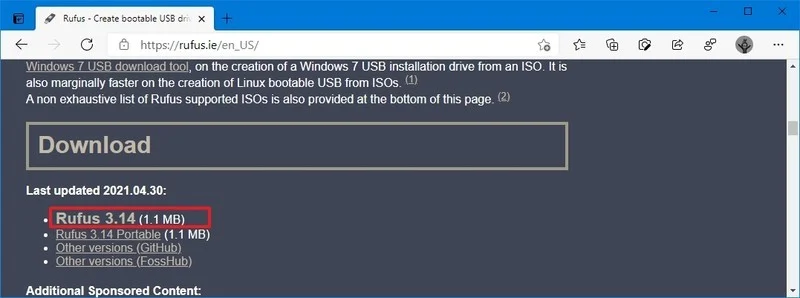
3. Double-click the file Rufus-x.xx.exe to launch the tool.
4. Click Settings at the bottom of the page.

5. In the “Settings” section, click the “Check for updates” drop-down menu and select Daily.
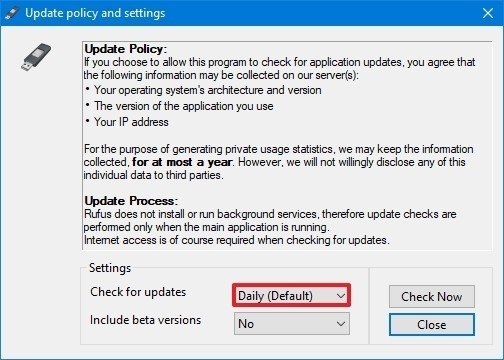
6. Click Closeclose Rufus and Double click on the file Rufus-x.xx.exe to reopen the widget.
7. In the “Device” section, select the USB you want to install Windows 10 on.
8. In the “Boot selection” section, click arrow next to “Select” and select Download.
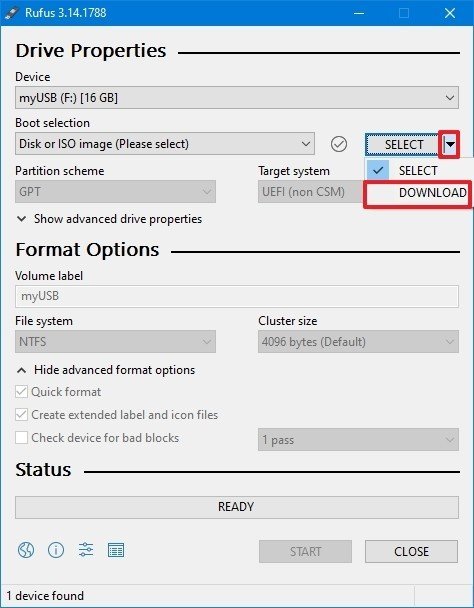
Press Download.
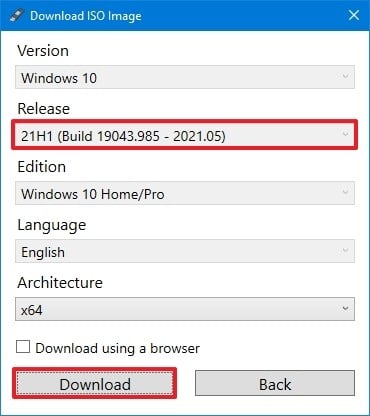
Click the “Version” drop-down menu and select Windows 10.
Click tiếp tục.
Select option 21H1 (Build 19043.xxx – xxxx.xx) to download the Windows 10 May 2021 Update.
Click tiếp tục.
Click the “Edition” drop-down menu and select Windows 10 Home / Pro.
Click tiếp tục.
Click the “Language” drop-down menu and choose your installation language. Quick tip: If you are in the US, select “English”. Otherwise, select “English International” or the language that applies to you.
Click tiếp tục.
Click the “Architecture” drop-down menu and select 32 bits or 64 bit (recommended).
Quick tip: You can check the computer architecture on Settings > System > Aboutand in the section Device specificationsdetermine if the “System type” is 64-bit or 32-bit.
Click Download.
Select a folder to save the ISO file.
Press Save.
Click the “Image option” drop-down menu and select Standard Windows installation.
Click the “Partition scheme” drop-down menu and select GPT.
Click the “Target system” drop-down menu and select UEFI (non CSM).
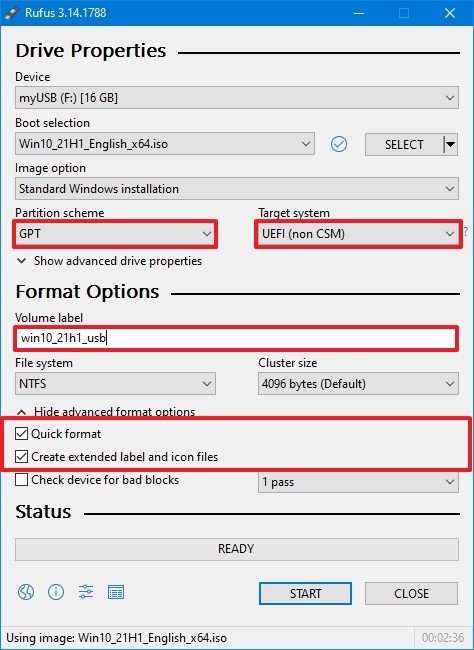
In the “Show Advanced drive properties” section, do not change the default settings.
In the “Volume label” section, specify a name for the drive – for example, “win10_21h1_usb”.
In the “File system” and “Cluster size” options do not change the default settings.
Click on Show advanced format options.
Tick option Quick format.
Tick option Create extended label and icon files.
Click Start.
Click OK To confirm.
Click Close.
After completing the steps, Rufus will run an automatic script to download the Windows 10 ISO file from Microsoft’s servers. You can then use Rufus to create bootable media to install Windows 10 on a UEFI device without the Media Creation Tool.
With UEFI-enabled USB Boot, you can use it to launch the “Windows Setup” wizard for a clean install of Windows 10 or an in-place upgrade. However, because “UEFI:NTFS bootloader” (UEFI:NTFS bootloader) does not include a digital signature for secure boot, you must temporarily disable secure boot on the firmware before Boot into setup.
Normally, you would complete this task from within UEFI, which you can access by pressing one of the function keys (F1, F2, F3, F10 or F12), Esc, or the delete key as soon as you boot up computer.
Firmware settings vary by manufacturer and by device type. Therefore, be sure to check your device manufacturer’s support website for more specific instructions. After installing Windows 10, you can re-enable secure boot.
How to create a USB to install Windows 10 on Mac
Download Windows 10 Disc Image (ISO File)
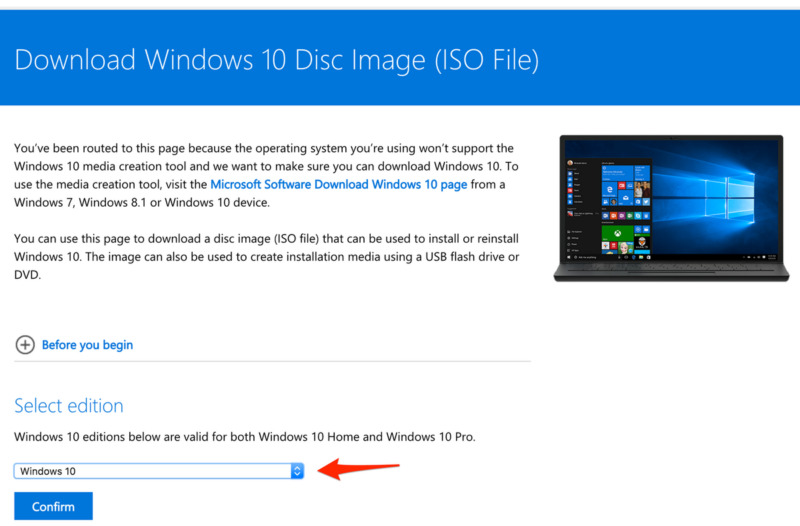
First, you need to download the Windows 10 ISO file. Go to the download page and select the appropriate version of Windows 10 in the drop-down menu. If you don’t know what version K, KN or Single Language stands for, just select Windows 10 from the list.
Create a USB installer with Boot Camp Assistant
After downloading the ISO file, you will need to use the Boot Camp Assistant to move it to a bootable USB drive.
- Plug the USB into your Mac. Make sure it’s at least 8GB, usually marked on the USB stick. You can also check by right clicking the USB drive on the desktop and clicking Get Info. Check that the number next to Capacity is at least 8GB. All files in the USB will be deleted, so make sure that there are no important documents inside.
- Open Boot Camp Assistant. The easiest way to launch it is through Spotlight Search (press Command and Spacebar for it to show). Press Enter to launch the application.
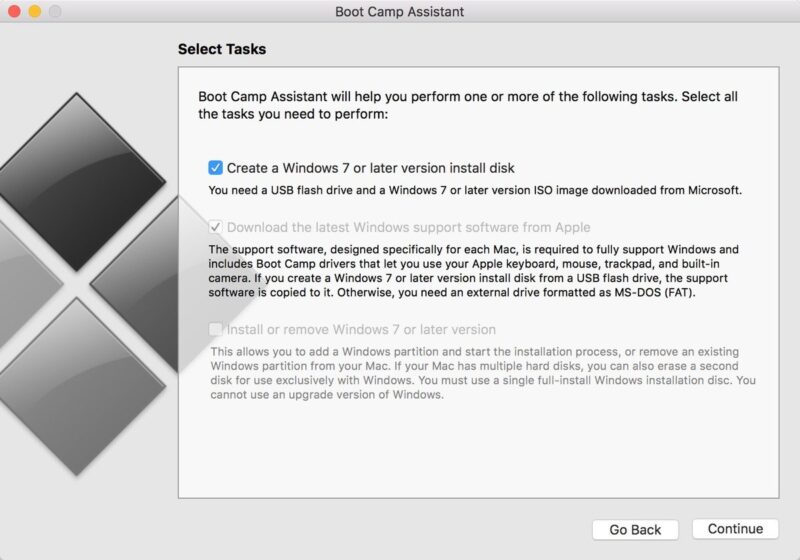
- Click the box “Create a Windows 7 or later version install disk” and uncheck “Install Windows 7 or later version“.
- Click tiếp tục to continue.
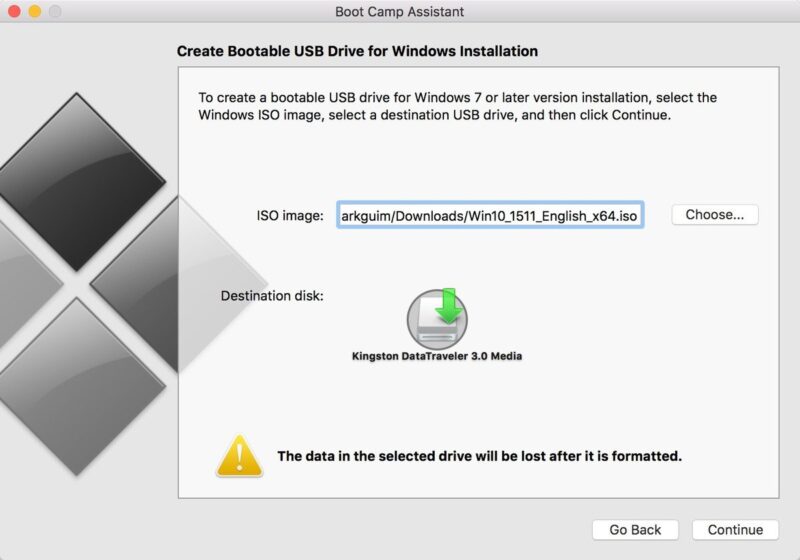
5. Boot Camp Assistant will automatically locate the ISO file from your download folder, but make sure it’s the correct one. Click the button “Choose…” and locate the ISO file. Make sure that the destination disk is the USB drive you plugged in.
6. Click tiếp tục. It takes about 20 minutes to format and set up the USB installer on your Mac.
7. When Boot Camp Assistant is done, the USB drive will be renamed to WININSTALL. Press Quit to close the application, then eject the USB drive (Eject).
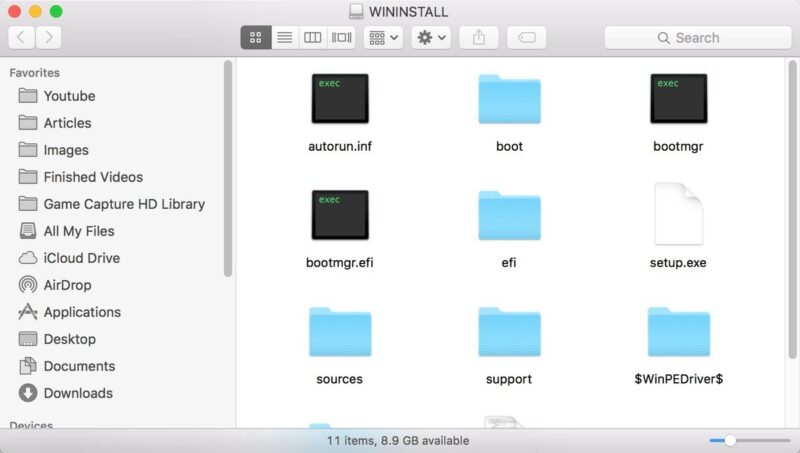
It’s done! You already have a USB Boot drive to install Windows 10. You can use it to configure a new Windows 10 PC from scratch. It’s easy isn’t it?
So GhienCongList has instructed you in detail how to create a USB to install Windows 10 according to UEFI standards. Hopefully the article can help you create a USB for yourself to save yourself and help others without spending any money.
See more:
If the article is useful to you, please Like and Share to support TechtipsNReview.com. Leave a comment if you have any other questions about the installation process. Good luck.
Refer to Windows Central
Source: How to create an extremely fast and simple Windows 10 USB installation for anyone
– TechtipsnReview


