
NOTE: Welcome to the Knowledge Sharing Blog! If you encounter any errors during use, such as error in download link, slow loading blog, or unable to access a certain page on the blog … please notify me. via Contact page. Thanks!
In the previous article, I showed you how to create a UEFI Windows bootable usb with the Rufus tool very easily.
However, for some reason, some of you still cannot do it successfully, so I decided to learn more ways to give you more choices.
Actually, there is nothing new about the way of doing it, I will use a tool called WinNTsetup to perform.
If you cannot install Win successfully with the previous tutorial that I have shared, you can refer to how to do in this article.
Read more:
I. What should be prepared before installing Windows under UEFI standard?
- A bootable usb: Recommended for newbers to create usb 1 click UEFI or create a multi-function bootable usb.
- A Windows Installer (7,8.1,10) 64-bit depending on your needs. Click here to download the original Windows version from Microsoft.
- Essential toolset: Download to computer / Link backup – Pass extract: techtipsnreview (These tools run well on the WinPE environment)
- You must first set up UEFI in BIOS, if you do not know how to set up, please review this tutorial.
II. What are the advantages of installing this win?
- You can install Windows under UEFI standard in any platform, whether you are using 32bit or 64bit mini windows, you can do it.
- Even if your USB BOOT only supports Legacy standard computers, it can still be installed successfully.
- Manually create an EFI partition, so you can manually adjust the size of this partition.
- Suitable for creating ghost / backup in Setup format.
Method 1: Start installing UEFI standard windows with WinNTSetup
+ Step 1: Please boot into Win Pi (Mini Windows), then unzip the toolkit you downloaded above to use.
+ Step 2: Open Partition Winzard software to create an empty partition (format Unlocated). The way to do it is also quite simple:
Perform:
Right-click the current operating system you are using, and select Delete to delete the current operating system partition.
(If your hard drive is brand new or you want to create another drive to install, refer to this tutorial.)
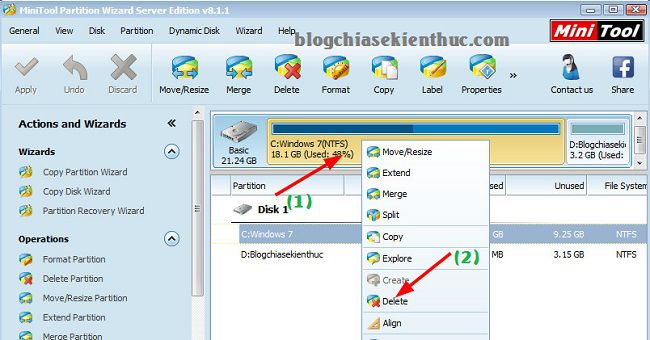
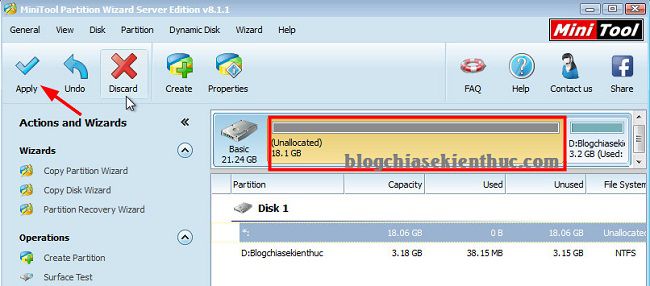
At this point, the button Apply will light up. Click on it to apply the deletion of that partition.
+ Step 3: If your hard drive is in MBR format (ie stream Convert MBR Disk to GPT Disk will light)> click on it to convert to GPT standard.
Tips: On the contrary, if the line Convert GPT Disk to MBR Disk When lit up, it means your hard drive is in GPT format, you don’t need to do this step anymore.
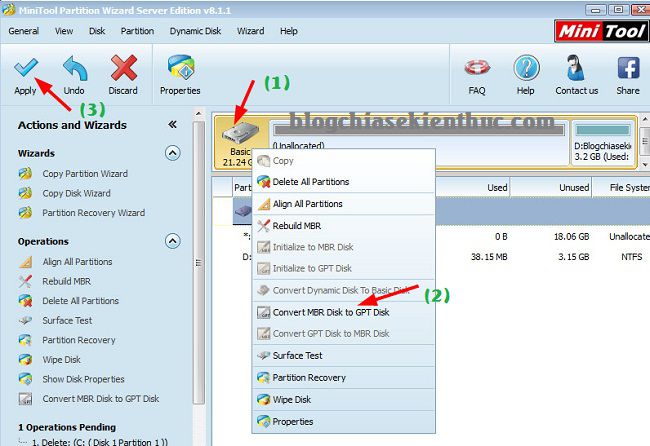
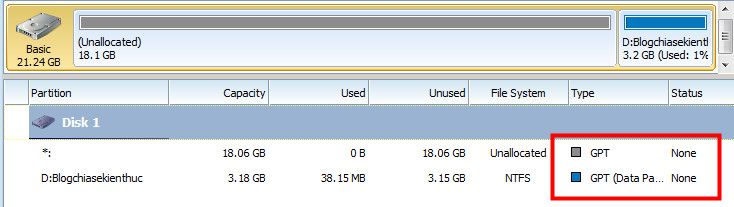
Then, after converting to standard GPT, all partitions will have Type was GPT as shown below.
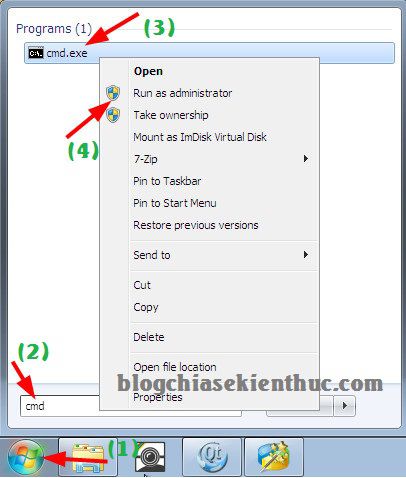
+ Step 4: Press the button Start => search with keywords cmd => Next, right click on the file cmd.exe and choose Rus as adminstrator to run as administrator.
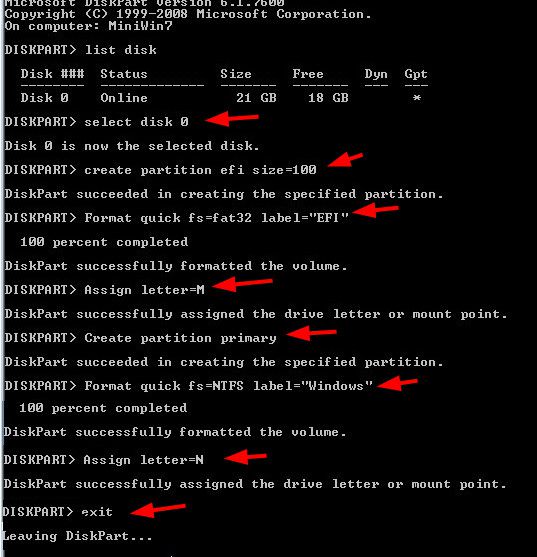
+ Step 5: The CMD window appears, enter the following commands one by one.
diskpart
list disk
select disk 0
create partition efi size = 200
Format quick fs = fat32 label = “EFI”
Assign letter = M
Create partition primary
Format quick fs = NTFS label = “Windows”
Assign letter = N
Exit
Tips: You can copy and paste each command 1 into the cmd window for quick and no mistakes. (Press Ctrl + C to perform Copy and Right-click on the cmd window to execute the command Paste).
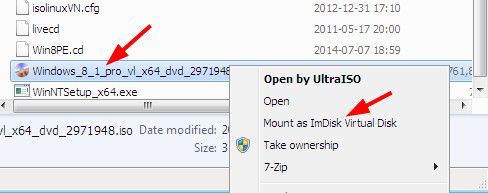
+ Step 6: Right-click the * .ISO Windows file and select Mount as ImDisk Virtual Disk to mount the file to virtual drive.
A window appears, click OK to perform Mount. At the box Driver will be the virtual drive and the Windows installer will be mounted on it.
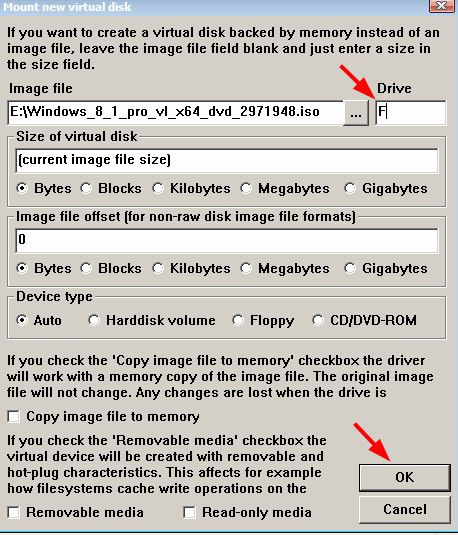
Okey! Mount has finished.

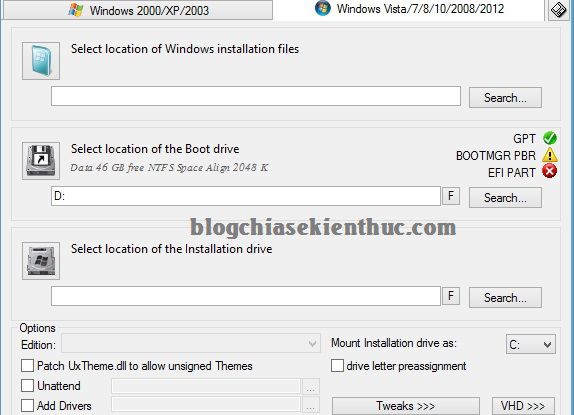
+ Step 7: Please open the WinNTsetup software (remember to choose the correct version to run, you will not have that error). The main interface of the WinNTsetup tool will be as shown below.
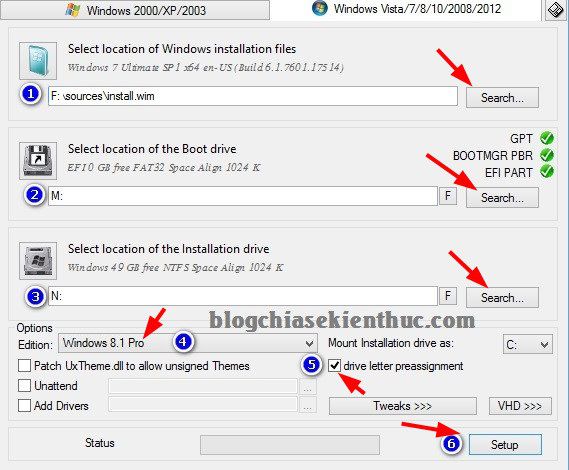
+ Step 8: Set the path as follows:
- Select location of Windows installation files: Here you press the button
Search=> select the path to the virtual drive that you just mounted the windows file earlier. You choose to follow the pathsourcesinstall.wimPlease. - Select location of the Boot drive: Click the button
Search=> select the path to the partitionEFIthat we just created earlier. If you use the correct commands as instructed above, it will be signedMPlease. - Select location of the Installation drive: Here you also click the button
Search=> choose to Windows partition. There is letter N if you use the commands above to create. - Option Edition: Here you select the version of Windows that you are preparing to install.
- Driver Letter Preassignment: Please check this option, the purpose is for the partition containing the operating system to carry characters C as usual.
- Finally click
Setup.
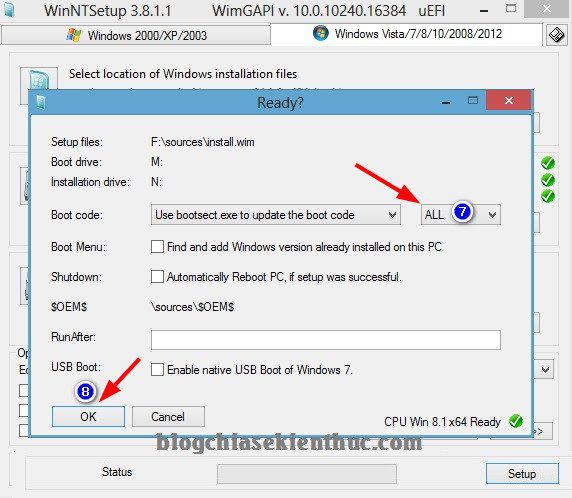
Click select ALL => select OK to start the installation process.
+ Step 9: Let the program finish working => restart the computer => set up in the BIOS according to UEFI standard => the rest of the installation steps will continue until complete.
Note: If after the computer reboots but does not continue, it is highly likely that you have set the BIOS incorrectly. Please do it right again.
+ Step 10: Done!
Video how to install Win according to UEFI standard by WinNTSetup
=> View or download here guys.
Method 2: Another simple way to install Windows according to UEFI standards
Tips: There is another very simple way, I can summarize the steps like this, (but I still encourage to do the above):
- Setting up the BIOS according to UEFI standard (the link above I have introduced)
- Create a Usb Boot UEFI.
- Perform
Bước 3as instructed above. - Access to WinPE (Mini Windows) => Mount Windows file to virtual drive (do as
bước 6above) - Open the virtual drive that you just mounted Windows file => run the file Setup.exe to start the installation. (If running Setup.exe file error, try to open the folder
sources=> run the fileinstall.wimHow to install? - Then, coming here is simple already. You proceed to install windows as usual.
=> In addition to the above instructions, you can watch or download videos detailed instructions here !
III. Epilogue
Very simple like that, the instructions are so long, but when done, it is very quick. 2 ways install win according to UEFI standard The instructions in this article are very simple and I think anyone can do it.
And I encourage you to gradually switch to the UEFI standard – GPT gradually fits, to feel its flexibility and agility.
Okey! Hope the article will be useful to you, wish you success!
Kien Nguyen – techtipsnreview
Note: Was this article helpful to you? Don’t forget to rate, like and share with your friends and relatives!
Source: Instructions for installing Win according to UEFI standards
– TechtipsnReview


