Family Sharing is a feature first introduced in iOS 8 that allows family members to share all purchased or downloaded apps with each other. Anyone who is a member of the group can download music, videos, movies, apps, books from other members to their device. This can save money and allow all members to enjoy the same recreational facilities.
To use Family Sharing, each member needs to have the following:
- iPhone, iPod touch or iPad
- iOS 8 and above
- One Apple ID/iTunes account
Once you’re ready, follow these steps:
1. Set up Family Sharing
- Enter Settings > iCloud > Set Up Family Sharing.
- You will be asked if you want to be the family organizer. Confirm if you want and then sign in to your Apple ID account. Then press Continue (Continue).

Note: Family Organizer will be the person responsible for all of the Family Sharing feature management in the family, from allowing who to join the group to paying for that application.
2. Set up payment and location sharing in Family Sharing
Once you’ve set up Family Sharing, you’ll have to take a few extra steps:
- Enter the screen share purchased items (Share Purchases) and make sure that the Apple ID you entered will be the primary Apple ID responsible for managing all Apple ID members. Then press Continue (Continue).
- Confirm that the credit card or online payment card shown on the screen will be used to pay for the apps you purchase as well as all other apps purchased by members of your Family Sharing group . When members under the age of 18 buy apps on the Appstore, they will need to get permission from your Apple ID.
- You can choose to enable location sharing with your family as it allows all family members to know where your device is. Press Share Your Location if you want, if not, choose Not Now (Later).

3. Add other members to the Family Sharing group
- Enter Settings > iCloud > Family > Add Family Member.
- Enter each member’s Apple ID into the device. You can also enter the person’s name if you have it saved in your contacts.
- Then follow the on-screen instructions.
- Invited members can accept the invitation in one of two ways:
- If the invited member is near you, ask them to enter their Apple ID.
- If the invited member is not nearby, select the sending invitation solution, then the device will send a message to that person.
- You can check if a member has joined your group by:
- Enter Settings > iCloud > Family. Tap each person’s name to see the status.

After completing the above steps, all members of your Family Sharing group can purchase apps through a common account as well as use all the apps purchased by other members.
4. Select sharing option
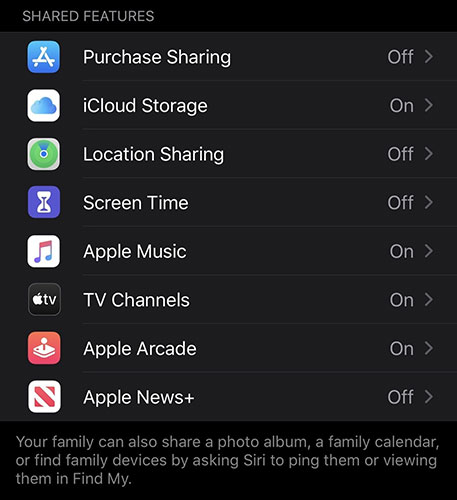
After adding a family member, you should choose the feature you want to share. Current options include:
- Purchase Sharing: Media you buy on iTunes, Books, and most App Store purchases (but not including in-app purchases)
- iCloud Storage: If you have 200GB or 2TB of storage, you can share it with your family.
- Location Sharing: Family members share their location or device location. You can always just share the location for an individual in the app Find My.
- Screen Time: If there is an account for young children in the family, you can set usage limits and view reports for that account.
- Apple Music: You need an Apple Music for your family to share with other members (cost is $15 – 345,000 VND/month, instead of $10 – 230,000 VND for individual accounts).
- TV Channels: If you’ve subscribed to a premium streaming service through the TV app, you can share it with the whole family at no cost, including Apple TV+, which is technically a channel .
- Apple Arcade: Apple’s gaming subscription service includes free Family Sharing.
- Apple News+: If you have a subscription to premium magazines and newspapers in the News app, you can share it with your family at no cost.
There are three important things to mention about these sharing options.
- First, if you turn on Purchase Sharing, family members will have access to all the movies, TV shows, and music you’ve purchased in iTunes, as well as books purchased in the Books app, and most apps that you purchase in the App Store, but do not include in-app purchases or app subscriptions. If you enable this option, the Family Organizer will be charged for any purchases made by anyone in the family, even if it’s not shared. You can enable one paying account for the whole family, which is always productive, but doesn’t need to turn on Purchase Sharing to share anything else.
- Second, when you share iCloud storage, family members can’t see other people’s cloud-stored content. This is like each person having their own iCloud storage. The data everyone uses counts towards the 200GB or 2TB limit.
- Finally, sharing services like Apple Music or Apple TV Channels doesn’t mean you’ll see other people’s content or playlists. Each family member has access to those services as if they had their own subscription, with play history, recommendations, etc… for themselves. So don’t worry about Family Sharing messing with Up Next choices in the TV app or your music recommendations in Apple Music.
Good luck!
Source link: Instructions for using the Family Sharing feature for iPhone/iPad
– https://techtipsnreview.com/