Windows 10 operating system gives users more advanced features than previous operating systems. However, some machines after installing Windows 10 experience some problems, such as a problem the computer loses sound. Many people have made adjustments to connecting the audio device to the computer, but the situation has not improved either.
If you have checked the hardware devices such as speakers, cables and made sure they have no problems, the problem of sound loss may be in the software.
In the article below, we will show you a few ways to fix the loss of sound error on Windows 10.
Method 1: Check the audio device connector
Before proceeding to check the system installed on the device, users should check the physical connections, to confirm whether the error of sound loss on Windows is from a hardware or software error. For those who use external speakers, this step should be done first. Check that the wire is correctly connected to the connection position between the speaker and the computer. Check the correct Audio and Micro end to receive sound.
If you reconnect the cord but still no results, we will check the system installed on Windows 10.
Method 2: Fix the connection using Windows Audiooubleshooter
Windows always has the default feature of detecting and resolving network and sound problems. In Sound icon on the Taskbar, we Right click and select Troubleshoot sound problems to use the troubleshooter to automatically scan for audio on your computer.

Wait a few minutes for the audio error handler to detect and fix the error automatically. If the self-correction process fails, you can also rely on the cause of the error to find a fix.

Method 3: Adjust the default audio format
By accidentally changing some audio formats on the computer, the speakers will not sound.
Step 1:
First of all, also at the sound icon on the computer, right click and select Playback devices.

Step 2:
Next at the interface Soundwe click speaker icon and select Properties.

Step 3:
At the interface Speakers Properties, click on Advanced tab. Down below the item Default Format, we choose the frequency 24 bit, 44100 Hz or 24 bit, 192,000 Hz. If not, choose 16 bit, 44100 Hz. Then press OK to save.

Method 4: Disable the audio upgrade process
Audio Enhancements is a feature available on Windows 10 used to improve the sound quality with external speaker devices. However, this feature sometimes causes audio loss issues as well.
Step 1:
Also at sound icon on the screen, Right click and select Playback devices. Then at the interface of the audio device in use, select Properties like steps 1 and 2 in way 3 above.

Step 2:
To the new interface, click to select Enhancements tab and Uncheck the Disable all enhancements to not use the sound improvement feature in Windows 10.

Method 5: Install or update Sound Drivers
Usually, the error of sound loss on the computer is caused by the driver error. Maybe the drivers are too old and incompatible with the current operating system, causing the computer to lose sound.
Step 1:
We press combinations Windows + R to open Run dialog box on the computer. Then enter the keyword devmgmt.msc, press OK to access.

Step 2:
At the new interface Device Manager, double click now Sound, video and game controllers.

Step 3:
Here we will have two ways to update the audio drivers, including automatically finding and downloading the driver from the homepage.
First: Download Windows 10 automatic audio drivers
When you double-click Sound, video and game controllers will appear audio drivers. We Right-click on it and then select Update Driver Software.

Step 2:
Then, press select Search automatically for updated driver software so that Windows will automatically find and update new drivers.

Second: Automatically download Windows sound driver
Step 1:
If it’s not working, you can find the driver yourself. We proceed to follow step 1 above. But will hit select Browse my computer for driver software.

Step 2:
Continue to press Let me pick from a list of device drivers on my computer, then press next.

Step 3:
Finally choose High Definition Audio Device press next to update the new driver.

If you are afraid to dig into the system settings to install and update the driver, you can try Driver Booster to update the driver for the computer.
Method 6: Restart Audio Services
Step 1:
Press Windows + R to open Run dialog box, then type services.msc then press OK.

Step 2:
Next, right-click Windows Audio choose Stop to stop Audio Services. Then click Start to restart the service.

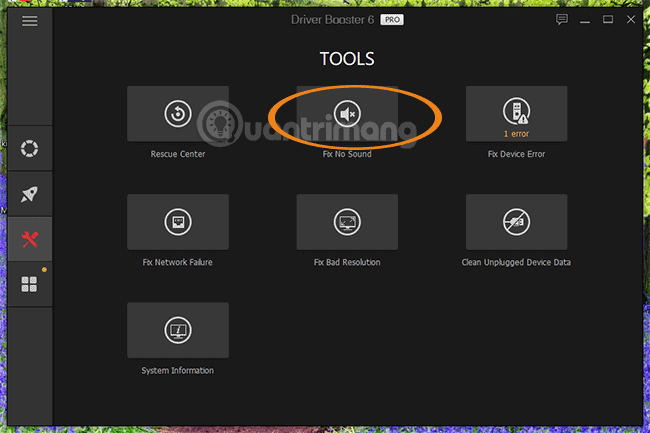
Method 7: Use Driver Booster’s Fix No Sound tool
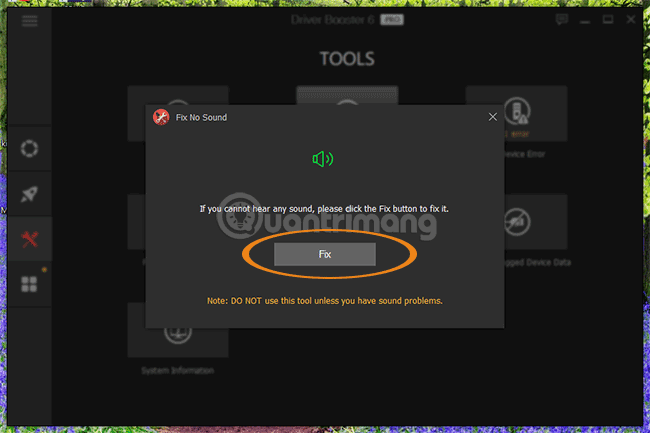
Driver Booster software update has a small tool is Fix No Sound, help you to fix the computer lost sound. You download Driver Booster to install on the computer. Then, click the tools icon on the left-hand side> select Fix No Sound.
In a small window that appears, choose Fix, wait a moment for the tool to check and fix the loss of sound on the computer.
Method 8: Upgrade Windows 10 version
If the version of Windows you are using has problems, you can upgrade to the latest version to fix the loss of sound.
Step 1:
At interface Settings on Windows 10, we press the button Update & Security.

Step 2:
Next, select Windows Update menu bar on the left and select Check for updates on the right for Windows to check and upgrade if any.

Above are some ways to help Windows 10 users fix the problem of sound loss on the computer. If you are using an external speaker connection, you should first check the connectors, then proceed to adjust the settings that we mentioned above.
Method 9: Disable Exclusive Mode
Some sound drivers seem to have problems with the “Exclusive Mode“, which allows the application to take exclusive control of your sound card. This is usually not a big deal. It was the bad sound driver that caused the problem on your system.
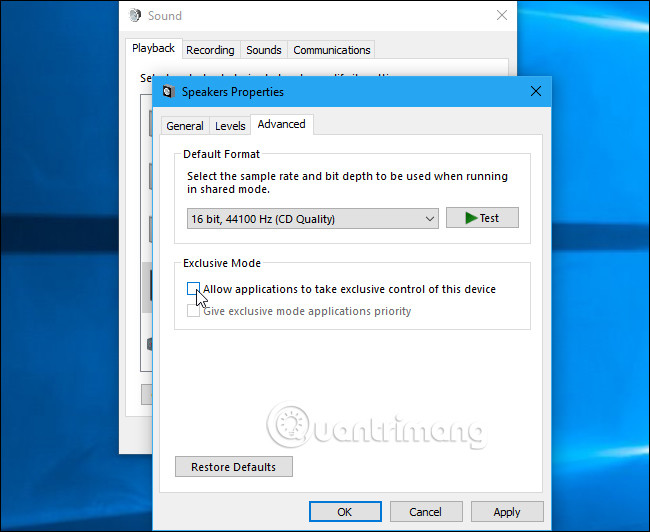
You will find this setting on the same window with the option “Default Format“. Turn off the “Allow applications to take exclusive control of this device” in “Exclusive Mode“. Click “OK”And see if this fixes your problem.
You can re-enable it if disabling this option doesn’t solve the problem.
Method 10: Check DPC latency
This issue can also be caused by DPC latency. DPC stands for “Deferred Procedure Call“. This is the part of Windows that handles hardware drivers. If the driver takes too long to do something, it can prevent other drivers, such as your sound driver, from being able to do their job in a timely manner. This can lead to sound problems like boiling, hum and other problems.
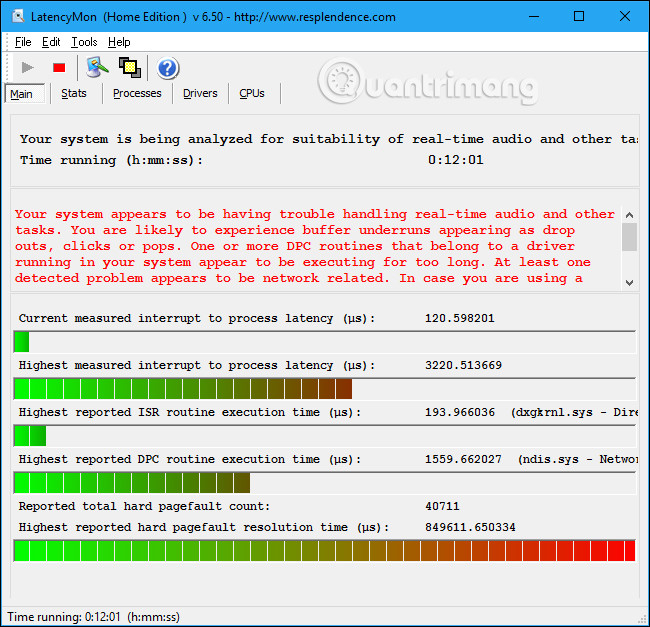
To test your DPC latency, download and run LatencyMon. Click the “Start“and let it run in the background for a while. It keeps track of your system’s hardware drivers and provides recommendations, letting you know which hardware driver might be having problems. specifically causing the problem, you can try to update the device driver, turn off the device, remove the device from your system or replace it.
Even if you see some latency issues here, they won’t necessarily be an issue for a regular PC where you just need to listen to music, watch videos and play video games. If the tool warns you about the problem but you don’t see a problem, you don’t need to disable any hardware. This is even more important for professional use cases where you really need real-time audio. However, if you do find something wrong, the tool can spot a faulty hardware driver.
- Link download LatencyMon: http://www.resplendence.com/latencymon
Method 11: Set the Processor power management to 100%
Here’s how to do it:

- Right click on the battery icon on the Taskbar.
- Choose Power Options.
- Click Change plan settings for your power plan.
- Click on the link Change advanced power settings.
- Scroll down, expand section Processor Power management and Minimum processor state.
- Change Minimum Processor state into 100%
- Click Apply> OK to save your changes.
Now check to see if you can still hear blistering sounds from your computer’s speakers or headphones, if you have headphones plugged in. If the problem persists, continue with the next solution.
Method 12: Disable ATI HDMI Audio
Sometimes ATI HDMI Audio can be the reason why the sound coming from your device is having problems. Please disable ATI HDMI Audio to make sure it’s not the culprit.
Here’s how to do it:
- Press Windows + X to open the Power User Menu, then press the key M to open Device Manager.
- Expand the category Sound, video and game controllers.
- Right click on the ATI HDMI Audio device and select Disable.
Also refer to the following articles:
Wish you all success!
Source link: How to fix sound problems on Windows 10
– https://techtipsnreview.com/


