
As a Windows user, you will certainly not be unfamiliar with the Command Prompt or we still call the CMD window – a familiar tool that often appears in the blog posts.
But it is possible that many of you still do not know on Windows operating systems – Windows 10 in particular – there is also a command line tool – Windows PowrShell, which is fully functional and even. even stronger than its predecessor, CMD.
Despite this power, Windows PowerShell is rarely chosen by general users because its usage is quite difficult – I mean, the command lines, very difficult to remember.
So if you don’t really need Windows PowerShell, I think you should turn it off! And of course in this article I will guide you how to uninstall Windows PowerShell simply and safely on Windows 10.
I. Why uninstall Windows PowerShell?
Say a little more about removing Windows PowerShell from Windows 10, besides the reason not to use it, there is another main problem, which is:
PowerShell on Windows 10 is version 2.0 by default – this version is quite old, is no longer used much and may even have many security holes compared to the latest version, Windows PowerShell 7.xx
Although Windows PowerShell is very powerful and Microsoft also encourages users to use PowerShell instead of CMD, using the built-in PowerShell is not recommended.
To uninstall Windows 10, we have two ways – it’s just one, but there are two different types of implementation to choose from, let’s take a look at each one below!
II. How to completely disable PowerShell on Windows 10
Read more:
#first. Use the command line in Windows PowerShell
I think this is the easiest way for you guys, just copy the available command line and run it in Windows PowerShell window.
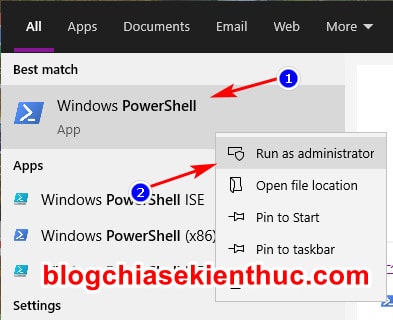
+ Step 1: First open PowerShell with permissions Administrator up by entering a keyword PowerShell into the Windows search box (Windows + S) => and right-click the first result as shown in the picture.
Also, if you haven’t turned off the option already Replace Command Prompt with Windows PowerShell… in the Windows Taskbar settings can be quickly opened by pressing a combination Windows + X => and choose PowerShell in the menu that appears.
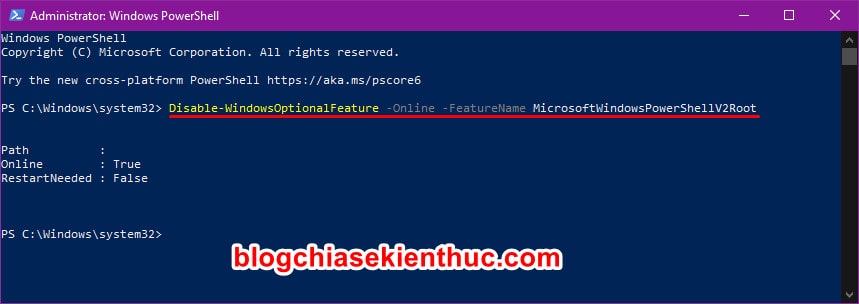
+ Step 2: Then copy this command => then paste it into the window PowerShell => and finally click Enter to execute the command, that’s it:
Disable-WindowsOptionalFeature -Online -FeatureName MicrosoftWindowsPowerShellV2Root
Immediately after, PowerShell will be immediately disabled and you will get the results as shown in the screen. Now restart your computer when possible for the changes to take effect.
#2. Use Program and Features – Windows Features of Windows 10
Programs and Futures is a nice feature, rather an underlying option Control Panel of Windows.
It has been around since the legendary version of Windows XP and the main task of this tool is to help users remove applications that we install from the outside.
Still Windows Features is a component of Programs and Features, it enables you to enable special Windows features such as .NET Framework, Hyper-V, Windows Subsytem for Linux (WSL) or Windows Sandbox and of course there are PowerShell 2.0 on Windows 10 too.
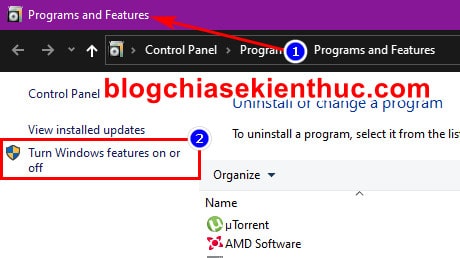
+ Step 1: To open Windows FeaturesUsually you will Control Panel => go on Programs and Features then come Features.
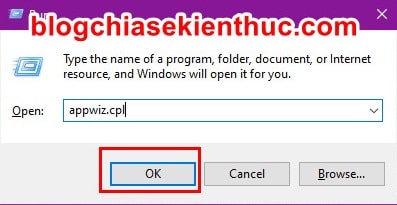
But now I’m going to show you a faster way to open it Programs And Features ok, you just need to enter the command appwiz.cpl in the dialog box RUN (Windows + R) => and press OK that is done.
+ Step 2: In the window Programs and Features Please click on the line Turn Windows Features on or off in the left column to open the window Windows Features on Windows 10.
In addition, you can also quickly open this window by entering the keyword PowerShell into the Windows search box and selecting the appropriate results.
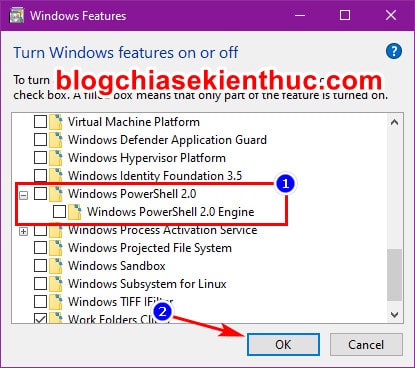
+ Step 3: Here, you drag down the list => then find and remove all traces in the line Windows PowerShell 2.0 go.
=> Then press OK To confirm the disabling and remember to wait a moment for the system to proceed to remove PowerShell from Windows 10.
+ Step 4: Finally, reboot when possible for these changes to take effect – Windows PowerShell is completely disabled.
III. Epilogue
Yes, I have finished the instructions for you How to completely disable PowerShell 2.0 on Windows 10 – Help to lighten Windows, as well as reduce the risk of security holes for this operating system.
Hopefully this article will be useful for you. Good luck !
CTV: Nguyen Thanh Tung – techtipsnreview
Note: Was this article helpful to you? Don’t forget to rate, like and share with your friends and relatives!
Source: Instructions on how to remove PowerShell 2.0 on Windows 10
– TechtipsnReview


