- How to change Dns Samsung Galaxy J7, J5
- Change DNS, change IP Wifi, change DNS of iPhone, Samsung, HTC, LG phones…
- How to change DNS 1.1.1.1 on Android and iPhone phones
- Change Dns Sony, change Dns address on Sony phones
- Change DNS Windows Phone, change dns address on Windows Phone 8.1 phone
Here, TechtipsNReview.com will guide you to change your device’s default DNS to google’s DNS. There are 2 ways to change DNS, one is that you can use DNS Changer software (recommended this way), the other is to edit directly in the DNS settings of Android devices like Zenfone 2 or oppo neo 7

Instructions to change DNS on Android
Change DNS on Android phones
Method 1. Use DNS Change softwarer (Recommend this way)
Download: DNS Changer for Android

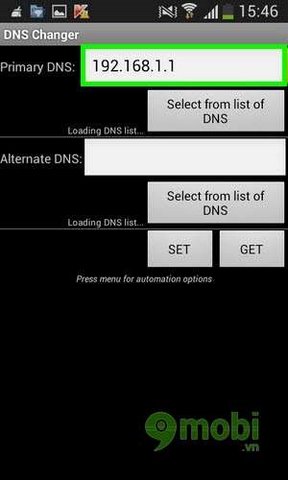
Step 1: Open the application after it has been downloaded and installed, the application will display DNS Your default is as shown below (DNS may be different depending on the network you are using)
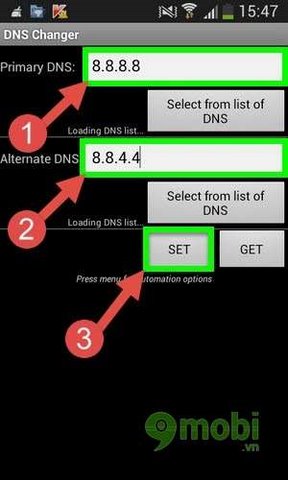
Step 2: You take turns correcting Primary DNS and Alternate DNS In the order shown in the picture, in this article I use Google DNS. Then press Set to set up a new DNS for the device.
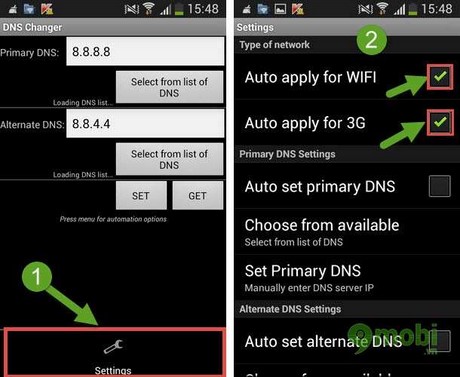
Step 3: On your Android device, press the Menu touch key to display the menu Settings application. Check the box Auto apply for wifi and Auto apply for 3G so that the application automatically sets up a new DNS configuration after each time you use the 3G or Wifi network to surf the Web.
Method 2. Change DNS directly on the machine
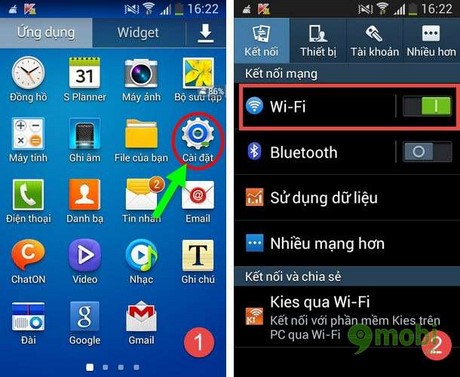
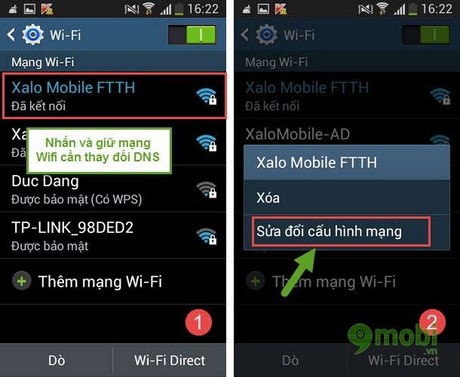
Step 1: You go to settings(install) on android device, choose next WIFI to enter the Wifi network settings for which you want to change DNS.
Step 2: Touch and hold Wifi network will display a notice board as shown Modify network configuration.
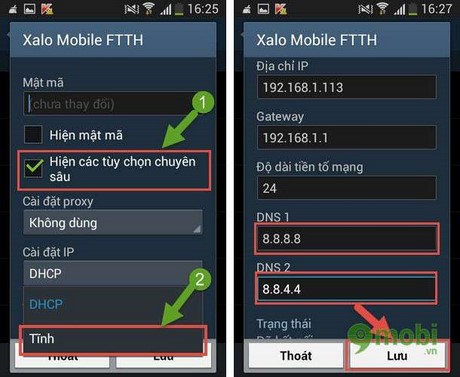
Step 3: At the Wifi network customization interface, select the box Show advanced options. Click to select Static in the item IP settings.Here, you choose to enter 2 parameters DNS1 and DNS2 as in the picture. Check Save to set up a new changed DNS 1 and 2 configuration.
https://TechtipsNReview.com/huong-dan-doi-dns-tren-android-458n.aspx
So TechtipsNReview.com has shown you how to change DNS in 2 simple and easiest ways. Now you can access websites and facebook with changed DNS. This DNS change does not affect your network speed. You can safely browse Facebook without worrying about being blocked or inaccessible.
Source: Change DNS on Android phones
– TechtipsnReview


