
To speed up the Internet connection on the phone, many people have changed to DNS 1.1.1.1 in many different ways. Users can manually change DNS 1.1.1.1 on the phone by changing in WiFi settings or installing an application to change. The following article will guide you how to change DNS 1.1.1.1 on your phone.
1. What is DNS 1.1.1.1?
DNS stands for Domain Name Server to help convert website addresses from alphanumeric to numeric from which to access the server containing the data. There are many professional DNS services such as Google DNS (8.8.8.8), OpenDNS (208.67.222.222) or CloudFlare DNS (1.1.1.1).
DNS 1.1.1.1 is CloudFlare’s domain name resolution service to speed up Internet access and be safe to use.
2. How to change DNS 1.1.1.1 on Android
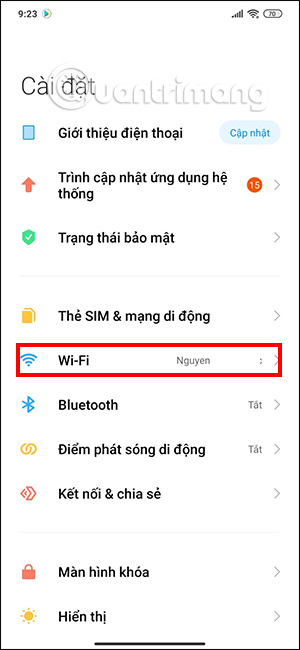
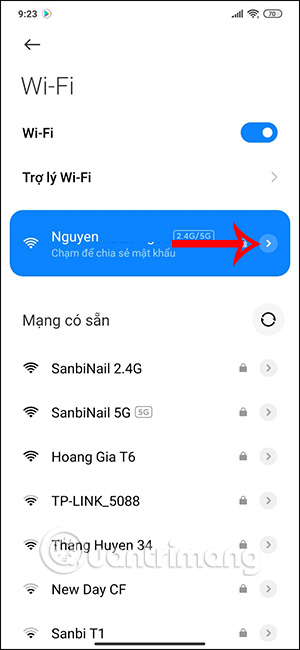
Step 1:
First, you connect to WiFi on your phone and then access Setting, then click on WiFi is connecting. Then at the WiFi name that is connecting you click arrow icon to change settings.
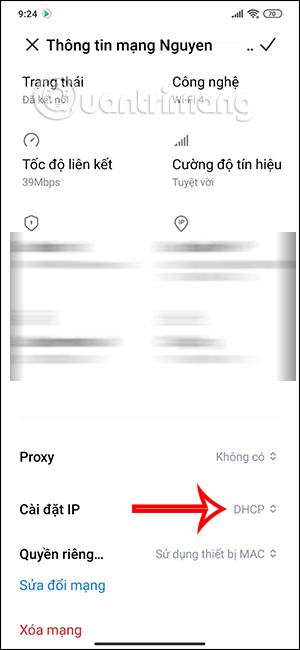
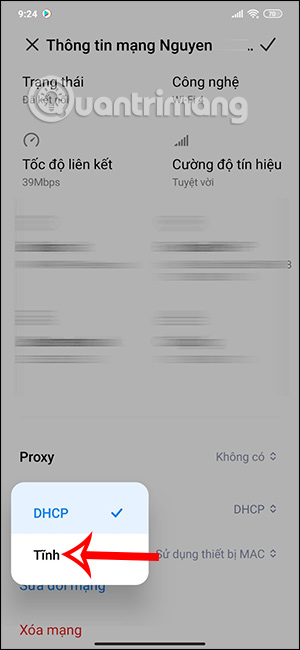
Step 2:
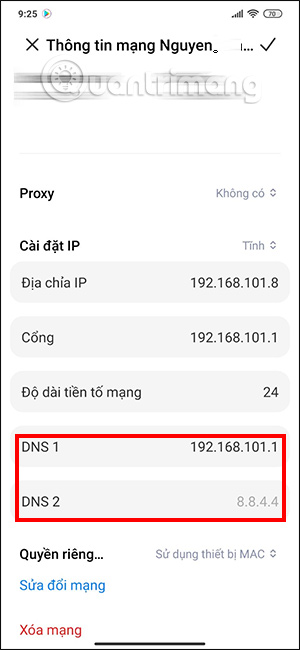
Here you will see network status information, scroll down below at IP setting changed to Static.
Step 3:
Switch to the DNS change interface. Here you will switch DNS 1 and DNS 2 to the sequence below.
- DNS 1: 1.1.1.1
- DNS 2: 1.0.0.1
After filling it out, Click the checkmark in the top right corner to save.
3. Instructions to change DNS 1.1.1.1 on iPhone
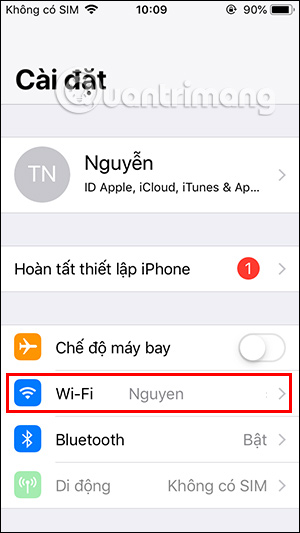
Step 1:
At the iPhone Settings interface we click on the name of the network I’m connected to, then tap letter i to enter settings.
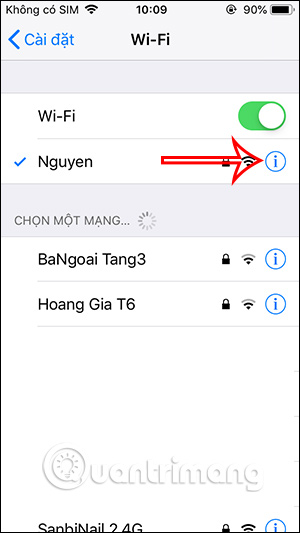
Step 2:
Then scroll down to the content below at the section Configure DNS we click to continue. Click Handmade to change the DNS again.

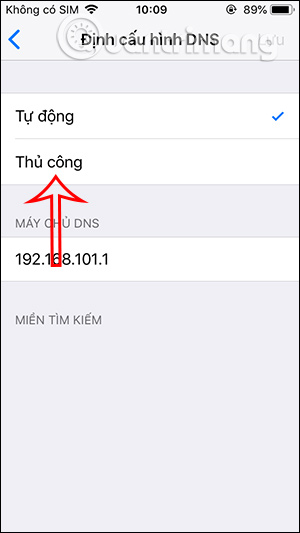
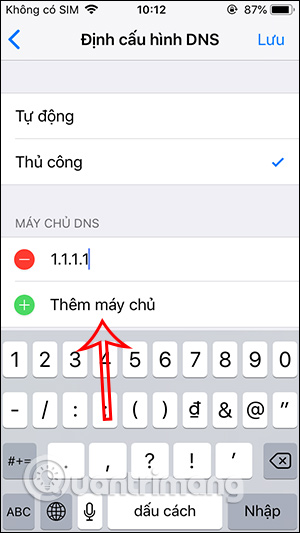
Step 3:
Next we click More servers to enter DNS. Here you enter DNS 1.1.1.1 and 1.0.0.1 then save.
4. How to change DNS on the phone with the 1.1.1.1 . app
1.1.1.1 DNS transfer application for iOS and Android is provided by Cloudflare for free, you can access the link below to download and experience.
With the 1.1.1.1 application on iPhone and Android (WARP+), you can quickly change the DNS on your phone to 1.1.1.1 with just a simple operation, instead of having to manually perform quite complicated and time consuming steps. .
After downloading and installing 1.1.1.1 on iPhone, you almost only agree with the default settings of the application.
You agree to 1.1.1.1 change the VPN settings on your device and choose whether or not to receive notifications from the app.
Until you see a screen with the word Disconnect, drag to the right to connect to the network via Cloudflare’s DNS.
I’ve tried some websites that can’t be accessed normally, but they are delicious and very fast, guys.
Change DNS 1.1.1.1 on Android
The operation is almost the same as on the iPhone, you need to agree to the default settings and click the buttons as shown in the picture:
When you get to the Disconected screen, push the button to the right to proceed to install the VPN profile for the device and click OK to agree to the connection.
When the installation is complete, you will be taken to the following 2 screens, when the word Conected appears, you have completed the private connection via Cloudflare DNS.


In addition to VPN software for phones or manually changing DNS on phones, you can use WARP+ if you want to stick with Cloudflare’s DNS 1.1.1.1, or on Android you can use Opera browser built-in VPN to bypass web censors.
Source link: How to change DNS 1.1.1.1 on Android and iPhone is very simple
– https://techtipsnreview.com/


