Using iMovie you can make very professional movies
iMovie is a video editing application on iPhones and iPads all free. This application allows users to create videos, combine multiple clips, insert images, add effects, sound ….
If you are simply editing a video or cutting a clip, you can use the app Photos. But if you want to edit more complicated videos then you have to use the app iMovie.
Download iMovie
If iPhone or iPad Yours has been updated iOS 8 or later, just open the app App Store type in the search to find the app iMoviedownload and install.
Note: If your iPhone or iPads haven’t updated to iOS 8 downloading iMovie will cost you.
iMovie User Guide
Basic operations with iMovie
Once the installation is done, open the app iMovie above iPhone or iPad your up.
Above iMovie will show the video available on your phone. If iCloud Photo Library is activated, the videos you have recorded or made will sync on your phone. Light touch “Play” to preview your video.

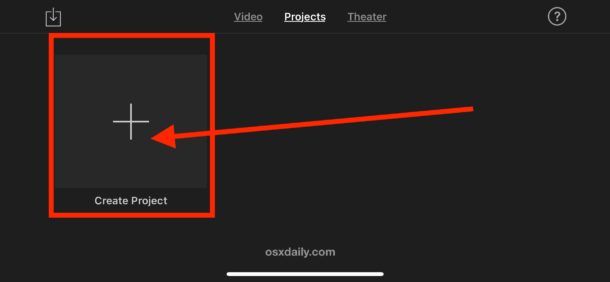
To get started, click “Projects”then click the button “Create Project”.

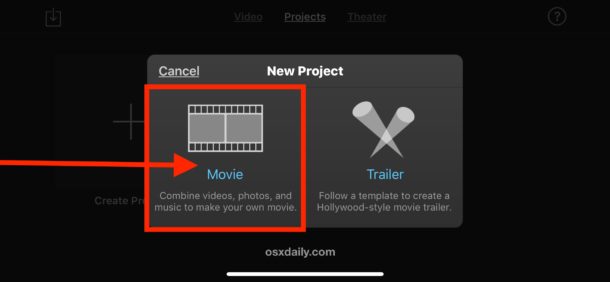
iMovie will allow you to create a Movie (Movie) or one “Trailers”. You can choose the item Good Movie Trailer. However, you can still transfer a Trailer into a movie, app iMovie allow editing after you finish a movie or a Trailer.
See more: Instructions on how to edit videos right on iPhone and iPad

If you want to create a Traileryou will be able to mine different parts of “Storyboard” (scenario is selected for each shot, every action and camera movement) to insert your own clip into Trailer.

If you want to make a movie, tap circle with a “?” on the top right corner of the screen.
Add media to video
If you want to add a photo or add a video, tap “Add Media” located near the bottom left corner. In addition, you can also record and insert directly into the movie you want to make.

Find the video or clip you want to insert. On the screen, if you want to insert more videos, you touch the first button, the second button to preview, the third button to insert audio. The remaining buttons are video inserts by topic.
Repeat this process to add video clips, audio, and images.

Change themes, filters for videos
Knot “Change themes and more” (Change theme and more) on the right side of the screen allows you to edit the entire video clip you create, select a theme, and edit individual footage and audio.

Add effects to videos in iMovie
After you have inserted and edited one or more videos, you can look at the bottom of the screen to choose effects. Simply tap each effect icon (None, Fade, Wipe…) to choose effects for each video.

Change the volume, insert text into the video
At the bottom of the clip screen, you will see an icon to edit the speed, change the volume, insert text or choose a style or use Filter (filter). Tap each icon lightly if you want to change the volume, insert text or choose a style… for your movie video.

You can press the . button “Undo” is the downward facing arrow icon on the right side of the screen to undo the change. Alternatively you can also press the . button “Play” to preview the movie you created.
After completing the steps, click “Done” to finish and save the movie you created. In addition, you can share the film you made on social networks via email, Facebook, Youtube. Just tap the “Share” button on the screen. Or you can also share “iMovie Theater” to easily review videos on your Mac or Apple TV.
Crop videos on iMovie to remove redundant images
Crop video using the iMovie application allows you to enlarge a content in the video, cut out unnecessary elements, or reframe the video to focus on specific content, etc., while keeping the video length. . It is different from video trimming which is used to shorten video length, cutting out unnecessary content.
iOS’s iMovie allows you to crop videos. However, the application does not have a crop button, instead it uses the zoom function to implement this ability to crop videos.
The feature works to crop/zoom any video imported into iMovie on iOS. Before you start, you need to have iMovie installed on your iPhone or iPad and have the video or movie you want to crop/zoom in on your device.
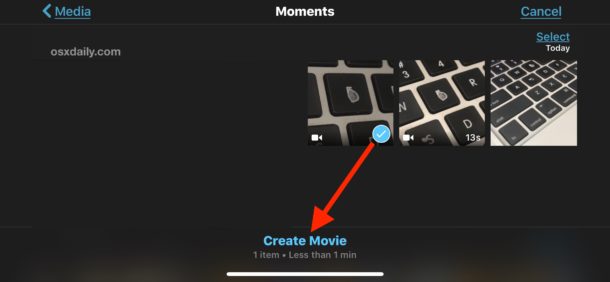
- Open the iMovie app, then tap Projects. Next, click the + Create Project button
- From the options, select Movie.
- Select the video you want to crop from your iOS library (there is a small blue check mark), then tap the . button Create Movie.
- iMovie will open the video in the project, now tap the timeline/scrubber section of the video.
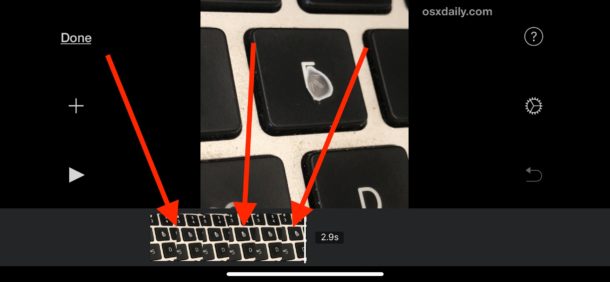
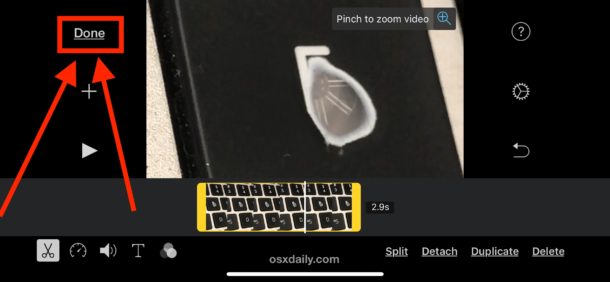
- Next, an additional toolbar will appear. On it you will see a small magnifying glass in the corner of the video. Tap the magnifying glass to enable iMovie’s crop/zoom feature in iOS.
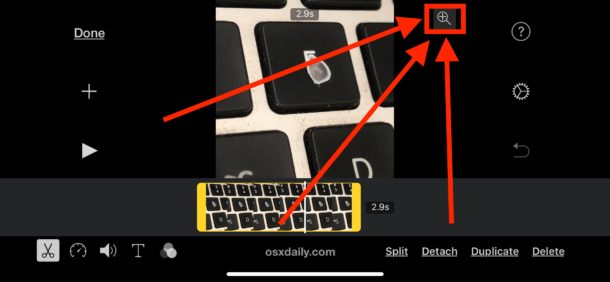
- After showing the words Pinch to zoom video, you can use pinch or stretch gestures to zoom and crop the video. Do this until you get a preview you like.
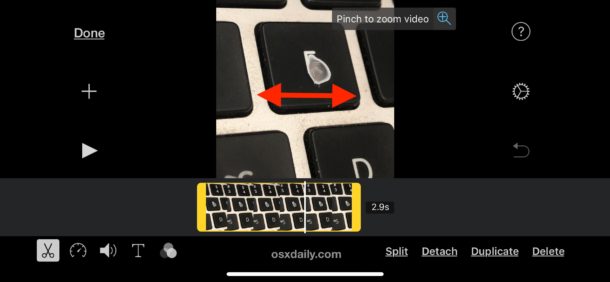
- When satisfied with the cropped/zoomed video, tap the “Done” button
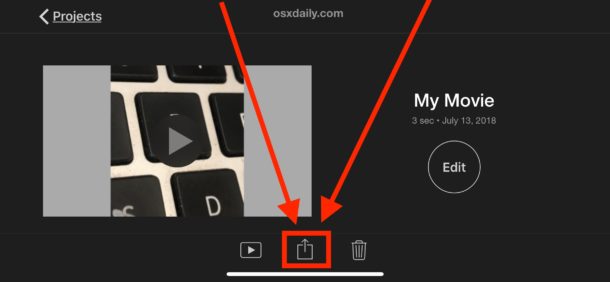
- You can now save and export the newly cut video from iMovie and save it to the photo library on your iPhone or iPad. Click the Sharing/Action button (the box with the arrow pointing up).
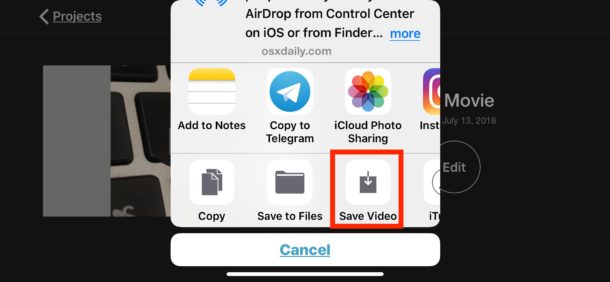
- Choose where you want to save the video to or how you want to share the video.
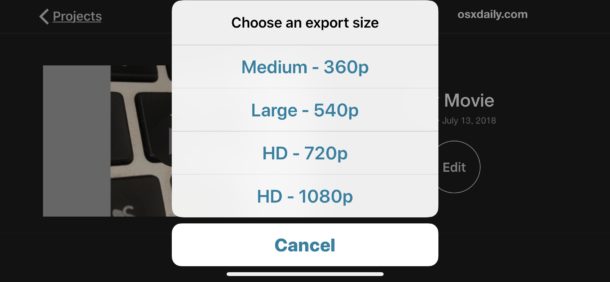
- Choose the video output size. The higher the resolution, the heavier the video size, you should see your needs to choose.
Now, you can open the Photos app and go to the Camera Roll or into the Videos folder to find the newly cropped video.
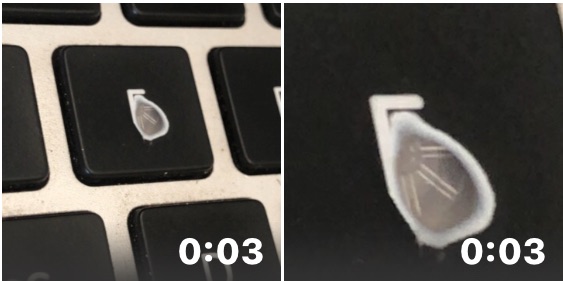
Note: if you save the original video, the thumbnail will not show the cropped image. But if you save the cropped video, the displayed image will be the cropped image.
Also cropping or zooming will reduce the video quality because you have scaled down the pixels used in the video.
Cropping/zooming a video is extremely useful, especially if you’ve shot a movie on an iPhone or iPad and want it to focus specifically on a certain subject, or if you decide to change the main focus of your video.
See more:
Source link: How to make professional movies with iMovie on iPhone and iPad
– https://techtipsnreview.com/