
This article you can apply the same to Word Please.
In our office work, sometimes it is required to print out statistical tables, long Excel spreadsheets and many complicated rows and columns.
With such situations, you will certainly not be able to print text by default of the software because the width of the Excel file is too wide, and the vertical size of the paper will not be enough.
So how to put the text content on the page without missing, or error when printing?
Well, the question above is also the main content and topic that this article will answer. In today’s post I will share a trick that will help you rotate A4 paper horizontally in Excelto make horizontal printing of paper extremely fast and simple.
Read more:
1. Instructions for horizontal rotation of paper on Excel 2003
+ Step 1: You open your Excel 2003 file => click Filethen select next Page Setup to enter the paper size setting.
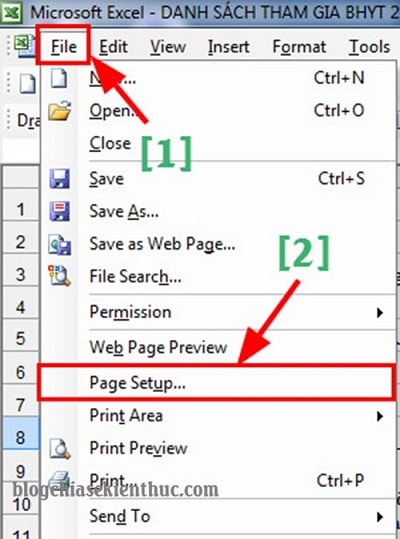
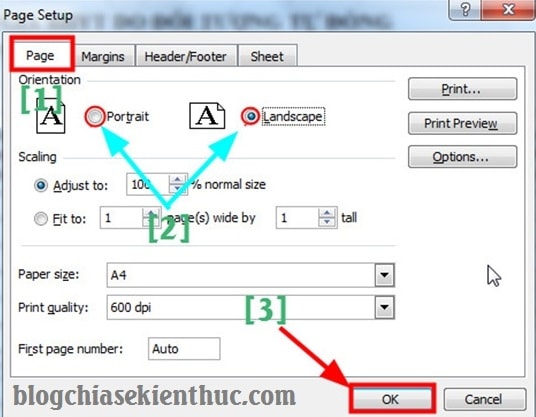
+ Step 2: At the dialog box Page Setup => you choose Tab Pagehere your options are:
- Landscape: Rotate the paper size horizontally, select this feature to perform the horizontal rotation of the paper size.
- Portrait: Rotate the paper size vertically, this is the default mode.
=> Then click Ok to complete.
+ Step 3: Check the result.
At the Excel toolbar, click on the magnifying glass icon (or use the keyboard shortcut Ctrl + F2) to preview the printout of the Excel file before printing.

The result is as shown below, so it is very suitable. You can now press the . button Close and print it out on paper.

2. How to rotate paper horizontally on Excel 2007, 2010, 2013, 2016..
Note: From Excel 2007 to 2016 versions, the format is quite similar, so you can use the same application.
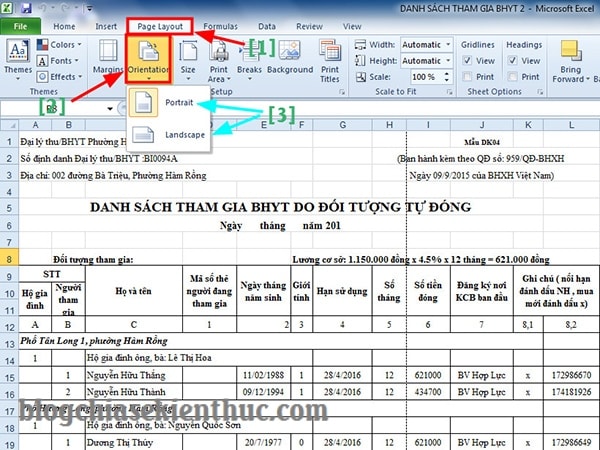
Method 1: Set up in Page Layout
You open your Excel file => select Tab Page Layout => then click on features Orientation. Here default is portrait ( Portrait ), now you can choose again Landscape to rotate the paper horizontally.
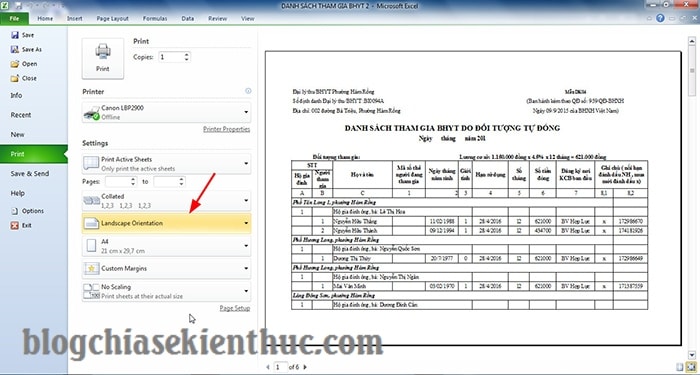
Method 2: Do it in the Print window
In addition to the way I just mentioned above, you can use another way. You click on File => choose Printor press the key combination Ctrl + P to enable the print dialog.
Here you have two options:
- Portrait Orientation (prints along the Excel default).
- LandscapeOrientation (print horizontally according to printer paper size).
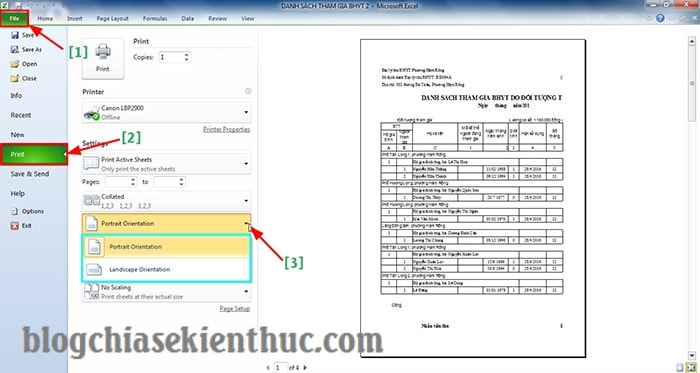
After selecting the print type, you just need to set the familiar printing parameters to print.
Epilogue
Ok, so I’ve just guided you guys how to rotate A4 paper horizontally in Excel before printing, so that you can retrieve and display all rows/columns contained in the Excel file without losing columns because the range of paper sizes is not large enough anymore.
At this point, the article on how to rotate the paper size on Excel files (on all versions of Excel) before printing is also finished. Hopefully with this little tip will be useful and support in your work.
Good luck !
CTV: Luong Trung – techtipsnreview
Note: Was this article helpful to you? Don’t forget to rate the article, like and share it with your friends and family!
Source: How to rotate paper horizontally in Excel/Word (all versions)
– TechtipsnReview